Create a status system for your RPG from scratch in this ORK 3 tutorial series.
This tutorial series will go through setting up a complete status system in a new ORK Framework project.
We’ll set up:
- status values
- status development
- attack/defence modifiers
- status effects
- damage and chance formulas
- abilities
- items
- equipment
- loot
- battle AI
- combatants
In the end, we’ll have a ready-to-use status system that we just need to plug into a game – i.e. add prefabs (e.g. for combatants), set up the UI, set up the battle system and animate battle actions (using schematics). These things will be the topic of other tutorial series that’ll be based on this status system setup.
This tutorial series is completed.
Planning a Status System #
When you start working on your own projects, you’ll most likely want to implement your own, unique status system. For this, it’s best to take some time to think about how everything should work together – e.g. which status values do you need and what are they used for? Do you use attack/defence modifiers to influence the damage, complex formulas calculating results from multiple values, etc.
Want to know how you can do this? If yes, I’ll try to explain how I developed the status system for this tutorial series to give you some ideas on how to go about it.
Otherwise, just skip this part and continue below with the First Steps.
Status Values, Formulas #
I already had an idea for the direction in which the status system should go – i.e. do separate physical and magical damage, use hit and critical hit chances and gradually increase in power with each level.
The status system of this tutorial series will use the following status values (beside HP, MP and experience):
- Weapon Damage
Damage factor coming from weapons. - Attack
The attacker’s physical attack power, used for physical damage calculations. - Defence
The target’s defence, used for physical damage calculations. - Magic Attack
The attacker’s magical attack power, used for magical damage calculations. - Magic Defence
The target’s defence, used for magical damage calculations. - Agility
Used for hit chance calculations and will later be used by other tutorial series for battle order calculations. - Dexterity
Used for hit chance and critical chance calculations. - Luck
Used for critical chance calculations.
These status values will operate in a value range from 1 to 255. It’s a pretty basic system that allows separate physical and magical calculations, e.g. a fighter would be good at physical damage, but lousy at magical, while a mage is good at magical damage and lousy at physical – you know, the standard RPG stuff.
The status system operates on a maximum level of 50, at which the primary status values of a combatant will be at around 100. A primary status value is the one that’s most important for the combatant’s role in battle, e.g. Attack for a physical DPS (damage dealer) or Magic Attack for a magical DPS.
Why at 100? Because we still need room for bonuses to increase a status value before hitting the 255 maximum – status value bonuses can be given in fix values or in percent.
Now, the basics in mind, I started testing out some formulas – you can either do that directly in ORK (e.g. formula testing allows you to test for level ranges), but for that you’d already have to have a ready to use setup with status values, status development and combatants. So, what to do? Good old spreadsheets, that’s what!
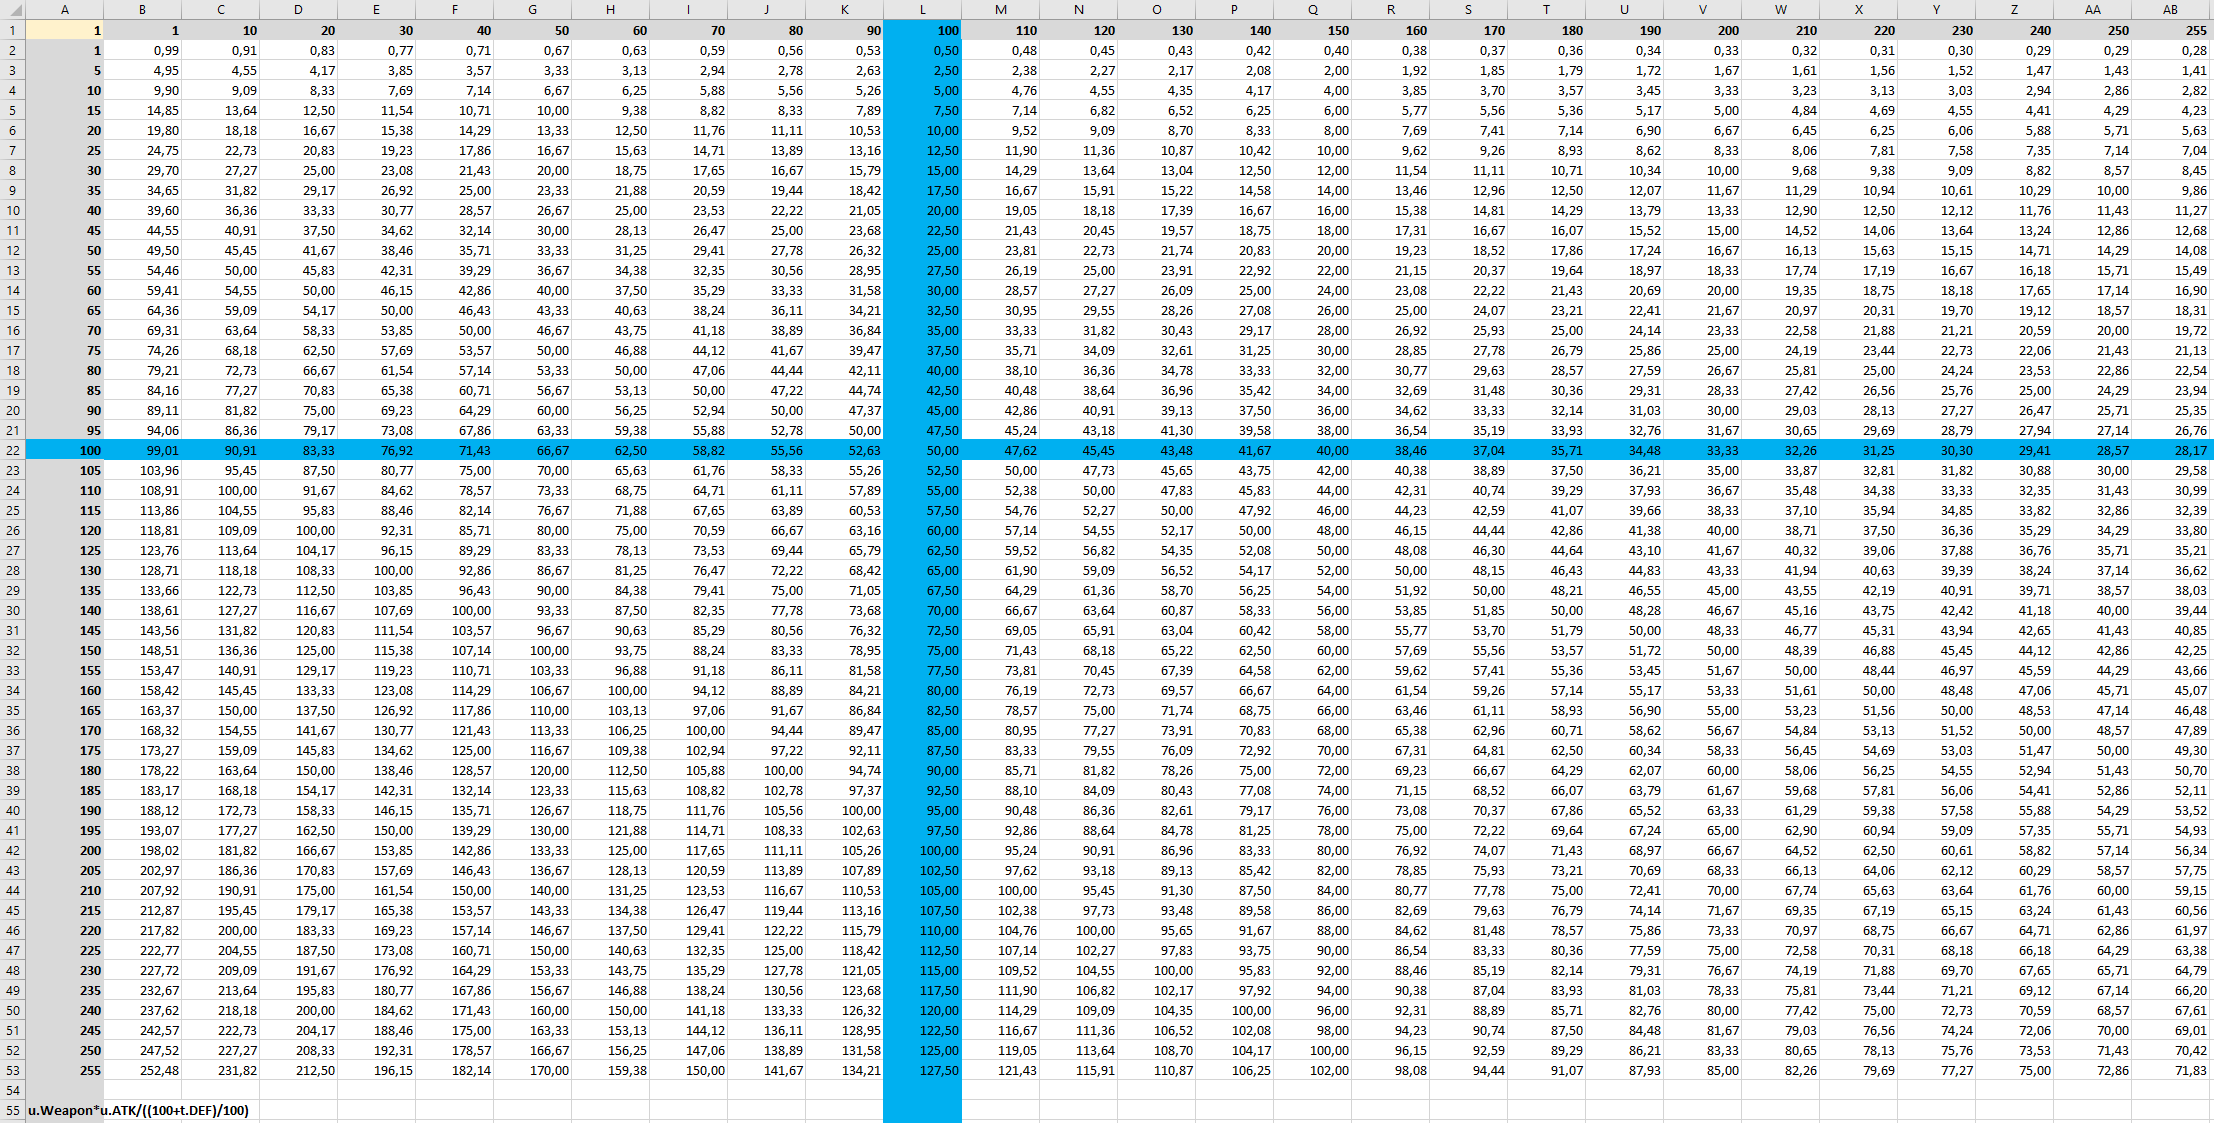
Here’s an example of how I checked the physical damage formula. The A column is the attacker’s Attack, the 1 row is the defender’s Defence. You can see the used formula at the bottom (will be part of the formulas tutorial). The blue marked column/row is the value 100 sweat spot for a combatant’s maximum development, everything past those lines is in bonus territory. All of these values are for a Weapon Damage of 1 (cell A1, changing it’s value will update all values in the spreadsheet).
I’ve done the same for all other formulas as well, magic damage (which scales a bit differently), hit chance, etc.
Take your time, play around with different formulas – search on the internet, there’s a lot of good advice out there on how to do damage calculations.
Status Development #
With 100 being the upper limit for a status value’s development at level 50, it wasn’t too hard to figure out a good composition. The spreadsheet helped immensely at testing things out.
The tutorial uses Percent Points to distribute status values evenly across levels, keeping the same ration between them. This allows to quickly change things and test out how the system works.
I’m using the percent points to define the values the status values should have at level 50 (max level), i.e. level 50 has 100 percent points, a status value that should have 100 at level 50 will use 100 percent points. Pretty simple to plan and use.
If things need a bit tweaking, you just have to go back to the status development, change a value or two and you’re good for the next test, scaled accross the whole level range. No need to set up strictly defined value curves – this is something you can do later once everything clicked together and you’re happy with your results. Or not, percent points are perfectly fine to use instead of defined curves.
Attack/Defence Modifiers #
This optional system is used to influence damages with percent based modifiers. Learn more about them in this documentation.
I’m using attack modifiers to add elemental damages to the game, the standard fire, water, earth, etc. – it’s pretty straight forward. Attacks can have an element, e.g. a fire magic spell, combatants can have strength and weaknesses, even get healed instead of damaged.
Defence modifiers give attributes to combatants, I’m using them to give a size attribute to them. The weapons of this status system will give bonuses to different sizes, e.g. daggers will do more damage on small targets and less damage on larger targets, while bows will do 100% damage on all targets. This gives each weapon category it’s own strengths and weaknesses.
Status Effects, Abilities, Items, Equipment, etc. #
The rest is just cranking stuff out – what kind of abilities do you want? How much should a potion heal, what bonuses does your equipment give?
At this point, when your status system is more or less ready to be tested, you’ll already know the limits and values of your system. E.g. how much bonus can low level or high level equipment give without breaking the system, or how much damage should an attack or spell do, if you take the damage formulas and modifiers into account.
It doesn’t matter if it’s a fireball, a thunderstrike or a sword, they all operate under the same rules you set up with your status values and formulas.
First Steps #
Before getting started with the actual status system setup, we’ll have to do some basic setup in the Unity project.
1. Create a new Unity project #
Use the Unity Hub to create a new Unity project.
Use at least Unity 2020.3 or newer.
Depending on what you want to do with the status system afterwards, either use the 3D or 2D template to create the project (or any other template you want). You can also create a new project with a different template and import your finished status system setup at a later time.
2. Import ORK Framework #
Import ORK Framework (including Makinom) into your Unity project.
Use either ORK’s free test version or your paid version from the Unity Asset Store (via the Unity Package Manager).
3. Initial ORK Project Setup #
Open the Makinom editor for the first time: Window > Gaming Is Love > Makinom
Or the keyboard shortcut: CTRL + Alt + M
Click on the Save Settings button on the bottom right of the editor window to save the intial project setup. This will save your initial project setup.
Close the editor.
4. Initial Unity UI Setup #
Follow the initial setup tutorial for the Unity UI module, this includes:
- changing your project’s UI System Type to the Unity UI module
- setting up TextMesh Pro
- setting up the UI Environment scene (for prefab editing)
- creating a first UI box prefab
- creating default input prefabs
- creating a flying text prefab and setting it up in UI > UI Settings
You can also download the UI asset package provided in the initial setup tutorial and use them in your project setup instead of setting up the prefabs. You still need to set up TextMesh Pro and the UI Environment scene.
Ready! #
You should now have a set up Unity project with ORK/Makinom and Unity UI module setup (including TextMesh Pro and flying texts).
I’d also recommend to take a look at this information on using the editor efficiently, as it’ll make the following tutorials a lot easier.
And with that, it’s time to start with the setup – we’ll start with setting up the status values, the basis for every status system.
Download the Completed Setup #
Don’t have the time to do all of that or already know how to do it? Want to immediately start working on some other tutorial series (based on this status system setup) or just play around in a set up system?
You can download the finished status system setup here:
Please note!
This package requires using at least Unity 2019.4.
It’s recommended to use Unity 2020.3 or higher other LTS (long term support) versions.
The unitypackage file contains:
- ORK/Makinom data assets
- icons and font with TMP setup
- flying text prefab and schematic
You need to import ORK 3 (and Makinom) and TextMesh Pro into your project before importing the status system setup package, i.e. in a new Unity project:
- import TextMesh Pro
usually already part of a new Unity project, otherwise use the Package Manager - import TMP Essential Resources
Window > TextMeshPro > Import TMP Essential Resources - import ORK 3
including Makinom and the Unity UI module - import the status system setup package
If you want to use the font and icons included in the package as TMP’s default setup, you need to select them in the TMP Settings asset (Assets/TextMesh Pro/Resources/). See all details in the TMP setup UI tutorial.
Please Note!
The package import might lose prefab references.
It’s recommended to simply close Unity after finishing the status system setup package import and open it again. This’ll resolve lost references.


