
In this tutorial we’ll set up some UI.
We’ll only use minimam UI in this tutorial – two UI boxes and a HUD showing who’s turn it currently is.
We’ll set up:
- UI box for battle menu
- UI box for battle message
- a HUD
- the battle menu
- a combatant selection (we’ll use it later for the player’s grid placement)
Let’s get to it.
By this point you should have done the initial UI setup, which includes setting up UI box prefab. If you want to use schematics to animate the UI (I’ll list it as an optional setup below), follow the UI animations tutorial or download the provided schematics.
Battle Menu UI Box Prefab #
We’ll simply build upon this. If you’re using the UI assets that are provided by the initial UI setup, you’ll have the UI Box Beige prefab in Assets/Tutorial Assets/_Created/UI/UI Box/. If not, use a the UI box prefab you’ve set up.
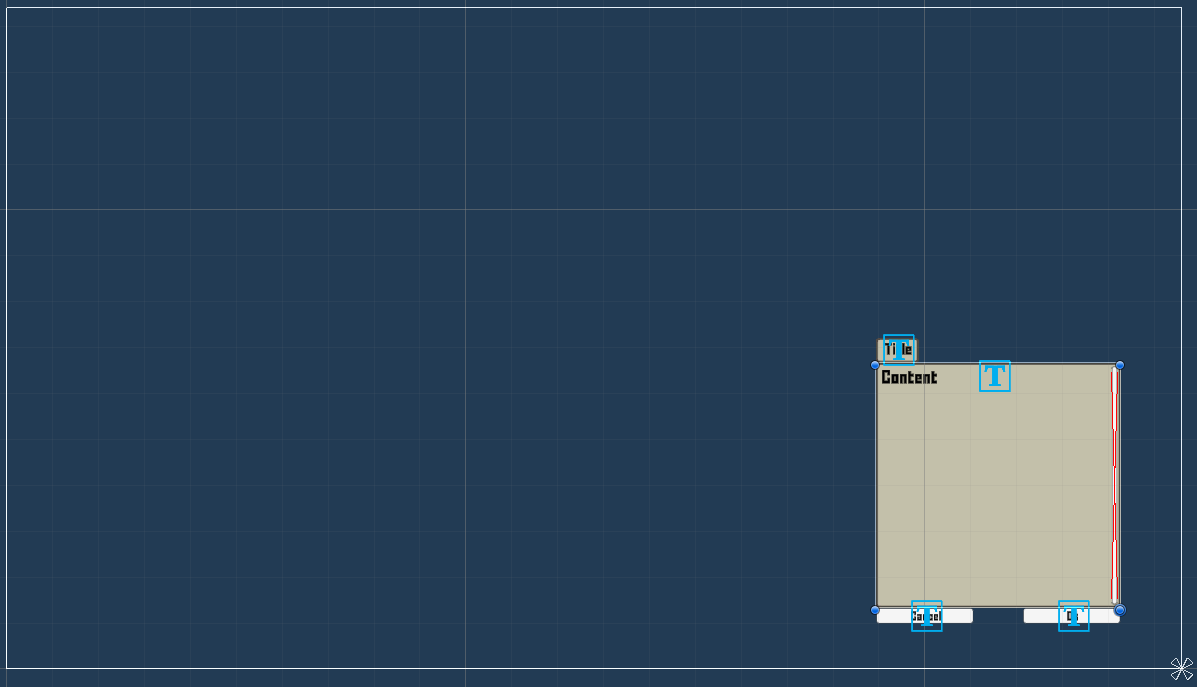
Duplicate it, change the name to UI Box Battle Menu and open it up for editing.
Rect Transform #
Change the settings in the following order.
Select the bottom right anchor preset.
- Pivot
Set to X=1, Y=0. - Pos X
Set to -100. - Pos Y
Set to 100. - Width
Set to 400. - Height
Set to 400.
The final result will look like this.
Save the changes and close editing the prefab.
Battle Message UI Box Prefab #
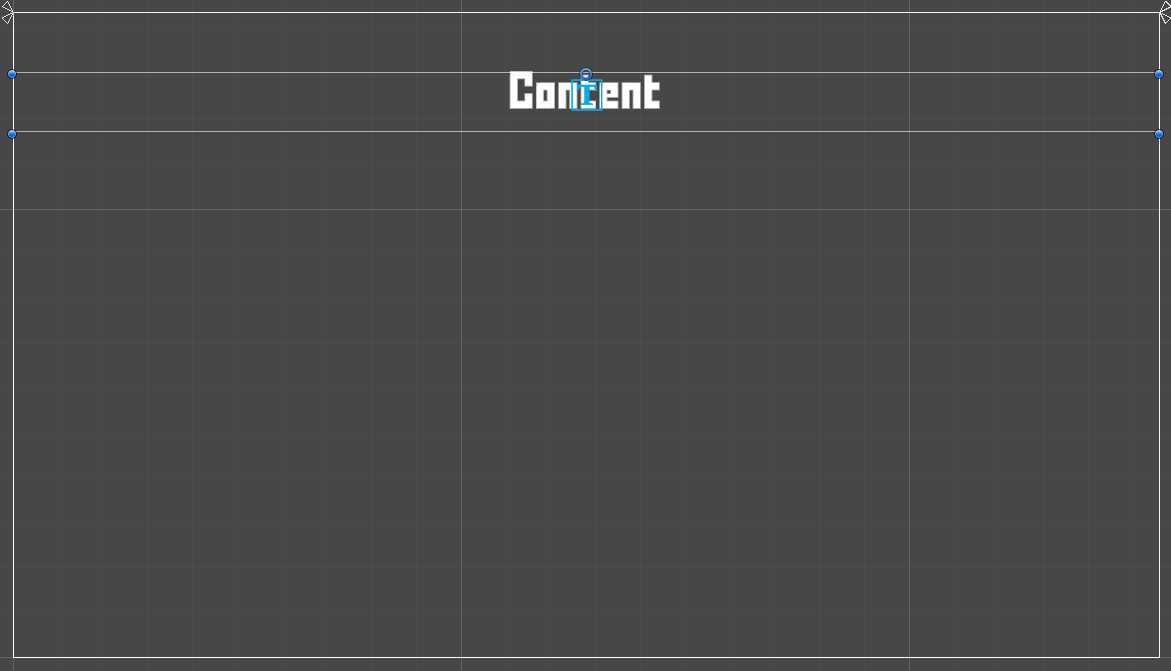
We’ll create a new UI box prefab from scratch this time, no scrolling, no background image, no title – just a centered text for our message.
Use the scene hierarchy context menu to create a basic setup: Makinom > UI Box > UI Box
Rect Transform #
Change the settings in the following order.
Select the top stretch anchor preset.
- Pivot
Set to X=0.5, Y=1. - Left
Set to 0. - Pos Y
Set to -100. - Right
Set to 0. - Height
Set to 100.
Image #
Remove the Image component from the UI Box game object, as we don’t want a background image in the box.
TextMeshPro – Text (UI) #
The text component is located on the UI Box > Text child object.
- Font Size
Set to 50. - Alignment
Select Center.
The finished result should look something like this.
Create Prefab #
Create a prefab out of the UI Box game object, e.g. name it UI Box Battle Message.
Don’t forget to remove the Canvas in case you created the UI box in one of your game scenes.
HUD Prefab #
Please follow this UI tutorial to set up the prefabs, but don’t do the UI Layout and HUD setup in the editor, i.e. follow the following topics:
- Status Value UI
- Status Effect UI
- HUD Prefab Setup
You can also download and import the finished prefab setup, but you still have to set up the status value UI and status effect UI in the editor.
We’ll now adjust the Simple Player HUD prefab – we’ll not use a UI layout to display it, but place it on screen where we want to display it. The HUD will be used to display information about the combatant who’s current turn it is, a Latest Turn HUD.
Select the Simple Player HUD prefab you created or imported (imported in Assets/Tutorial Assets/_Created/UI/HUD/) and open the prefab for editing.
Rect Transform #
Change the settings in the following order.
Select the bottom left anchor preset.
- Pivot
Set to X=0, Y=0. - Pos X
Set to 0. - Pos Y
Set to 0. - Width
Set to 400.
The result will look like this.
Save the changes and close the prefab editing.
UI Layer #
We’ll continue our setup in the editor with adding two new UI layers, one for the HUD, and one above the screen fader for our battle message.
Navigate to UI > UI Layers and add new UI layers.
HUDs #
After adding the new UI layer, drag it above the screen fader in the list.
- Name
Set to HUDs.
Above Screen Fader #
Add another new layer, we’ll keep it as the last layer in the list, i.e. it’s content will be displayed above the screen fader.
- Name
Set to Above Screen Fader.
UI Boxes General Settings #
We’ll now set up some default settings for all UI boxes.
Navigate to UI > UI Boxes > General Settings.
Default Controls > Input Settings #
- Loop
Enable this setting.
Default Audio Settings #
- Cursor Move
Select Menu2. - Accept
Select Menu5. - Cancel
Select Menu4. - Fail
Select Menu6.
While we don’t really use the others in this tutorial, you can select Menu1 for all of them.
Default Schematics (Optional) #
I’ll use a simple fade in/out animation for all UI boxes.
- Before Open Schematic
Select the UI Fade In schematic. - Wait
Enable this setting. - Before Close Schematic
Select the UI Fade Out schematic. - Wait
Enable this setting.
UI Box Setup #
Next, we’ll set up the battle menu and battle message UI box.
Navigate to UI > UI Boxes, we’ll change the Default box and add another UI box.
0: Battle Menu #
- Name
Set to Battle Menu. - UI Layer
Select Layer 1.
Unity UI #
- UI Box Prefab
Select the UI Box Battle Menu prefab.
1: Battle Message #
- Name
Set to Battle Message. - UI Layer
Select Above Screen Fader.
Unity UI #
- UI Box Prefab
Select the UI Box Battle Message prefab.
Latest Turn HUD #
We’ll set up a Latest Turn HUD – this displays only the combatant who is currently selecting actions, i.e. who has the latest turn.
Navigate to UI > HUDs and change the Default HUD.
- Name
Set to Current Turn Combatant. - HUD Type
Select Latest Turn. - Auto Display
Enable this setting.
Latest Turn Settings #
- Player
Enable this setting. - Ally
Enable this setting. - Enemy
Enable this setting. - Keep Latest Match
Disable this setting.
The HUD will only display during a combatant’s turn and not be kept open.
Unity UI #
- UI Layer
Select HUDs. - HUD Prefab
Select the Simple Player HUD prefab.
Battle Menu #
Next, we’ll set up the battle menu.
Navigate to UI > Battle Menus, we’ll change the Default battle menu. This battle menu is also already set up as the default battle menu used in battles.
- UI Box
Select Battle Menu. - Show Title
Enable this setting. - Text (Title Content)
Set to: <name>
We’ll use some targeting Options.
- Select Last Target
Enable this setting. - Select Self
Enable this setting. - Remeber Selection
Enable this setting. - Target Sort Type
Select Screen Position.
Layout Settings > Content Layout #
The Content Layout settings control how the content of buttons in the battle menu is displayed. The default setup shows icon and name of content (e.g. abilities) and adds information content as additional content with the content ID info.
We’ll stick with the default setup – however, if you didn’t use a button prefab with content ID info (additional content) added as the default button prefab (UI > UI System), you need to select one here. Otherwise you wouldn’t see things like item quantities or use costs of abilities.
The default Choice Info Button you can create using the scene hierarchy context menu has such a setup. See the initial UI setup for more details.
- Custon Input Prefab
Select a button prefab with an additional content info.
Option 0 #
We’ll change the first option in the battle menu to use the Grid Move command.
- Type
Select Grid Move. - Text (Button Content)
Set to: Move
Option 1 #
Click on Add Option to add another battle menu option.
- Type
Select Attack. - Use Ability Information
Enable this setting.
Option 2 #
Click on Add Option.
- Type
Select Ability. - Type Display
Select Combined.
We’ll display all abilities in a single list, not separating them by type. - Sort By
Select ID. - Text (Button Content)
Set to: Abilities
Option 3 #
Click on Add Option.
- Type
Select Item. - Type Display
Select Combined.
We’ll display all items in a single list, not separating them by type. - Sort By
Select ID. - Text (Button Content)
Set to: Items
Option 4 #
Click on Add Option.
- Type
Select Grid Orientation.
This’ll allow the player to rotate the combatant to face a different direction on the grid. - Text (Button Content)
Set to: Rotate
Option 5 #
Click on Add Option.
- Type
Select End.
This’ll end the combatant’s turn, e.g. in case a combatant can’t use any action due to no target being in range. - Text (Button Content)
Set to: Skip
Combatant Selection #
Our final setup UI setup is a combatant selection. We’ll use it for the player’s grid placement selection, where the player selects which combatants to use in battle and where to place them on the grid.
Navigate to UI > Combatant Selections and add a new selection.
Base Settings #
- Name
Set to Grid Placement. - UI Box
Select Battle Menu. - Only Battle Group
Disable this setting. - Add Back Button
Select Last.
Content Settings #
We’ll display the number of combatants that are already placed and the total number in the title of the UI box.
The grid placement will also be used to select the battle group members for the battle, i.e. we can use text codes that display the current (<playergroup.battlesize>) and maximum (<playergroup.maxbattlesize>) battle group size of the player group to add this information.
- Show Title
Enable this setting. - Text (Title Content)
Set to: Placed: <playergroup.battlesize>/<playergroup.maxbattlesize>
Save Changes #
And that’s it!
Don’t forget to save your changes by clicking on Save Settings at the bottom of the editor.
Next, we’ll set up some schematics to handle the battle’s start, end and phase changes.


