ORK Framework Logo - RPG Editor for Unity
  • Features
  • Showcase
  • Guide
    • Documentation
    • Tutorials
    • API
  • ORK 2
    • Tutorials
    • Plugins
    • API
  • Support
  • Forum
  • Get ORK

2D RPG Quickstart

30
  • START 2D RPG Quickstart
  • 01 Initial Setup
  • 02 Player Setup
  • 03 Music & Scenes
  • 04 UI System Setup
  • 05 UI Boxes
  • 06 Flying Texts
  • 07 Status Values
  • 08 Status Effects
  • 09 First Abilities
  • 10 Fighter Setup
  • 11 First Enemies & Battle AI
  • 12 Battle System Setup
  • 13 Animating Battle Start and End
  • 14 Random Battles
  • 15 Animating Actions
  • 16 Player Battle HUD
  • 17 Elemental Attacks
  • 18 Animating More Actions
  • 19 Inventory & Loot
  • 20 Equipment
  • 21 Loot, Start Equipment & Viewers
  • 22 Magic Abilities
  • 23 Caster Setup
  • 24 More Enemies
  • 25 Start Menu & Save Games
  • 26 Menu Screens
  • 27 Interactions
  • 28 Item Collectors
  • END 2D RPG Quickstart

3D RPG Quickstart

30
  • START 3D RPG Quickstart
  • 01 Initial Setup
  • 02 Player Setup
  • 03 Music & Scenes
  • 04 UI System Setup
  • 05 UI Boxes
  • 06 Flying Texts
  • 07 Status Values
  • 08 Status Effects
  • 09 First Abilities
  • 10 Fighter Setup
  • 11 First Enemies & Battle AI
  • 12 Battle System Setup
  • 13 Animating Battle Start and End
  • 14 Random Battles
  • 15 Animating Actions
  • 16 Player Battle HUD
  • 17 Elemental Attacks
  • 18 Animating More Actions
  • 19 Inventory & Loot
  • 20 Equipment
  • 21 Loot, Start Equipment & Viewers
  • 22 Magic Abilities
  • 23 Caster Setup
  • 24 More Enemies
  • 25 Start Menu & Save Games
  • 26 Menu Screens
  • 27 Interactions
  • 28 Item Collectors
  • END 3D RPG Quickstart

Status System Setup

24
  • START Status System Setup
  • 01 Status Values
  • 02 Status Development
  • 03 Attack/Defence Modifiers
  • 04 Status Effects
  • 05 Formulas
  • 06 Ability & Item Types
  • 07 Abilities Part 1: Attacks
  • 08 Abilities Part 2: Support & Sabotage
  • 09 Abilities Part 3: Elemental Magic
  • 10 Items
  • 11 Equipment Part 1: Slots & Slot Set Templates
  • 12 Equipment Part 2: Weapons
  • 12.5 (Optional) Equipment Part 2.5: Weapons
  • 13 Equipment Part 3: Shields, Armor & Accessories
  • 13.5 (Optional) Equipment Part 3.5: Shields, Armor & Accessories
  • 14 Equipment Part 4: Available Equipment Templates
  • 15 Loot
  • 16 Battle AIs
  • 17 Combatants Part 1: General Settings
  • 18 Combatants Part 2: Players
  • 19 Combatants Part 3: Enemies
  • 20 Combatant Groups
  • END Status System Setup

3D RPG Playground

53
  • START 3D RPG Playground
  • 01 Player Setup
  • 02 Start Menu
  • 03 First Interaction
  • 04 Music
  • 05 Areas
  • 06 Collecting Items
  • 07 Displaying Equipment
  • 08 Combatant Prefabs, Icons & Portraits
  • 09 Combatant Animations
  • 10 Camera Positions
  • ANIM 01 Battle Start/End Schematics
  • ANIM 02 Use, Cast & Camera
  • ANIM 03 Abilities & Items
  • ANIM 04 Physical Attacks
  • ANIM 05 Special Actions
  • BATTLE 01 Battle Menu
  • BATTLE 02 Prepare for Battle
  • TURN 01 Turn Based Setup
  • TURN 02 Turn Order HUD
  • ATB 01 Active Time Setup
  • ATB 02 Cast Times
  • ATB 03 Timebar HUD
  • BATTLE 03 The First Battle
  • BATTLE 04 Hunting Move AI
  • BATTLE 05 Spawning Combatants
  • 11 Save Games
  • MENU 01 UI Boxes
  • MENU 02 Template HUDs
  • MENU 03 Overview Menu
  • MENU 04 Menu Screens
  • 12 Shop
  • BATTLE 06 Random Battles
  • DUNGEON 01 Enter the Dungeon
  • DUNGEON 02 The Trapdoor
  • DUNGEON 03 Enemies on Level 1 & 2
  • DUNGEON 04 Traps on Level 3
  • DUNGEON 05 Going Deeper
  • 13 Bestiary (+MENU+ANIM)
  • QUEST 01 Hunting Quests (+MENU)
  • QUEST 02 Guard NPC
  • QUEST 03 Forest Ruin Cheese
  • QUEST 04 Witch NPC with Cheese
  • QUEST 05 Quest Mark HUDs
  • 14 Research Trees (+MENU)
  • CRAFT 01 Crafting Materials
  • CRAFT 02 Crafting Recipes
  • CRAFT 03 Crafting Menu
  • CRAFT 04 Crafting Proficiency & Critical Crafting
  • CRAFT 05 Materials Loot
  • 15 Changing Choice Dialogue
  • 16 Follow Me!
  • BATTLE 07 Sequence Loot Dialogue

3D Action RPG

20
  • START 3D Action RPG
  • 01 Status System Setup
  • 02 Player Setup
  • 03 Player Weapon
  • 04 Player Attacks
  • 05 Enemy: Chomper
  • 06 Chomper Attack
  • 07 Hit & Death
  • 08 HUDs
  • 09 Rolling on the Floor
  • 10 Enemy: Spitter
  • 11 Spit Attack
  • 12 Potion
  • 13 Grenade
  • 14 Item HUD
  • 15 Enemy: Grenadier
  • 16 Grenadier Melee Attacks
  • 17 Grenadier Flamethrower
  • 18 Item Drops
  • END 3D Action RPG

2D Grid Battle RPG

17
  • START 2D Grid Battle RPG
  • 01 Player Setup
  • 02 Prefab & Music Setup
  • 03 Randomizing Combatants
  • 04 UI Setup
  • 05 Battle Start, End & Phase Schematics
  • 06 Battle System Setup
  • 07 Battle Grid Setup
  • 08 Grid Move
  • 09 Forest Battle Grid
  • 10 Battle AI
  • 11 Ability Ranges
  • 12 Death & Use Schematics
  • 13 Attack Schematic
  • 14 Shoot Schematics
  • 15 Battle Selection Interaction
  • END 2D Grid Battle RPG

Schematics

10
  • Simple Start Schematic
  • Battle Start Schematic
  • Battle End Schematic
  • Moving to Target and Back
  • Animating a Base Attack
  • Animating a Magic Ability
  • Animating Target Selection
  • Grid Movement
  • Open and Close UI Animations
  • Flying Text Mover

UI Setups

16
  • Unity UI: Initial Setup
  • Unity UI: TextMesh Pro Setup
  • Unity UI: UI Box
  • Unity UI: Flying Text
  • Unity UI: Dragging Notification
  • Unity UI: Canvas with Screen Space Camera
  • Unity UI: Interaction HUD
  • Unity UI: Simple Player HUD
  • Unity UI: Quest HUD
  • Unity UI: Battle Actions HUD
  • Unity UI: Shortcuts HUD
  • Unity UI: Currency HUD
  • Unity UI: Tooltip HUD
  • Unity UI: Control HUD
  • Unity UI: Attack Modifiers
  • Unity UI: Defence Modifiers

Gameplay Bits

13
  • 2.5D Setup
  • Body Part Weakpoint
  • Click Attack
  • Combining Input Origins
  • Combining Status Value Flying Texts
  • Fun With Flying Text
  • HUD Effects With Conditional Schematics
  • Inventory Containers
  • Local Multiplayer
  • Multi Interaction Controllers
  • Target Selection Lines
  • World Space HUD
  • World Space Dialogue
  • Home
  • Guide
  • Tutorials
  • 3D RPG Playground
  • QUEST 05 Quest Mark HUDs
View Categories

QUEST 05 Quest Mark HUDs

In this tutorial we’ll set up our quest objects in the scene.

This tutorial continues the sub-series for setting up quests.

We’ll set up 2 HUDs, one for marking game objects that start new quests and one for marking game objects that are part of active quest.

HUD Prefabs #

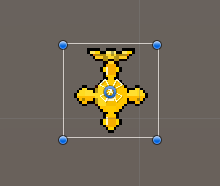
First, we’ll set up 2 HUD prefabs – we’ll keep it simple and just display an icon (sprite).

New Quest HUD #

We use the scene hierarchy’s context menu to create an empty HUD without any layout: Makinom > HUD > HUD

Rect Transform #

The HUD will be placed at the position of a game object in the scene, so we only adjust the width and height.

  • Width
    Set to 50.
  • Height
    Set to 50.

Image #

Add an Image component to the HUD game object using the component menu.

  • Source Image
    Select icons_14.

Create Prefab #

That’s already all we need to do.

Create a prefab out of the HUD game object (without the canvas), e.g. name it Quest New HUD.

Progress Quest HUD #

We’ll adjust the still added HUD game object for our 2nd HUD.

Image #

We simply use a different icon.

  • Source Image
    Select icons_15.

Create Prefab #

That’s already all we need to do.

Create a new prefab out of the HUD game object (without the canvas), e.g. name it Quest Progress HUD.

HUD Setup #

Open the editor and navigate to UI > HUDs, we’ll add 2 new HUDs.

Quest New #

We’ll use Object HUDs, they are displayed at game objects and also have to be added to them using an Object HUD component.

HUD Settings #

  • Name
    Set to Quest New.
  • HUD Type
    Select Object.
  • Auto Display
    Enable this setting.

Object Settings #

  • Path to Child
    Set to HUD.
    We’ll also need to add this child object for placing the HUD to our game objects (we’ll add it to the NPC prefabs).
  • Use Range Limit
    Enable this setting.
    We’ll only show the HUD if the player is within a defined range of the game object.
  • Range
    Select Value > Value.
    Set the value to 40.
  • Threshold
    Select Value > Value.
    Set the value to 1.

Display Conditions > Game State Condition #

We’ll check fo our game state managing battle HUDs.

Click on Add Game State.

  • Condition Type
    Select Game State.
  • Game State
    Select In Control.
  • Check State
    Select Active.

Unity UI #

  • UI Layout
    Select HUDs.
  • HUD Prefab
    Select the Quest New HUD prefab.

Quest Progress #

Copy the Quest New HUD.

HUD Settings #

  • Name
    Set to Quest Progress.

Unity UI #

  • HUD Prefab
    Select the Quest Progress HUD prefab.

Save Settings #

That’s it for the HUD setup – we’ll now add the HUD to game objects in the scene.

Don’t forget to save your changes by clicking on Save Settings at the bottom of the editor.

Updating NPC Prefabs #

Before adding the HUD, we’ll add the HUD child object for placing the HUD to our quest-related NPC prefabs.

You can find the NPC prefabs in Assets/Tutorial Assets/Prefabs/NPCs/. I’m updating the Witch and Knight_Male prefabs, but feel free to add it to all NPCs.

Open the prefab for editing.

Add a new empty game object to the Witch root game object and name it HUD.

Transform #

Change the position of the added HUD game object.

  • Position
    Set to X=0, Y=4, Z=0.

Witch NPCs #

Now, we’ll add the quest mark HUDs to the 3 witch NPCs.

Town Witch #

Add an Object HUD component to the WitchTown game object using the component menu.

We don’t need to add a condition to display this HUD, because the game object is only here when the quest is available.

  • Object HUD
    Select Quest New.

Forest Witch #

Add an Object HUD component to the WitchForestRuins game object using the component menu.

The HUD should display when either the Meet at the ruins task or the Bring items to the witch task is active.

  • Object HUD
    Select Quest Progress.

Click on Add Condition.

  • Condition Type
    Select Quest Task.
  • Needed
    Select One.

Click on Add Task Condition.

  • Quest Task
    Select Meet at the ruins.
  • Check Status
    Select Active.

Copy Task Condition 0.

  • Quest Task
    Select Bring items to the witch.

Outpost Witch #

Add an Object HUD component to the WitchOutpost game object using the component menu.

The HUD should display when either the Meet the witch in the outpost task is active.

  • Object HUD
    Select Quest Progress.

Click on Add Condition.

  • Condition Type
    Select Quest Task.

Click on Add Task Condition.

  • Quest Task
    Select Meet the witch in the outpost.
  • Check Status
    Select Active.

Guard NPC #

The town’s guard also gives us quests, so we’ll add HUDs to him as well.

We’ll display both quest mark HUDs, depending on the state of the quests/HUDs. If the Report to the guard task is active (from Hunt Dragon quest), we’ll display the Quest Progress HUD, if either of the hunting quests is not added or finished and the Report to the guard task is not active, we’ll display the Quest New HUD.

Add an Object HUD component to the Knight_Male game object (in the town) using the component menu. The component can manage multiple HUDs, so we only need that one component.

Object HUD 0 #

First, we’ll set up the quest progress HUD.

  • Object HUD
    Select Quest Progress.

Click on Add Condition.

  • Condition Type
    Select Quest Task.

Click on Add Task Condition.

  • Quest Task
    Select Report to the guard.
  • Check Status
    Select Active.

Object HUD 1 #

We basically need to negate the other HUD’s check and an add additional condition checking for other quest states.

Copy Object HUD 0.

  • Object HUD
    Select Quest New.

Condition 0 > Task Status Condition 0 #

  • Is Valid
    Disable this setting.

Condition 1 #

Click on Add Condition.

  • Condition Type
    Select Quest.
  • Needed
    Select One.

Click on Add Quest Condition.

  • Quest
    Select Hunt Wasps.
  • Check Status
    Select Not Added.

Copy Quest Status Condition 0.

  • Quest
    Select Hunt Skeletons.

Copy Quest Status Condition 1.

  • Quest
    Select Hunt Supporters.

Copy Quest Status Condition 2.

  • Quest
    Select Hunt Dragon.

Copy Quest Status Condition 3.

  • Check Status
    Select Finished.

Copy Quest Status Condition 4.

  • Quest
    Select Hunt Supporters.

Copy Quest Status Condition 5.

  • Quest
    Select Hunt Skeletons.

Copy Quest Status Condition 6.

  • Quest
    Select Hunt Wasps.

And that’s it for our setup – don’t forget to save your scene.

Testing #

Hit play and run to one of the quest NPCs.

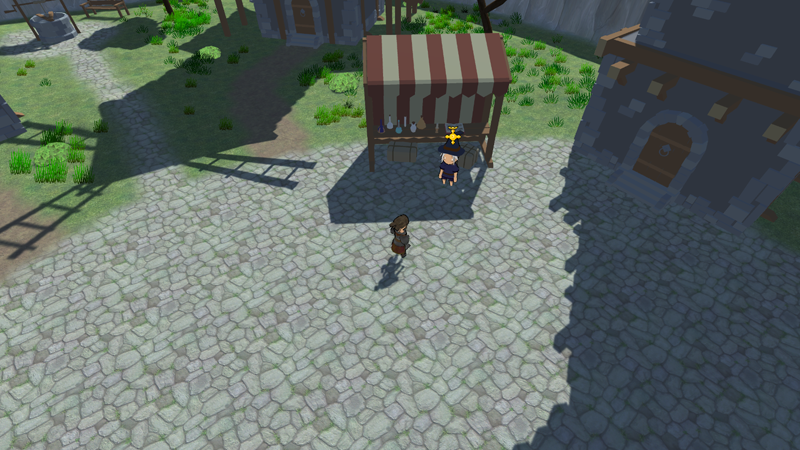
Seems like there’s a new quest available.

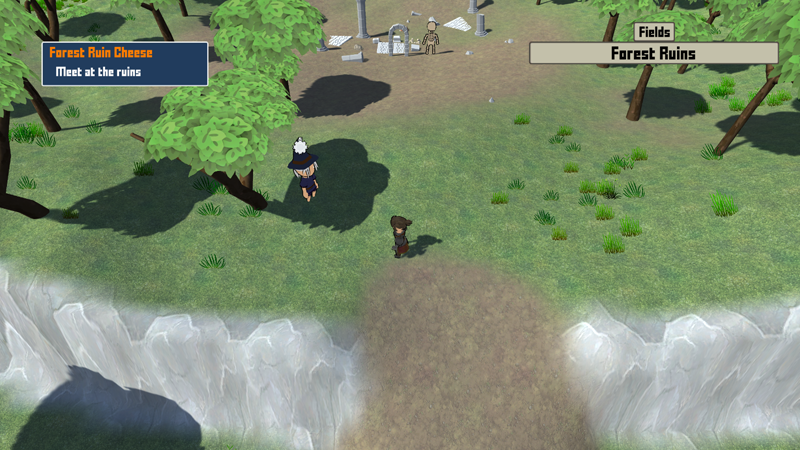
And our quest progress NPC is also marked – great!

Next, we’ll look into research trees to upgrade abilities with our magic crystals.

Share This Article :
  • Facebook
  • X
  • LinkedIn
  • Pinterest
Table of Contents
  • HUD Prefabs
    • New Quest HUD
      • Rect Transform
      • Image
      • Create Prefab
    • Progress Quest HUD
      • Image
      • Create Prefab
  • HUD Setup
    • Quest New
      • HUD Settings
      • Object Settings
      • Display Conditions > Game State Condition
      • Unity UI
    • Quest Progress
      • HUD Settings
      • Unity UI
  • Save Settings
  • Updating NPC Prefabs
    • Transform
  • Witch NPCs
    • Town Witch
    • Forest Witch
    • Outpost Witch
  • Guard NPC
    • Object HUD 0
    • Object HUD 1
      • Condition 0 > Task Status Condition 0
      • Condition 1
  • Testing
Sitemap
  • Features
  • Showcase
  • Guide
    • Documentation
    • Tutorials
    • API
  • ORK 2 Hub
    • Tutorials
    • Plugins
    • API
  • Support
  • Forum
  • Get ORK
  • Contact
  • Blog
  • Makinom
  • gamingislove.com
Categories
  • News (69)
  • ORK 2 (137)
    • Tutorial (137)
      • Game tutorial (50)
      • Gameplay (32)
      • How-to (55)
  • Release (149)
Search

© 2015 Gaming is Love e.U.

Disclosure: This site may contain affiliate links, which means I may receive a commission if you click a link and purchase something that I have recommended. While clicking these links won’t cost you any money, they will help me fund my development projects while recommending great assets!