---
title: CRAFT 03 Crafting Menu
description: "In this tutorial we'll set up a crafting menu screen. This tutorial continues the sub-series for setting up crafting. The crafting menu will list our available recipes, shows their ingredients and allows us to craft the items. Learn more about…"
url: "https://orkframework.com/guide/ork3/ork3-tutorials/3d-rpg-playground/craft-03-crafting-menu/"
updated: "2026-07-08"
category: ORK 3 Tutorials / 3D RPG Playground
---
# CRAFT 03 Crafting Menu
In this tutorial we'll set up a crafting menu screen.
This tutorial continues the sub-series for setting up crafting.
The crafting menu will list our available recipes, shows their ingredients and allows us to craft the items. Learn more about menu screens in [this documentation](https://orkframework.com/guide/documentation/ui-system/menu-screens/).
# Recipe Layout
First, we'll handle how a recipe's information (ingredients, outcome, etc.) is displayed. This is done using a recipe layout.
Navigate to **Inventory > Crafting Settings & Types > General Settings**, we'll set up the default recipe layout here.
## Default Recipe Layout
The default layout is usually used whenever we display a crafting recipe's details - unless a custom recipe is used in a menu.
### Content
The content defines the combined text of the layout. It uses text codes to add the different parts of the information (e.g. listing the ingredients).
- **Text**
Set to:
**
**
*Ingredient*
**
*Outcome*
**
### Ingredient Text
Defines how each ingredient is displayed. By default each ingredient is displayed in it's own line, we'll keep it that way.
- **Default Content (Ingredient Text)**
Set to: * (/)*
- **Use Not Available Text**
*Enable* this setting.
In case not enough of the required ingredient is in the user's inventory, we'll display a different text (just the same information but in a red color).
- **Default Content (Not Available Text)**
Set to: * (/)*
### Outcome
Defines how each outcome is displayed. By default each outcome is displayed in it's own line, we'll keep it that way.
- **Default Content (Outcome)**
Set to: * (/)*
# Menu Requirement
We'll set up a menu requirement template, as we only want the crafting menu to be available when we have crafting recipes.
Navigate to **Templates > Menu Requirement** and add a new requirement.
## Base Settings
- **Name**
Set to *Crafting*.
## General Requirement
- **Knows Recipes**
*Enable* this setting.
# Crafting Menu Screen
Next, we'll set up the crafting menu.
Navigate to **UI > Menu Screens** and add a new menu screen.
## Menu Screen Settings
- **Name**
Set to *Crafting*.
- **Remember Selection**
*Enable* this setting.
- **Pause Notifications**
*Enable* this setting.
- **Block Notifications**
*Enable* this setting.
- **Block Flying Texts**
*Enable* this setting.
- **Pause Game**
*Enable* this setting.
- **Freeze Pause**
*Enable* this setting.
## Crafting Part
The *Crafting* part is used to display crafting recipes.
Scroll down to the bottom of the settings to see the *Add Menu Part* button.
Click on the *Add Menu Part* button and select *Crafting*.
The default setup will already show all types and sort them by name - we'll change it to sort by ID.
### Available Crafting Types
- **Sort By**
Select *ID*.
### Type Box Settings
Lists the crafting types that are available.
- **Type Display**
Select *Tabs*.
We'll display the crafting types as tabs in the recipe box.
### Recipe Box Settings
Lists the crafting recipes from the selected crafting type.
- **Recipe Box**
Select *Blue Menu Tab Center Scroll*.
- **Sort By**
Select *ID*.
- **Add Back Button**
Select *Last*.
### Create Box Settings
Optionally displays detailed information about a recipe using a recipe layout - can also be used us a crafting confirmation.
We'll use it as a *HUD*, only showing information for the selected recipe. The actual crafting is started by accepting a recipe in the *recipe box*.
- **Create Box Mode**
Select *HUD*.
- **Create Box**
Select *Blue Top Right Fit*.
## Description Part
Scroll down to the bottom of the settings to see the *Add Menu Part* button.
Click on the *Add Menu Part* button and select *Description*.
- **UI Box**
Select *Blue Top Left Fit*.
That's it for the crafting menu screen.
# Updating Overview Menu Screen
Select the *Overview* menu screen, we'll now add a button for the crafting menu.
## Button List 0
Scroll down to *Menu Item 1*, the button for the *Inventory* menu screen.
Copy *Menu Item 1*.
### Menu Item 2
This is the copied button, let's change it.
- **Menu Screen**
Select *Crafting*.
- **Text (Button Content)**
Set to *Crafting*.
We'll also use our menu requirement in the *Requirements* settings.
- **Hide**
*Enable* this setting.
The button will be hidden if the requirement check fails.
- **Use Menu Requirement**
*Enable* this setting.
- **Menu Requirement**
Select *Crafting*.
# Save Changes
And that's it for our crafting menu!
Don't forget to save your changes by clicking on *Save Settings* at the bottom of the editor.
# Updating the Start Game Schematic
We'll update the *Start Game* schematic that's used to set up the player group and add the crafting recipes and some ingredients to be able to test the system.
Navigate to **Schematics**, select your *Start Game* schematic and add the following new nodes at the end.
[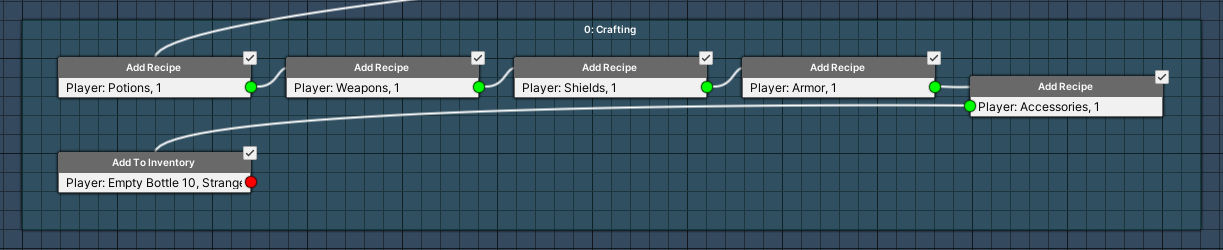](https://orkframework.com/wp-content/uploads/ork3_tutorial_crafting_system_setup__update_start_game_schematic.png)
## Add Recipe
*Add Node > Inventory > Crafting > Add Recipe*
This node is used to add a crafting recipe or all recipes of a crafting type - we'll add by type.
- **Object (Combatant)**
Select *Player*.
- **Add Crafting Type**
*Enable* this setting.
- **Crafting Type**
Select *Potions*.
You can ignore the *Quantity* setting, since our recipes are not set up to be consumed on use, i.e. quantities aren't used by them.
## Add Recipe
*Add Node > Inventory > Crafting > Add Recipe*
Copy the previous *Add Recipe* node and change the used type.
- **Crafting Type**
Select *Weapons*.
## Add Recipe
*Add Node > Inventory > Crafting > Add Recipe*
Copy the previous *Add Recipe* node and change the used type.
- **Crafting Type**
Select *Shields*.
## Add Recipe
*Add Node > Inventory > Crafting > Add Recipe*
Copy the previous *Add Recipe* node and change the used type.
- **Crafting Type**
Select *Armor*.
## Add Recipe
*Add Node > Inventory > Crafting > Add Recipe*
Copy the previous *Add Recipe* node and change the used type.
- **Crafting Type**
Select *Accessories*.
## Add To Inventory
*Add Node > Inventory > Inventory > Add To Inventory*
We'll now add some materials to the player's inventory.
- **Object (Combatant)**
Select *Player*.
There's already an item added automatically.
- **Type**
Select *Item*.
- **Item**
Select *Empty Bottle*.
- **Quantity**
Select *Value > Value*.
Set the value to *10*.
Copy the item and change the following settings.
- **Item**
Select *Strange Liquid*.
Copy the item and change the following settings.
- **Item**
Select *Slime*.
- **Quantity**
Select *Value > Value*.
Set the value to *5*.
Copy the item and change the following settings.
- **Item**
Select *Bone*.
Copy the item and change the following settings.
- **Item**
Select *Venom*.
Copy the item and change the following settings.
- **Item**
Select *Bat Wing*.
Copy the item and change the following settings.
- **Item**
Select *Wood*.
- **Quantity**
Select *Value > Value*.
Set the value to *10*.
Copy the item and change the following settings.
- **Item**
Select *Iron*.
- **Quantity**
Select *Value > Value*.
Set the value to *15*.
And that's it for the schematic. Click on *Save Schematic* to save the changes.
**Tip!**
Use node groups to organize your schematics.
Select all nodes that we just added, right-click on a node and select: *Node Groups > Add Node Group* or *Node Groups > Add To Node Group > Add New Node Group*
This'll create a new node group and add all selected nodes to it. You can change the node group's name by selecting it and changing the name in the settings.
# Testing
Hit play, call the menu and open the crafting menu.
[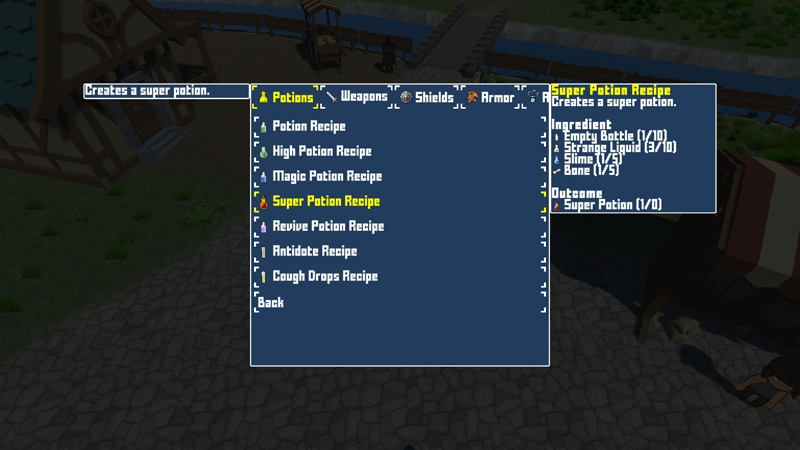](https://orkframework.com/wp-content/uploads/ork3_tutorial_crafting_system_setup__menu_screen.png)
You can change tabs with the *next/previous tab keys* (we set them up in **UI > UI Boxes > General Settings**) and craft items by accepting a button.
The info box on the right side shows the needed ingredients and outcome of the recipe.
With this we have a working crafting system - but let's do a bit more!
Next, we'll add a [crafting proficiency system](https://orkframework.com/guide/tutorials/3d-rpg-playground/craft-04-crafting-proficiency-critical-crafting/).