
In this tutorial we’ll set up research trees to upgrade our abilities.
Research trees can be used to learn or upgrade abilities, change status values or create items, equipment and more. You can also create custom functionality by using schematics. Learn more about research trees in this documentation.
We’ll use research trees to upgrade our player abilities with multiple levels (e.g. heal, fire or dark), i.e. they’re limited to the wizard and cleric. While research trees also allow for completion to take time or use a custom progression, we’ll learn the new ability levels immediately.
All abilities will work by the same pattern for our setup:
- ability mastery (e.g. Healing Mastery) requires the level 1 ability to be learned and costs 1 magic crystal
- level 2 requires the ability mastery to be completed and costs 3 magic crystals
- level 3 requires level 2 to be completed and costs 5 magic crystals
You can either set up one research tree per combatant to manage all of their abilities, or set up a research tree per ability (or use any other custom arrangement). For this tutorial we’ll set up a research tree for each individual ability.
We’ll also set up the research menu screen, which will merge all research types and research trees into a single list of upgrades for our abilities, so we don’t really need to put much thought into the content (name, description, etc.) of the research trees and can stick with the Default research type that’s already set up.
Navigate to Combatants > Research Trees, we’ll change the Default research tree and add additional research trees.
0: Fire #
Naturally, the Fire research tree will handle upgrading the Fire ability.
- Name
Set to Fire.
Base Settings #
- Research Type
Select Default.
Research Item 0 #
This’ll be the Fire Mastery research item, which requires Fire 1 to be learned and costs 1 Magic Crystal.
Click on Add Research Item at the bottom of the settings.
- Type
Select None.
This type is used for anything that isn’t for learning or upgrading an ability, status value or creating an item, etc.
The following settings are the default settings, we don’t need to change them, but we’ll still take a quick look at them.
- Limit Research Times
Enable this setting.
We only want to research this item once, so we limit the number of times it can be researched. - Research Times
Set to 1. - Research Duration
Select None.
The research item is completed immediately, but you could also use a time or custom progression (via schematics).
Content Information #
Since this research item isn’t related to any other content (e.g. an ability), we need to define it’s content information.
- Name
Set to Fire Mastery. - Description
Set to: Learn more about fire elemental magic. - Sprite (Icon)
Select icons_263.
Click on the Find TMP Tag button to get the icon’s tag for displaying it in texts (via text codes). This uses TextMesh Pro’s sprite asset setup.
Research Costs #
Click on Add Research Cost.
- Cost Type
Select Item. - Consume Cost
Enable this setting.
The item will be removed from inventory. - Type
Select Item. - Item
Select Magic Crystal. - Quantity
Select Value > Value.
Set the value to 1.
Research Conditions #
- Use Conditions
Enable this setting.
Click on Add Condition.
- Condition Type
Select Combatant Status.
Click on Add Status Condition.
- Status Needed
Select Ability. - Ability
Select Fire. - Level
Set to 1. - Ability Is
Select Learned.
Research Item 1 #
This’ll upgrade Fire to level 2 and cost 3 magic crystals.
Click on Add Research Item at the bottom of the settings.
- Type
Select Ability. - Ability
Select Fire. - Ability Level
Set to 2.
Research Costs #
Click on Add Research Cost.
- Cost Type
Select Item. - Item
Select Magic Crystal. - Quantity
Select Value > Value.
Set the value to 3.
Research Conditions #
Click on Add Previous Item Completed.
This automatically sets up a condition checking for the previous research item (i.e. Fire Mastery) to be completed.
Research Item 2 #
This’ll upgrade Fire to level 3 and cost 5 magic crystals.
Copy Research Item 1 and change the following settings.
Ability Settings #
- Ability Level
Set to 3.
Research Costs > Research Cost 0 #
- Quantity
Set the value to 5.
Research Conditions > Condition 0 > Status Condition 0 #
- Research Item
Select Fire 2.
I.e. instead of checking for Fire Mastery being completed, we’ll check for the research item upgrading to level 2 being completed.
1: Water #
Now that we’ve got our first research tree set up, we only need to copy it and adjust a few settings.
So, copy the Fire research tree and change the following settings.
- Name
Set to Water.
Research Item 0 #
Content Information #
- Name
Set to Water Mastery. - Description
Set to: Learn more about water elemental magic. - Sprite (Icon)
Select icons_357.
Click on the Find TMP Tag button to get the icon’s tag for displaying it in texts (via text codes). This uses TextMesh Pro’s sprite asset setup.
Research Conditions > Condition 0 > Status Condition 0 #
- Ability
Select Water.
Research Item 1 #
Ability Settings #
- Ability
Select Water.
Research Conditions > Condition 0 > Status Condition 0 #
- Research Tree
Select Water.
Research Item 2 #
Ability Settings #
- Ability
Select Water.
Research Conditions > Condition 0 > Status Condition 0 #
- Research Tree
Select Water.
2: Quake #
Copy the Water research tree and change the following settings.
- Name
Set to Quake.
Research Item 0 #
Content Information #
- Name
Set to Earth Mastery. - Description
Set to: Learn more about earth elemental magic. - Sprite (Icon)
Select icons_255.
Click on the Find TMP Tag button to get the icon’s tag for displaying it in texts (via text codes). This uses TextMesh Pro’s sprite asset setup.
Research Conditions > Condition 0 > Status Condition 0 #
- Ability
Select Quake.
Research Item 1 #
Ability Settings #
- Ability
Select Quake.
Research Conditions > Condition 0 > Status Condition 0 #
- Research Tree
Select Quake.
Research Item 2 #
Ability Settings #
- Ability
Select Quake.
Research Conditions > Condition 0 > Status Condition 0 #
- Research Tree
Select Quake.
3: Wind #
Copy the Quake research tree and change the following settings.
- Name
Set to Wind.
Research Item 0 #
Content Information #
- Name
Set to Wind Mastery. - Description
Set to: Learn more about wind elemental magic. - Sprite (Icon)
Select icons_363.
Click on the Find TMP Tag button to get the icon’s tag for displaying it in texts (via text codes). This uses TextMesh Pro’s sprite asset setup.
Research Conditions > Condition 0 > Status Condition 0 #
- Ability
Select Wind.
Research Item 1 #
Ability Settings #
- Ability
Select Wind.
Research Conditions > Condition 0 > Status Condition 0 #
- Research Tree
Select Wind.
Research Item 2 #
Ability Settings #
- Ability
Select Wind.
Research Conditions > Condition 0 > Status Condition 0 #
- Research Tree
Select Wind.
4: Electro #
Copy the Wind research tree and change the following settings.
- Name
Set to Electro.
Research Item 0 #
Content Information #
- Name
Set to Electro Mastery. - Description
Set to: Learn more about electricity. - Sprite (Icon)
Select icons_351.
Click on the Find TMP Tag button to get the icon’s tag for displaying it in texts (via text codes). This uses TextMesh Pro’s sprite asset setup.
Research Conditions > Condition 0 > Status Condition 0 #
- Ability
Select Electro.
Research Item 1 #
Ability Settings #
- Ability
Select Electro.
Research Conditions > Condition 0 > Status Condition 0 #
- Research Tree
Select Electro.
Research Item 2 #
Ability Settings #
- Ability
Select Electro.
Research Conditions > Condition 0 > Status Condition 0 #
- Research Tree
Select Electro.
5: Heal #
Now we’ll get to the cleric’s abilities – the setup is still the same.
Copy the Electro research tree and change the following settings.
- Name
Set to Heal.
Research Item 0 #
Content Information #
- Name
Set to Healing Mastery. - Description
Set to: Learn more about healing. - Sprite (Icon)
Select icons_270.
Click on the Find TMP Tag button to get the icon’s tag for displaying it in texts (via text codes). This uses TextMesh Pro’s sprite asset setup.
Research Conditions > Condition 0 > Status Condition 0 #
- Ability
Select Heal.
Research Item 1 #
Ability Settings #
- Ability
Select Heal.
Research Conditions > Condition 0 > Status Condition 0 #
- Research Tree
Select Heal.
Research Item 2 #
Ability Settings #
- Ability
Select Heal.
Research Conditions > Condition 0 > Status Condition 0 #
- Research Tree
Select Heal.
6: Light #
Copy the Heal research tree and change the following settings.
- Name
Set to Light.
Research Item 0 #
Content Information #
- Name
Set to Light Mastery. - Description
Set to: Learn more about light elemental magic. - Sprite (Icon)
Select icons_291.
Click on the Find TMP Tag button to get the icon’s tag for displaying it in texts (via text codes). This uses TextMesh Pro’s sprite asset setup.
Research Conditions > Condition 0 > Status Condition 0 #
- Ability
Select Light.
Research Item 1 #
Ability Settings #
- Ability
Select Light.
Research Conditions > Condition 0 > Status Condition 0 #
- Research Tree
Select Light.
Research Item 2 #
Ability Settings #
- Ability
Select Light.
Research Conditions > Condition 0 > Status Condition 0 #
- Research Tree
Select Light.
7: Dark #
Copy the Light research tree and change the following settings.
- Name
Set to Dark.
Research Item 0 #
Content Information #
- Name
Set to Dark Mastery. - Description
Set to: Learn more about dark elemental magic. - Sprite (Icon)
Select icons_317.
Click on the Find TMP Tag button to get the icon’s tag for displaying it in texts (via text codes). This uses TextMesh Pro’s sprite asset setup.
Research Conditions > Condition 0 > Status Condition 0 #
- Ability
Select Dark.
Research Item 1 #
Ability Settings #
- Ability
Select Dark.
Research Conditions > Condition 0 > Status Condition 0 #
- Research Tree
Select Dark.
Research Item 2 #
Ability Settings #
- Ability
Select Dark.
Research Conditions > Condition 0 > Status Condition 0 #
- Research Tree
Select Dark.
Combatants #
Next, we’ll add the research trees to the wizard and cleric. We’ll learn the research trees at the same levels as their abilities are learned.
Navigate to Combatants > Combatants and select the Wizard.
3: Wizard #
The wizard can use fire, water, quake, wind and electro, so that are the research trees we’ll add.
Attacks & Abilities > Research Trees #
Click on Add Research Tree.
- Learn at Level
Set to 1. - Research Tree
Select Fire. - Allow Multiple Trees
Disable this setting.
Research trees can be added multiple times, e.g. when dealing with something beside abilities, you might want to have them available multiple times.
Click on Add Research Tree.
- Learn at Level
Set to 5. - Research Tree
Select Water. - Allow Multiple Trees
Disable this setting.
Click on Add Research Tree.
- Learn at Level
Set to 10. - Research Tree
Select Wind. - Allow Multiple Trees
Disable this setting.
Click on Add Research Tree.
- Learn at Level
Set to 15. - Research Tree
Select Quake. - Allow Multiple Trees
Disable this setting.
Click on Add Research Tree.
- Learn at Level
Set to 20. - Research Tree
Select Electro. - Allow Multiple Trees
Disable this setting.
4: Cleric #
The cleric can use heal, light and dark, so that are the research trees we’ll add.
Attacks & Abilities > Research Trees #
Click on Add Research Tree.
- Learn at Level
Set to 1. - Research Tree
Select Heal. - Allow Multiple Trees
Disable this setting.
Click on Add Research Tree.
- Learn at Level
Set to 2. - Research Tree
Select Light. - Allow Multiple Trees
Disable this setting.
Click on Add Research Tree.
- Learn at Level
Set to 20. - Research Tree
Select Dark. - Allow Multiple Trees
Disable this setting.
Research Menu Screen #
Next, we’ll set up the research menu.
Navigate to UI > Menu Screens and add a new menu screen.
Menu Screen Settings #
We’ll use the same setup as in the other menu screens.
- Name
Set to Upgrade Abilities. - Remember Selection
Enable this setting. - Pause Notifications
Enable this setting. - Block Notifications
Enable this setting. - Block Flying Texts
Enable this setting. - Pause Game
Enable this setting. - Freeze Pause
Enable this setting.
Combatant Settings #
- Allow User Change
Enable this setting. - Only Battle Group
Disable this setting. - Change Battle Sorted
Enable this setting.
Previous Key #
- Input Key
Select Previous. - Audio Type
Select Tab Change.
Next Key #
- Input Key
Select Next. - Audio Type
Select Tab Change.
Research (List View) Part #
The Research (List View) part is used to display a combatant’s research trees, showing the research items in a list.
Scroll down to the bottom of the settings to see the Add Menu Part button.
Click on the Add Menu Part button and select Research (List View).
The default setup will already show all types and sort them by name (which is ok for us). As said, we’ll let the menu screen merge types and trees and just display a list of all available research items (i.e. ability upgrades).
However, we’ll limit using this menu screen to combatants that have research trees available (based on the part’s setup).
- Limit Allowed User
Enable this setting.
Type Box Settings #
Lists the available research types – we’ll merge them together and not display a UI box.
- Type Display
Select Merged.
Research Tree Box Settings #
Lists the available research trees – we’ll merge them together and not display a UI box.
- Tree Display
Select Merged.
Research Item Box Settings #
Lists the available research items.
- Research Item Box
Select Blue Menu Center Scroll. - Sort By
Select ID. - Researchable
Enable this setting.
Items that can be researched will be displayed. - Costs Fail
Enable this setting.
Items that can’t be researched due to costs not covered will be displayed. - Requirements Fail
Enable this setting.
Items that can’t be researched due to not met requirements will be displayed. - In Research
Enable this setting.
Items that are currently being researched will be displayed (though we don’t really use that). - Complete
Enable this setting.
Items that have been completed will be displayed. - Add Back Button
Select Last.
We’ll use the same content layout for the buttons for all different research item states, except for the completed research items.
- Use Complete Layout
Enable this setting. - Content Type
Select Custom. - Add Icon
Enable this setting. - Default Content
Set to: [Learned] <name>
Details Box Settings #
You can optionally open another UI box displaying details about a research item, allowing to start/stop the research in there.
We’ll not use it, i.e. research is started in the Research Item Box.
- Details Box Mode
Select None.
Start Question Dialogue #
You can optionally show a question dialogue if research should be started. We’ll use it.
- Show Start Question
Enable this setting. - UI Box
Select Blue Center Fit. - Show Title
Enable this setting. - Text (Title Content)
Set to: <name> - Text (Message Content)
Set to:
Research <name>
Cost: <costs>
- Use Choice
Enable this setting.
I.e. we’ll use choice buttons instead of the ok/cancel buttons of the UI box.
We’ll keep the default button content for the choice buttons (i.e. Yes and No).
Combatant Part #
Scroll down to the bottom of the settings to see the Add Menu Part button.
Click on the Add Menu Part button and select Combatant.
- UI Box
Select Blue Bottom Left Fit. - Combatant Scope
Select Current.
Entry Page 0 #
- Add HUD
Enable this setting. - HUD
Select Combatant Information.
Description Part #
Scroll down to the bottom of the settings to see the Add Menu Part button.
Click on the Add Menu Part button and select Description.
- UI Box
Select Blue Top Left Fit.
Information Part #
We’ll also show how many magic crystals we have in our inventory.
Scroll down to the bottom of the settings to see the Add Menu Part button.
Click on the Add Menu Part button and select Information.
- UI Box
Select Blue Top Right Fit. - Update By Inventory
Enable this setting.
Changes to the player’s inventory (e.g. consuming the magic crystals) will update the content.
Information Page 0 #
We’ll add the name of the Magic Crystal item and the quantity in the player’s inventory via text codes.
- Text (Message Content)
Set to: <item.name=99c94188-41be-47dc-b698-c575b847ff86>: <item.inventory=99c94188-41be-47dc-b698-c575b847ff86>
Please note that the GUID of your item might vary, so please use the buttons above the text editor to add that information. Click on the More button while editing the text to show more text code options and click on Data to show which data entries you can add.
Select Item in the first popup, Magic Crystal in the second popup.
To add the name: Select Name in the 3rd popup and click on Add.
To add the inventory quantity: Select In Inventory in the 3rd popup and click on Add.
Updating Overview Menu Screen #
Select the Overview menu screen, we’ll now add a button for the research menu.
Button List 0 #
Scroll down to Menu Item 3, the button for the Abilities menu screen.
Copy Menu Item 3.
Menu Item 4 #
This is the copied button, let’s change it.
- Menu Screen
Select Upgrade Abilities. - Text (Button Content)
Set to Upgrade Abilities.
Save Changes #
And that’s it for our research trees!
Don’t forget to save your changes by clicking on Save Settings at the bottom of the editor.
Testing #
Hit play and test the new menu screen – to be able to test the upgrades, you can e.g. add some magic crystals to the player’s inventory in the start schematic.
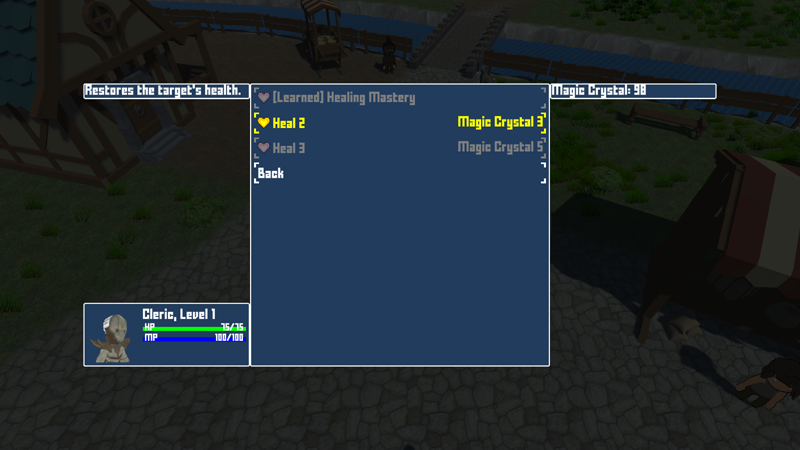
Notice that you can’t select other combatants than the cleric or wizard as users of the menu screen? That’s because we enabled Limit Allowed User, which only allows using combatants with research trees (of the available research types, all in our case).
Next, we’ll start setting up a crafting system.


