
Create simple schematics that can be used as a battle’s end schematics for victory, escape and defeat.
In this tutorial we’ll create 3 very simple battle end schematics. One for the player’s victory, one for the player escaping and one for the player’s defeat (causing game over).
Additionally, we’ll also set up 2 teleport variations for the victory and escape schematics.
Victory Battle End Schematic #
A victory battle end schematic is used when the player won a battle, e.g. to play a victory music and collect the battle gains.
You can download the finished schematic here:
Please note that you’ll have to update the used music in the 1st Change Music node of the schematic.

Settings #
We want the player and camera controls to be blocked during this schematic.
- Block Player Control
Enable this setting. - Block Camera Control
Enable this setting.
Change Music #
Add Node > Audio > Music > Change Music
Play the fanfare! This requires you to already have a music clip set up in Game > Music.
- Music Channel
Set to 0. - Play Type
Select Play. - Music Clip
Select your victory music.
Wait #
Add Node > Base > Wait
Let’s wait for a second to give the music some time before collecting our battle gains.
- Time
Select Value > Value.
Set the value to 1.
Collect Battle Gains #
Add Node > Battle > Gains > Collect Battle Gains
This node is used to collect the battle gains and can optionally show the loot dialogue (set up in Battles > Battle End).
We’ll show the loot dialogue, assuming you already set one up.
- Show Gains
Enable this setting. - Collect Loot
Enable this setting - Collect Experience
Enable this setting. - Wait
Enable this setting.
The schematic will continue after the loot dialogue.
Wait #
Add Node > Base > Wait
Wait a short while again before restoring the music that was playing before the battle.
- Time
Select Value > Value.
Set the value to 0.5.
Change Music #
Add Node > Audio > Music > Change Music
Now we’ll fade back to the music that was stored in the battle start event (according to this tutorial).
- Music Channel
Set to 0. - Play Type
Select Fade To. - Play Stored Music
Enable this setting. - Stored ID
Set to 0. - Fade Time
Set to 0.5. - Interpolation
Select Linear.
Destroy Battle Combatants #
Add Node > Battle > Spawn > Destroy Battle Combatants
This node will destroy (remaining) combatants from the battle that are not the player.
E.g. when you only have the player out in the field, this’ll destroy the player group members and leave the player.
- Destroy Player
Disable this setting. - Destroy All
Enable this setting.
Wait #
Add Node > Base > Wait
And a final short wait before restoring player controls and continuing with our game.
- Time
Select Value > Value.
Set the value to 1.
And that’s it for the schematic. Click on Save Schematic to save it, e.g. as SimpleVictoryBattleEnd.
Escape Battle End Schematic #
An escape battle end schematic is used when the player escapes a battle (via escape command).
You can download the finished schematic here:
Settings #
We want the player and camera controls to be blocked during this schematic.
- Block Player Control
Enable this setting. - Block Camera Control
Enable this setting.
Change Music #
Add Node > Audio > Music > Change Music
We’ll fade back to the music that was stored in the battle start event (according to this tutorial).
- Music Channel
Set to 0. - Play Type
Select Fade To. - Play Stored Music
Enable this setting. - Stored ID
Set to 0. - Fade Time
Set to 1. - Interpolation
Select Linear.
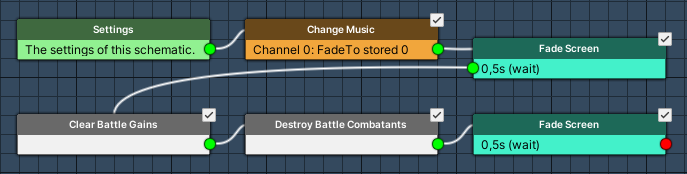
Fade Screen #
Add Node > Animation > Fade > Fade Screen
We’ll fade out the screen to hide the remaining battle combatants getting destroyed (except for the player).
- Wait
Enable this setting. - Time
Set to 0.5. - Interpolation
Select Linear. - Fade Alpha/Red/Green/Blue
Enable all. - Start Color
Set to a black color with no alpha (fully transparent).
E.g. R=0, G=0, B=0, A=0. - End Color
Set to a black color with full alpha (not transparent).
E.g. R=0, G=0, B=0, A=255.
Clear Battle Gains #
Add Node > Battle > Gains > Clear Battle Gains
We’ll remove all loot and rewards – no gains for cowards.
- Clear Loot
Enable this setting. - Clear Experience
Enable this setting. - Clear Normal SV
Enable this setting.
Destroy Battle Combatants #
Add Node > Battle > Spawn > Destroy Battle Combatants
This node will destroy (remaining) combatants from the battle that are not the player.
E.g. when you only have the player out in the field, this’ll destroy the player group members and leave the player.
- Destroy Player
Disable this setting. - Destroy All
Enable this setting.
Fade Screen #
Add Node > Animation > Fade > Fade Screen
We need to fade in the screen again – let’s make this easy and copy the previous Fade Screen node and connect it to the Next slot of the Destroy Battle Combatants node.
Change the following settings in the copied node.
Click on the Swap Colors button to change our fade direction.
And that’s it for the schematic. Click on Save Schematic to save it, e.g. as SimpleEscapeBattleEnd.
Defeat Battle End Schematic #
A defeat battle end schematic is used when the player was defeated, e.g. to call a game over.
You can download the finished schematic here:

Settings #
We want the player and camera controls to be blocked during this schematic.
- Block Player Control
Enable this setting. - Block Camera Control
Enable this setting.
Change Music #
Add Node > Audio > Music > Change Music
Fade out the battle music.
- Music Channel
Set to 0. - Play Type
Select Fade Out. - Fade Time
Set to 3. - Interpolation
Select Linear.
Wait #
Add Node > Base > Wait
Let’s wait for a second to give the music some time before calling game over.
- Time
Select Value > Value.
Set the value to 1.
Game Over #
Add Node > Game > Game > Game Over
Nothing to do here.
Game over is used according to the Game Over Settings in Game > Game Settings (see this documentation for details).
And that’s it for the schematic. Click on Save Schematic to save it, e.g. as SimpleDefeatBattleEnd.
There’s no need for a teleport variation of this defeat event, since it’s game over and doesn’t return to the previous scene.
Teleport Victory Battle End Schematic #
This variation of the victory battle end schematic will teleport back to the scene that was stored in the battle start schematic (according to the teleport setup in this tutorial).
You can download the finished schematic here:
Please note that you’ll have to update the used music in the 1st Change Music node of the schematic.

The setup is identical to the Victory Battle End Schematic above, but it replaces the last 2 nodes (Destroy Battle Combatants and Wait) with a Load Scene node, so I’ll only add that setup here.
Load Scene #
Add Node > Game > Scene > Load Scene
We’ll load the scene that was previously stored.
- Spawn Machine Object
Disable this setting.
This time we spawn the player (the battle start schematic used this option to spawn the battle). - Scene Origin
Select Stored. - Own Screen Fade
Disable the setting.
We’ll just use the default screen fade settings (defined in Game > Game Settings).
And that’s it for the schematic. Click on Save Schematic to save it, e.g. as SimpleTeleportVictoryBattleEnd.
Teleport Escape Battle End Schematic #
This variation of the escape battle end schematic will teleport back to the scene that was stored in the battle start schematic (according to the teleport setup in this tutorial).
You can download the finished schematic here:

Settings #
We want the player and camera controls to be blocked during this schematic.
- Block Player Control
Enable this setting. - Block Camera Control
Enable this setting.
Change Music #
Add Node > Audio > Music > Change Music
We’ll fade back to the music that was stored in the battle start event (according to this tutorial).
- Music Channel
Set to 0. - Play Type
Select Fade To. - Play Stored Music
Enable this setting. - Stored ID
Set to 0. - Fade Time
Set to 1. - Interpolation
Select Linear.
Clear Battle Gains #
Add Node > Battle > Gains > Clear Battle Gains
We’ll remove all loot and rewards – no gains for cowards.
- Clear Loot
Enable this setting. - Clear Experience
Enable this setting. - Clear Normal SV
Enable this setting.
Load Scene #
Add Node > Game > Scene > Load Scene
We’ll load the scene that was previously stored.
- Spawn Machine Object
Disable this setting.
This time we spawn the player (the battle start schematic used this option to spawn the battle). - Scene Origin
Select Stored. - Own Screen Fade
Disable the setting.
We’ll just use the default screen fade settings (defined in Game > Game Settings).
And that’s it for the schematic. Click on Save Schematic to save it, e.g. as SimpleTeleportEscapeBattleEnd.
Using the Battle End Schematics #
You can use a battle end schematics in two ways.
Battle System #
Define the battle end schematics as the default end schematics of a battle system. This’ll be used by all battles, unless the Battle component will override it.
Navigate to Battles > Battle System and select the battle system you want to use the end schematics in.
Base Settings > Battle Start/End Schematics #
- Victory Schematic
Select the SimpleVictoryBattleStart (or whatever schematic you created). - Escape Schematic
Select the SimpleEscapeBattleStart (or whatever schematic you created). - Defeat Schematic
Select the SimpleDefeatBattleStart (or whatever schematic you created).
Don’t forget to save your changes via the Save Settings button.
Battle Component #
A Battle component can optionally override the default battle end schematics for a battle. This can e.g. be useful when you want to do a special end of a battle, e.g. a battle the player has to be defeated in not causing game over.
Select the battle’s game object in the scene and change the following settings in the Battle component’s inspector.
Battle Settings > Battle Start/End Schematics #
- Own End Schematic
Enable this setting. - Victory Schematic
Select the SimpleVictoryBattleStart (or whatever schematic you created). - Escape Schematic
Select the SimpleEscapeBattleStart (or whatever schematic you created). - Defeat Schematic
Select the SimpleDefeatBattleStart (or whatever schematic you created).
Add More #
The battle end schematics we’ve set up here are very basic – you can add more functionality by adding different nodes.
Change Camera Position #
Add Node > Game Object > Camera > Change Camera Position
This node uses camera positions (set up in Game > Camera Positions) to set or fade the camera to a new position.
E.g. look at the player’s combatant or to a camera move over the battle arena.
Show Dialogue #
Add Node > UI > Diaogue > Show Dialogue
This node can show dialogues, e.g. an Auto Close dialogue to display a battle message (e.g. You Won!!!).
Combatant Animation #
Add Node > Animation > Combatant > Combatant Animation
Use an Animation Type to play a victory animation on your combatants.
You can add the different actors to the schematic’s settings node to have different groups available for this. E.g. the Player (Battle) and Enemies (Battle) actor types to have the player and enemy combatants participating in battle as separate actors.
Please note that battles can automatically play the victory animation type on the combatants who won a battle. This can be enabled in Battles > Battle System > General Settings (Play Victory Animation setting). The default victory animation type is defined in Base/Control > Animation Types > General Settings.
Doing this manually in a battle end schematic will give you more control over the timing of the animation.


