ORK Framework Logo - RPG Editor for Unity
  • Features
  • Showcase
  • Guide
    • Documentation
    • Tutorials
    • API
  • ORK 2
    • Tutorials
    • Plugins
    • API
  • Support
  • Forum
  • Get ORK

2D RPG Quickstart

  • START 2D RPG Quickstart
  • 01 Initial Setup
  • 02 Player Setup
  • 03 Music & Scenes
  • 04 UI System Setup
  • 05 UI Boxes
  • 06 Flying Texts
  • 07 Status Values
  • 08 Status Effects
  • 09 First Abilities
  • 10 Fighter Setup
  • 11 First Enemies & Battle AI
  • 12 Battle System Setup
  • 13 Animating Battle Start and End
  • 14 Random Battles
  • 15 Animating Actions
  • 16 Player Battle HUD
  • 17 Elemental Attacks
  • 18 Animating More Actions
  • 19 Inventory & Loot
  • 20 Equipment
  • 21 Loot, Start Equipment & Viewers
  • 22 Magic Abilities
  • 23 Caster Setup
  • 24 More Enemies
  • 25 Start Menu & Save Games
  • 26 Menu Screens
  • 27 Interactions
  • 28 Item Collectors
  • END 2D RPG Quickstart

3D RPG Quickstart

  • START 3D RPG Quickstart
  • 01 Initial Setup
  • 02 Player Setup
  • 03 Music & Scenes
  • 04 UI System Setup
  • 05 UI Boxes
  • 06 Flying Texts
  • 07 Status Values
  • 08 Status Effects
  • 09 First Abilities
  • 10 Fighter Setup
  • 11 First Enemies & Battle AI
  • 12 Battle System Setup
  • 13 Animating Battle Start and End
  • 14 Random Battles
  • 15 Animating Actions
  • 16 Player Battle HUD
  • 17 Elemental Attacks
  • 18 Animating More Actions
  • 19 Inventory & Loot
  • 20 Equipment
  • 21 Loot, Start Equipment & Viewers
  • 22 Magic Abilities
  • 23 Caster Setup
  • 24 More Enemies
  • 25 Start Menu & Save Games
  • 26 Menu Screens
  • 27 Interactions
  • 28 Item Collectors
  • END 3D RPG Quickstart

Status System Setup

  • START Status System Setup
  • 01 Status Values
  • 02 Status Development
  • 03 Attack/Defence Modifiers
  • 04 Status Effects
  • 05 Formulas
  • 06 Ability & Item Types
  • 07 Abilities Part 1: Attacks
  • 08 Abilities Part 2: Support & Sabotage
  • 09 Abilities Part 3: Elemental Magic
  • 10 Items
  • 11 Equipment Part 1: Slots & Slot Set Templates
  • 12 Equipment Part 2: Weapons
  • 12.5 (Optional) Equipment Part 2.5: Weapons
  • 13 Equipment Part 3: Shields, Armor & Accessories
  • 13.5 (Optional) Equipment Part 3.5: Shields, Armor & Accessories
  • 14 Equipment Part 4: Available Equipment Templates
  • 15 Loot
  • 16 Battle AIs
  • 17 Combatants Part 1: General Settings
  • 18 Combatants Part 2: Players
  • 19 Combatants Part 3: Enemies
  • 20 Combatant Groups
  • END Status System Setup

3D RPG Playground

  • START 3D RPG Playground
  • 01 Player Setup
  • 02 Start Menu
  • 03 First Interaction
  • 04 Music
  • 05 Areas
  • 06 Collecting Items
  • 07 Displaying Equipment
  • 08 Combatant Prefabs, Icons & Portraits
  • 09 Combatant Animations
  • 10 Camera Positions
  • ANIM 01 Battle Start/End Schematics
  • ANIM 02 Use, Cast & Camera
  • ANIM 03 Abilities & Items
  • ANIM 04 Physical Attacks
  • ANIM 05 Special Actions
  • BATTLE 01 Battle Menu
  • BATTLE 02 Prepare for Battle
  • TURN 01 Turn Based Setup
  • TURN 02 Turn Order HUD
  • ATB 01 Active Time Setup
  • ATB 02 Cast Times
  • ATB 03 Timebar HUD
  • BATTLE 03 The First Battle
  • BATTLE 04 Hunting Move AI
  • BATTLE 05 Spawning Combatants
  • 11 Save Games
  • MENU 01 UI Boxes
  • MENU 02 Template HUDs
  • MENU 03 Overview Menu
  • MENU 04 Menu Screens
  • 12 Shop
  • BATTLE 06 Random Battles
  • DUNGEON 01 Enter the Dungeon
  • DUNGEON 02 The Trapdoor
  • DUNGEON 03 Enemies on Level 1 & 2
  • DUNGEON 04 Traps on Level 3
  • DUNGEON 05 Going Deeper
  • 13 Bestiary (+MENU+ANIM)
  • QUEST 01 Hunting Quests (+MENU)
  • QUEST 02 Guard NPC
  • QUEST 03 Forest Ruin Cheese
  • QUEST 04 Witch NPC with Cheese
  • QUEST 05 Quest Mark HUDs
  • 14 Research Trees (+MENU)
  • CRAFT 01 Crafting Materials
  • CRAFT 02 Crafting Recipes
  • CRAFT 03 Crafting Menu
  • CRAFT 04 Crafting Proficiency & Critical Crafting
  • CRAFT 05 Materials Loot
  • 15 Changing Choice Dialogue
  • 16 Follow Me!
  • BATTLE 07 Sequence Loot Dialogue

3D Action RPG

  • START 3D Action RPG
  • 01 Status System Setup
  • 02 Player Setup
  • 03 Player Weapon
  • 04 Player Attacks
  • 05 Enemy: Chomper
  • 06 Chomper Attack
  • 07 Hit & Death
  • 08 HUDs
  • 09 Rolling on the Floor
  • 10 Enemy: Spitter
  • 11 Spit Attack
  • 12 Potion
  • 13 Grenade
  • 14 Item HUD
  • 15 Enemy: Grenadier
  • 16 Grenadier Melee Attacks
  • 17 Grenadier Flamethrower
  • 18 Item Drops
  • END 3D Action RPG

2D Grid Battle RPG

  • START 2D Grid Battle RPG
  • 01 Player Setup
  • 02 Prefab & Music Setup
  • 03 Randomizing Combatants
  • 04 UI Setup
  • 05 Battle Start, End & Phase Schematics
  • 06 Battle System Setup
  • 07 Battle Grid Setup
  • 08 Grid Move
  • 09 Forest Battle Grid
  • 10 Battle AI
  • 11 Ability Ranges
  • 12 Death & Use Schematics
  • 13 Attack Schematic
  • 14 Shoot Schematics
  • 15 Battle Selection Interaction
  • END 2D Grid Battle RPG

Schematics

  • Simple Start Schematic
  • Battle Start Schematic
  • Battle End Schematic
  • Moving to Target and Back
  • Animating a Base Attack
  • Animating a Magic Ability
  • Animating Target Selection
  • Grid Movement
  • Open and Close UI Animations
  • Flying Text Mover

UI Setups

  • Unity UI: Initial Setup
  • Unity UI: TextMesh Pro Setup
  • Unity UI: UI Box
  • Unity UI: Flying Text
  • Unity UI: Dragging Notification
  • Unity UI: Canvas with Screen Space Camera
  • Unity UI: Interaction HUD
  • Unity UI: Simple Player HUD
  • Unity UI: Quest HUD
  • Unity UI: Battle Actions HUD
  • Unity UI: Shortcuts HUD
  • Unity UI: Currency HUD
  • Unity UI: Tooltip HUD
  • Unity UI: Control HUD
  • Unity UI: Attack Modifiers
  • Unity UI: Defence Modifiers

Gameplay Bits

  • 2.5D Setup
  • Click Attack
  • Combining Input Origins
  • Combining Status Value Flying Texts
  • Fun With Flying Text
  • HUD Effects With Conditional Schematics
  • Inventory Containers
  • Local Multiplayer
  • Multi Interaction Controllers
  • Target Selection Lines
  • World Space HUD
  • World Space Dialogue
  • Home
  • Guide
  • Tutorials
  • Gameplay Bits
  • Combining Status Value Flying Texts

Combining Status Value Flying Texts

Table of Contents
  • Combined Flying Text Schematic
    • Change Variables
    • Wait
    • Check Variables
    • Show Flying Text
    • Change Variables
  • Status Value Settings
    • Change Schematics
    • UI Settings > Flying Text Settings
  • Combatant Object Variables
    • Base Settings > Object Variable Settings
  • Save Changes
  • Testing
  • Tip: Multiple Combining Flying Texts

Use schematics to combine multiple status value changes into a single flying text.

The flying texts you can add to status values are displayed for each individual change. However, you can use Change Schematics of the status value to combine multiple changes into a single flying text.

In this tutorial we’ll create a schematic to collect the changes to an experience status value (but this can be used for any status value) and handle the setup on the status value (and combatants). The change schematic works like this:

  • adds the change value (provided as local int variable) to an object variable on the combatant
  • waits a bit
  • checks if the object variable on the combatant still has a change value (i.e. not being 0)
  • displays a flying text
  • resets the object variable on the combatant to 0

I.e. beside the schematic, we also need to set up object variables for the combatants.

This tutorial is based on the 3D RPG Playground series, but you can use this for any kind of project.

Combined Flying Text Schematic #

We’ll start with the schematic we’re using as the change schematic on the status value.

The combatant the status value change happens on is available as the Starting Object of the schematic – in case the change came from another combatant (e.g. via an ability), the attacker is available as the Machine Object.

The status value change information is available as local int variables in the schematic, it has the change value via the variable key change, the old value (before the change) as oldValue and the new value (after the change) as newValue.

Open the Makinom editor, navigate to Schematics and start working on a new schematic.


You can download the finished schematic here:

Download Schematic

Change Variables #

Add Node > Value > Variable > Change Variables

We’ll add the local int variable change (holding the status value change) to an object variable on the combatant (Starting Object).

Click on Add Variable.

  • Change Type
    Select Variable.
  • Variable Key
    Set to combinedExp.
  • Variable Origin
    Select Object.
  • Object
    Select Starting Object.
  • Type
    Select Int.
  • Operator
    Select Add.
  • Float Value
    Select Variable > Int Variable.
  • Variable Key (Float Value)
    Set to change.
  • Variable Origin (Float Value)
    Select Local.

Wait #

Add Node > Base > Wait

Add a short wait time to collect some experience changes.

  • Time
    Select Value > Value.
    Set the value to 0.5.

Check Variables #

Add Node > Value > Variable > Check Variables

We check if the combinedExp has a value, or if it was already reset to 0 by another change displaying the flying text.

Click on Add Variable.

  • Condition Type
    Select Variable.
  • Variable Key
    Set to combinedExp.
  • Variable Origin
    Select Object.
  • Object
    Select Starting Object.
  • Type
    Select Int.
  • Check Type
    Select Not Equal.
  • Check Value
    Select Value > Value.
    Set the value to 0.

Show Flying Text #

Add Node > UI > Dialogue > Show Flying Text

If there is a combined change, we’ll show it’s value in a flying text on the combatant (Starting Object).

This node is connected to the Success slot of the Check Variables node.

  • Object
    Select Starting Object.
  • Show Number
    Enable this setting.
  • Number
    Select Variable > Int Variable.
  • Variable Key
    Set to combinedExp.
  • Variable Origin
    Select Object.
  • Object
    Select Starting Object.

The Content defines what’s displayed in the flying text – we can add the number via the text code <value>. Let’s display it in a yellow text.

  • Text
    Set to: <color=#FFFF00FF>+<value> EXP</color>

The rest of the flying text setup is as we know it from other settings.

  • UI Prefab
    Leave this empty to use the default flying text prefab defined in UI > UI Settings.
    In case you want to use a different prefab to create the flying text, define it here.
  • Schematic Asset
    Select the schematic you want to use to animate the flying text.
    I’m using the FlyingTextScaleMover schematic, see this tutorial for details.
  • Destroy Time
    In case you don’t use a schematic, this setting defines how long the flying text is displayed.

Change Variables #

Add Node > Value > Variable > Change Variables

Finally, we’ll reset the combinedExp variable to 0.

Copy the first Change Variables node and change the following settings.

  • Operator
    Select Set.
  • Float Value
    Select Value > Value.
    Set the value to 0.

And that’s it for the schematic – save it, e.g. as CombinedExpFlyingText.

Status Value Settings #

With our schematic ready, we can now add the change schematic settings to the Experience status value.

Navigate to Status > Status Values and select the Experience status value (or any other you want to use this on).

Change Schematics #

The change schematics can be executed each time a change happens on a status value. You can also optionally limit it to defined sources (e.g. only from abilities), change values (e.g. only for damages by checking for negative values) and use other conditions.

We’ll just play our schematic for whatever change happens (on the player only).

Click on Add Schematic.

  • Schematic Asset
    Select the CombinedExpFlyingText schematic we just created.
  • Player
    Enable this setting.
  • Allies, Enemies
    Disable these settings.
    Only combatants of the player group should display this (for our exp changes).
    Please note that other status values (e.g. HP) most likely should be displayed for all.
  • From Ability/Item/Status Effect/Schematic
    Set all to Ignore.
    This’ll not limit where the change comes from.

UI Settings > Flying Text Settings #

Since the 3D RPG Playground’s experience doesn’t show any flying texts, there’s nothing to do for us here.

However, if you’re e.g. using this for a status value that’s already displaying flying texts, you might want to remove them. The change schematic doesn’t stop the regular flying texts from appearing, so this’ll lead to double flying texts.

Combatant Object Variables #

Finally, we’ll set up object variables for all combatants – they’ll be used as local object variables, i.e. each combatant has their own unique variables instead of sharing them via an object ID.

Navigate to Combatants > Combatants > General Settings.

Base Settings > Object Variable Settings #

  • Use Object Variables
    Enable this setting.
  • Local Variables
    Enable this setting.

Save Changes #

And that’s it for the setup.

Don’t forget to save your changes by clicking on Save Settings at the bottom of the editor.

Testing #

Hit play and test the status value changes.

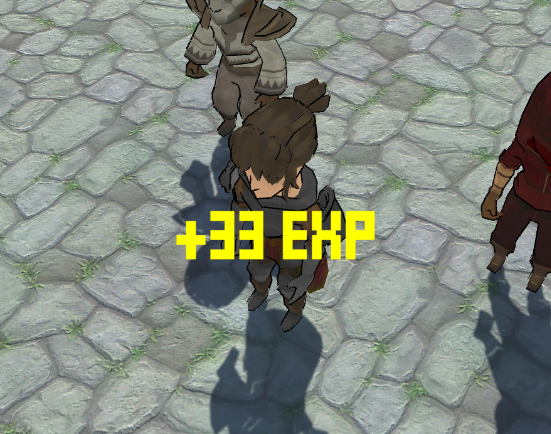
You can quickly test flying texts of status values by selecting a combatant’s game object – the Combatant Component in the inspector allows you to change status values. E.g. add 11 exp and click on Add multiple times in a short time to combine the changes.

Tip: Multiple Combining Flying Texts #

If you have multiple status values that should combine changes in flying texts, make sure to use a unique variable key for each of them.

I.e. you have to set up an individual change schematic for each status value, or rather, for each combined change.

E.g. to combine positive changes with positive changes and negative changes with negative changes, you need a schematic and change schematic setup for each one, also limiting when they’re used via the Value Change Check settings.

Share This Article :
  • Facebook
  • Twitter
  • LinkedIn
  • Pinterest
Updated on July 20, 2022
Table of Contents
  • Combined Flying Text Schematic
    • Change Variables
    • Wait
    • Check Variables
    • Show Flying Text
    • Change Variables
  • Status Value Settings
    • Change Schematics
    • UI Settings > Flying Text Settings
  • Combatant Object Variables
    • Base Settings > Object Variable Settings
  • Save Changes
  • Testing
  • Tip: Multiple Combining Flying Texts
Sitemap
  • Features
  • Showcase
  • Guide
    • Documentation
    • Tutorials
    • API
  • ORK 2 Hub
    • Tutorials
    • Plugins
    • API
  • Support
  • Forum
  • Get ORK
  • Contact
  • Blog
  • Makinom
  • gamingislove.com
Categories
  • News (61)
  • ORK 2 (137)
    • Tutorial (137)
      • Game tutorial (50)
      • Gameplay (32)
      • How-to (55)
  • Release (133)
Search

© 2015 Gaming is Love e.U.

Disclosure: This site may contain affiliate links, which means I may receive a commission if you click a link and purchase something that I have recommended. While clicking these links won’t cost you any money, they will help me fund my development projects while recommending great assets!