
In this tutorial we’ll set up schematics to animate our battle actions.
Battle actions like abilities or items are animated using schematics – and they can use multiple schematics to do so. We’ll split most of our actions into multiple schematics to have them available as modular parts to reuse and combine as needed.
All our actions will perform in a similar way. The combatants will step forward, do their action and step back. Schematics used to animate battle actions will have the user of the action available as Machine Object and the target(s) as Starting Object.
We’ll now set up 3 schematics:
- move forward
- move back
- attack
Afterwards, we’ll set up default animations that are used before each ability/item (i.e. stepping forward and back) and the battle animations of our already added abilities.
Let’s get to it.
Move Forward Schematic #
We’ll start with the schematic to move the user of the action forward (in local space of the combatant). In schematics animating actions, the Machine Object is the user of the action.
Open the Makinom editor and navigate to Schematics.

Change Position #
Add Node > Movement > Movement > Change Position
This node is used to set or move a game object to another position. We’ll use it to move the user forward.
- Moving Object
Select Machine Object.
This is the user of the battle action. - Move Component
Select Auto.
Target Position #
- To Object
Disable this setting.
We don’t move to an object. - Vector3 Type (Position)
Select Value > Value. - Value
Set to X=0, Y=0, Z=1.
This is forward in local space of the game object. - Local Space
Enable this setting. - Ignore Scale
Enable this setting.
Movement Settings #
- Move
Enable this setting.
We’ll move the combatant’s game object – when disabled, the node would set the position immediately. - Wait
Enable this setting.
The schematic will wait for the movement to finish. - Apply Gravity
Enable this setting.
The movement will also include gravity, i.e. sticking to the ground. - Time
Select Value > Value.
Set the value to 0.3. - Interpolation
Select Quadratic > Quadratic In + Out.
And that’s it for the schematic. Click on Save Schematic to save it, e.g. as MoveForward.
Move Back Schematic #
This schematic will move the combatant back to the battle spot.
Create a new schematic.

Settings #
We’ll add an actor to this schematic – actors can be used as game objects in object selections of the schematic or e.g. as speaker of a dialogue.
There is a wide range of different types of actors available, we’ll use the action user’s battle spot.
Actors #
Click on Add Actor.
- Actor Type
Select User Base.
This’ll use the battle spot of the user of the action (Machine Object).
Change Position #
Add Node > Movement > Movement > Change Position
We’ll move to the User Base actor’s position.
- Moving Object
Select Machine Object. - Move Component
Select Auto.
Target Position #
- To Object
Enable this setting.
This time we move to a game object. - Object
Select Actor 0: User Base.
Movement Settings #
We’ll move just like in the Move Forward schematic.
- Move
Enable this setting. - Wait
Enable this setting. - Apply Gravity
Enable this setting. - Time
Select Value > Value.
Set the value to 0.3. - Interpolation
Select Quadratic > Quadratic In + Out.
And that’s it for the schematic. Click on Save Schematic to save it, e.g. as MoveBack.
Attack Schematic #
Next, we’ll set up the schematic to animate our attacks.
It’ll play the attack animation, spawn a prefab on the target and calculate the damage of the action.
Create a new schematic.
Settings #
We’ll add a prefab for the damage effect – some abilities will override the prefab with a custom one (e.g. poison attack).
Prefabs #
Click on Add Prefab.
- Auto Destroy After Time
Enable this setting. - Time
Set to 1. - Prefab
Select the HitEffect prefab.
You can find it in Assets/Tutorial Assets/Prefabs/ParticleEffects/.
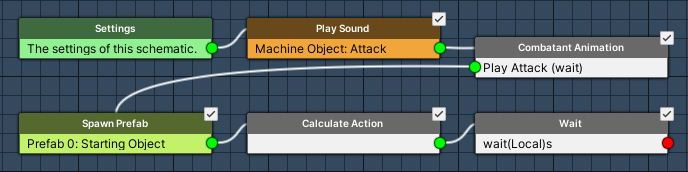
Play Sound #
Add Node > Audio > Audio > Play Sound
Play the Attack sound type on the user.
- Object (Play On)
Select Machine Object. - Use Sound Type
Enable this setting. - Sound Type
Select Attack. - Play One Shot
Enable this setting.
Combatant Animation #
Add Node > Animation > Combatant > Combatant Animation
We’ll play the Attack animation.
- Object
Select Machine Object. - Animation Type
Select Attack. - Wait
Enable this setting. - Normalized Time
Set to 0.5.
We’ll wait for half of the animation’s duration. - Store Duration
Enable this setting.
We’ll also store the animation’s duration into a float variable and use it afterwards in a Wait node. - Normalized Time (Store Duration)
Set to 0.5.
We store the remaining duration’s half. - Variable Key
Set to wait. - Variable Origin
Select Local.
These are local variables of the running schematic and will be gone after it finished.
Spawn Prefab #
Add Node > Game Object > Prefab > Spawn Prefab
We’ll spawn the prefab on the target (Starting Object).
- Prefab
Select Prefab 0. - Use Prefab Rotation
Enable this setting. - Target Type
Select Object. - Object (Target Object)
Select Starting Object. - On Child
Select Path.
We’ll define a path to a child object. - Find Child
Set to: Center
We’ll spawn the prefab at the center of the target’s game object.
The Center child object is already set up on all combatant prefabs. - Spawn At
Select All.
In case an action has multiple targets, this’ll spawn the prefab on all of them.
Calculate Action #
Add Node > Battle > Action Outcome > Calculate Action
We now calculate the outcome of the action.
No further settings needed.
Wait #
Add Node > Base > Wait
And now we’ll wait for the stored duration.
This node is connected to the Next slot of the Spawn Prefab node and the Miss slot of the Calculate Action node.
- Time
Select Variable > Float Variable. - Variable Key
Set to wait. - Variable Origin
Select Local.
And that’s it for the schematic. Click on Save Schematic to save it, e.g. as Attack.
Default Battle Animations #
Now, we’ll use the move forward/back schematics to set up some default battle animations that’ll be used before and after each ability and item. In case an ability or item shouldn’t use them, they can be disabled for that individual ability/item.
Navigate to Combatants > Combatants > General Settings.
Battle Settings > Default Battle Animations #
These settings handle the default battle animations (using schematics) for special actions, e.g. a combatant’s death or defending. Each combatant can optionally override the default animations.
We’ll set up battle animations that will be used before and after each ability and item, using the move forward/back schematics.
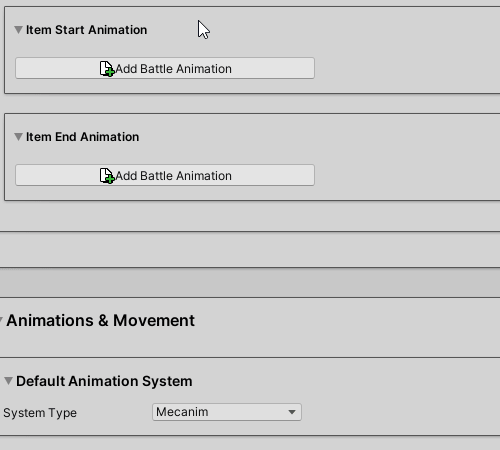
Ability Start Animation #
These battle animations are used before an ability’s battle animations.
Click on Add Battle Animation.
- Schematic Asset
Select the MoveForward schematic.
Ability End Animation #
These battle animations are used after an ability’s battle animations.
Click on Add Battle Animation.
- Schematic Asset
Select the MoveBack schematic.
Item Start Animation #
We’ll use the same setup as the Ability Start Animation – so why not just copy and paste it here?
You can do this using the context menu – right/context-click on the Ability Start Animation foldout’s title and select Copy to Clipboard.

The copied settings are highlighted, so you know which settings are included.
Now, right/context-click on the Item Start Animation foldout’s title and select Paste from Clipboard.
This’ll paste the settings as they where when copied.
Item End Animation #
Again, the same setup as in the Ability End Animation settings – so copy/paste them as well.
Abilities #
Next, we’ll update our Attack and Poison Attack abilities to use the Attack schematic.
Navigate to Status > Abilities and select the Attack ability first.
0: Attack #
We’ll just use the Attack schematic as it is, so all we need to do is add a battle animation using it.
Battle Animation #
The Use Start Animation and Use End Animation settings manage if the abiltiy start/end animations are used.
Click on Add Battle Animation.
- Schematic Asset
Select Attack.
1: Poison Attack #
The poison attack will override the prefab of the schematic.
This is called asset override and allows to reuse schematics for different use cases, replacing the used assets – e.g. spawning other prefabs, playing other audio clips, etc.
Battle Animation #
Click on Add Battle Animation.
- Schematic Asset
Select Attack.
The Resource Overrides settings let us override the prefab of the schematic.
Click on Add Prefab Override.
- Auto Destroy After Time
Enable this setting. - Time
Set to 3. - Prefab
Select the PoisonEffect prefab.
You can find it in Assets/Tutorial Assets/Prefabs/ParticleEffects/.
Save Changes #
And that’s it!
Save the changes using the Save Settings button at the bottom of the editor.
Testing #
Hit play and start a battle outside of town.
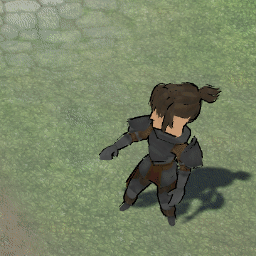
Great, the attacks are now animated!
Next, we’ll add the battle HUD to know the state of our player.


