ORK Framework Logo - RPG Editor for Unity
  • Features
  • Showcase
  • Guide
    • Documentation
    • Tutorials
    • API
  • ORK 2
    • Tutorials
    • Plugins
    • API
  • Support
  • Forum
  • Get ORK

Status System Setup

  • START Status System Setup
  • 01 Status Values
  • 02 Status Development
  • 03 Attack/Defence Modifiers
  • 04 Status Effects
  • 05 Formulas
  • 06 Ability & Item Types
  • 07 Abilities Part 1: Attacks
  • 08 Abilities Part 2: Support & Sabotage
  • 09 Abilities Part 3: Elemental Magic
  • 10 Items
  • 11 Equipment Part 1: Slots & Slot Set Templates
  • 12 Equipment Part 2: Weapons
  • 12.5 (Optional) Equipment Part 2.5: Weapons
  • 13 Equipment Part 3: Shields, Armor & Accessories
  • 13.5 (Optional) Equipment Part 3.5: Shields, Armor & Accessories
  • 14 Equipment Part 4: Available Equipment Templates
  • 15 Loot
  • 16 Battle AIs
  • 17 Combatants Part 1: General Settings
  • 18 Combatants Part 2: Players
  • 19 Combatants Part 3: Enemies
  • 20 Combatant Groups
  • END Status System Setup

3D RPG Playground

  • START 3D RPG Playground
  • 01 Player Setup
  • 02 Start Menu
  • 03 First Interaction
  • 04 Music
  • 05 Areas
  • 06 Collecting Items
  • 07 Displaying Equipment
  • 08 Combatant Prefabs, Icons & Portraits
  • 09 Combatant Animations
  • 10 Camera Positions
  • ANIM 01 Battle Start/End Schematics
  • ANIM 02 Use, Cast & Camera
  • ANIM 03 Abilities & Items
  • ANIM 04 Physical Attacks
  • ANIM 05 Special Actions
  • BATTLE 01 Battle Menu
  • BATTLE 02 Prepare for Battle
  • TURN 01 Turn Based Setup
  • TURN 02 Turn Order HUD
  • ATB 01 Active Time Setup
  • ATB 02 Cast Times
  • ATB 03 Timebar HUD
  • BATTLE 03 The First Battle
  • BATTLE 04 Hunting Move AI
  • BATTLE 05 Spawning Combatants
  • 11 Save Games
  • MENU 01 UI Boxes
  • MENU 02 Template HUDs
  • MENU 03 Overview Menu
  • MENU 04 Menu Screens
  • 12 Shop
  • BATTLE 06 Random Battles
  • DUNGEON 01 Enter the Dungeon
  • DUNGEON 02 The Trapdoor
  • DUNGEON 03 Enemies on Level 1 & 2
  • DUNGEON 04 Traps on Level 3
  • DUNGEON 05 Going Deeper
  • 13 Bestiary (+MENU+ANIM)
  • QUEST 01 Hunting Quests (+MENU)
  • QUEST 02 Guard NPC
  • QUEST 03 Forest Ruin Cheese
  • QUEST 04 Witch NPC with Cheese
  • QUEST 05 Quest Mark HUDs
  • 14 Research Trees (+MENU)
  • CRAFT 01 Crafting Materials
  • CRAFT 02 Crafting Recipes
  • CRAFT 03 Crafting Menu
  • CRAFT 04 Crafting Proficiency & Critical Crafting
  • CRAFT 05 Materials Loot
  • 15 Changing Choice Dialogue
  • 16 Follow Me!
  • BATTLE 07 Sequence Loot Dialogue

3D Action RPG

  • START 3D Action RPG
  • 01 Status System Setup
  • 02 Player Setup
  • 03 Player Weapon
  • 04 Player Attacks
  • 05 Enemy: Chomper
  • 06 Chomper Attack
  • 07 Hit & Death
  • 08 HUDs
  • 09 Rolling on the Floor
  • 10 Enemy: Spitter
  • 11 Spit Attack
  • 12 Potion
  • 13 Grenade
  • 14 Item HUD
  • 15 Enemy: Grenadier
  • 16 Grenadier Melee Attacks
  • 17 Grenadier Flamethrower
  • 18 Item Drops
  • END 3D Action RPG

2D Grid Battle RPG

  • START 2D Grid Battle RPG
  • 01 Player Setup
  • 02 Prefab & Music Setup
  • 03 Randomizing Combatants
  • 04 UI Setup
  • 05 Battle Start, End & Phase Schematics
  • 06 Battle System Setup
  • 07 Battle Grid Setup
  • 08 Grid Move
  • 09 Forest Battle Grid
  • 10 Battle AI
  • 11 Ability Ranges
  • 12 Death & Use Schematics
  • 13 Attack Schematic
  • 14 Shoot Schematics
  • 15 Battle Selection Interaction
  • END 2D Grid Battle RPG

Schematics

  • Simple Start Schematic
  • Battle Start Schematic
  • Battle End Schematic
  • Moving to Target and Back
  • Animating a Base Attack
  • Animating a Magic Ability
  • Grid Movement
  • Open and Close UI Animations
  • Flying Text Mover

UI Setups

  • Unity UI: Initial Setup
  • Unity UI: TextMesh Pro Setup
  • Unity UI: UI Box
  • Unity UI: Flying Text
  • Unity UI: Dragging Notification
  • Unity UI: Interaction HUD
  • Unity UI: Simple Player HUD
  • Unity UI: Quest HUD
  • Unity UI: Shortcuts HUD
  • Unity UI: Currency HUD
  • Unity UI: Tooltip HUD
  • Unity UI: Control HUD
  • Unity UI: Attack Modifiers
  • Unity UI: Defence Modifiers

Gameplay Bits

  • Combining Input Origins
  • Combining Status Value Flying Texts
  • Fun With Flying Text
  • HUD Effects With Conditional Schematics
  • Inventory Containers
  • Multi Interaction Controllers
  • World Space HUD
  • World Space Dialogue
  • Home
  • Guide
  • Tutorials
  • 2D Grid Battle RPG
  • 02 Prefab & Music Setup

02 Prefab & Music Setup

Table of Contents
  • Interaction Controller
    • Prefab Setup
      • Box Collider 2D
      • Create Prefab
    • Interaction Settings
      • Interaction Settings
  • Music
    • 0: Town
    • 1: Battle
    • 2: Victory
    • 4: Lost
  • Save Changes
  • Music Scene Setup
    • Forest Battle Scene
      • Add Game Starter
      • Add Music Player
    • Town Scene
      • Add Music Player
  • Combatant Prefab Setup
    • Add Face Camera Component
    • Add Equipment Viewer
      • Equipment Viewer Settings
      • Display Conditions
  • Testing

In this tutorial we’ll continue our initial setup.

There’s still a bit more to do before getting down to the whole fighting business. We need an interaction controller for our princess to talk to an NPC (which starts the battle), some music and a Face Camera component to keep our combatant’s sprites always rotated to the camera correctly (otherwise they’d rotate with the movement direction, more on that below).

We’ll set up:

  • interaction controller
  • music
  • combatant prefabs (adding component)

Let’s get to it.

Interaction Controller #

The Interaction Controller is used to interact with any interaction within it’s trigger when the player uses the Interact key.

We’ll create a prefab that’s automatically added to the player.

Prefab Setup #

Use the scene hierarchy context menu (Makinom > Interaction Controller 2D) or the Makinom Scene Wizard (Create Game Object > Interaction Controller 2D) to create a ready-to-use setup.

Change the following settings in the inspector

Box Collider 2D #

  • Size
    Set to X=1, Y=1.

Create Prefab #

Create a prefab out of the Interaction Controller (2D) game object.

Remove the game object from the scene.

Interaction Settings #

Open the editor and navigate to Base/Control > Game Controls and change the following settings.

Interaction Settings #

The default setup should already use an interaction controller and the accpet input key.

  • Interaction Control
    Select Interaction Controller.
  • Interact Key
    Select Accept.

The Interaction Controller settings handle adding our prefab to the player.

  • Add Automatically
    Enable this setting.
  • IC Prefab
    Select the Interaction Controller prefab you created.
  • On Child
    Set to: Mount/Front
    The interaction controller will be placed on this child object, which will automatically rotate into the direction the combatant moves in.

That’s it for the interaction controller.

Music #

Next, we’ll set up some music clips.

Navigate to Game > Music, we’ll change the Default music and add additional music.

You can find the used audio clips in Assets/Tutorial Assets/NinjaAdventure/Musics/.

0: Town #

  • Name
    Set to Town.
  • Audio Clip
    Select 4 – Village.
  • Loop Clip
    Enable this setting.

1: Battle #

  • Name
    Set to Battle.
  • Audio Clip
    Select 17 – Fight.
  • Loop Clip
    Enable this setting.

2: Victory #

  • Name
    Set to Victory.
  • Audio Clip
    Select 3 – Revelation.
  • Loop Clip
    Enable this setting.

4: Lost #

  • Name
    Set to Lost.
  • Audio Clip
    Select 7 – Sad Theme.
  • Loop Clip
    Enable this setting.

Save Changes #

That’s it for the setup.

Don’t forget to save your changes by clicking on Save Settings at the bottom of the editor.

Music Scene Setup #

We’re done with the editor now, so you can close it.

Forest Battle Scene #

We’ll now add music to our two scenes. First, open the Forest Battle 1 scene (Assets/Scenes/).

We’ll add a Game Starter and a Music Player.

Add Game Starter #

Use the scene hierarchy context menu (ORK Framework > ORK Game Starter) or the scene wizard to add an ORK Game Starter to the scene.

The added game starter should already have your Project asset set up. Change the following setting in the ORK Game Starter component’s inspector.

  • Start Game
    Enable this setting.

It doesn’t really matter where you place the game starter.

Add Music Player #

Use the scene hierarchy context menu (Makinom > Music Player) or the scene wizard (Create Object > Music Player) to create a Music Player in the scene.

  • Play Type
    Select Fade To.
  • Music Clip
    Select Battle.
  • Fade Time
    Set to 1.
  • Interpolation
    Select Linear.

It also doesn’t matter where you place the music player.

Save the changes you’ve made in the scene.

Town Scene #

Open the Town scene, we’ll only need to add the music player.

Add Music Player #

Use the scene hierarchy context menu (Makinom > Music Player) or the scene wizard (Create Object > Music Player) to create a Music Player in the scene.

  • Play Type
    Select Fade To.
  • Music Clip
    Select Town.
  • Fade Time
    Set to 1.
  • Interpolation
    Select Linear.

It also doesn’t matter where you place the music player.

Save the changes you’ve made in the scene.

Combatant Prefab Setup #

Finally, we’ll set up the combatant prefab – all our combatant prefabs are variants of a base prefab, so we only need to make changes to the base prefab.

Open the CombatantBase prefab for editing, you can find it in Assets/Tutorial Assets/Prefabs/Combatants/. The structure is like this:

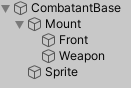
The Mount and it’s child objects will rotate with the root (CombatantBase) into the direction the combatant moves.

However, we don’t want this for the Sprite, which displays the combatant’s sprite. To prevent this, we’ll add a Face Camera component to it.

We’ll also add an Equipment Viewer to show weapons during attacks (to the Mount > Weapon child object).

Add Face Camera Component #

Add a Face Camera component to the CombatantBase > Sprite child object using the component menu.

  • Makinom Camera
    Enable this setting.
    This’ll face the camera that’s found by Makinom in the scene, which usually is the game’s main camera.

Add Equipment Viewer #

Equipment Viewer components are used to display a combatant’s equipment by spawning it’s Viewer Prefab. We’ll only display equipment during attacks – we’ll control this by using a bool variable on our combatants.

Select the Mount > Weapon child object and add an Equipment Viewer component using the component menu.

Equipment Viewer Settings #

  • Equipment Slot
    Select Weapon.

Display Conditions #

Click on Add Condition.

  • Condition Type
    Select Variable.

Click on Add Variable.

  • Condition Type
    Select Variable.
  • Variable Key
    Set to showWeapon.
  • Variable Origin
    Select Object.
    We’ll use the combatant’s variables.
  • Game Object
    Select User.
    This’ll use the combatant.
  • Is Valid
    Enable this setting.
    The check needs to be valid.
  • Type
    Select Bool.

And that’s it for the prefab – save the changes.

Testing #

Hit play in the Town scene – you don’t really see what’s going on unless you enable displaying Gizmos in the game view.

When displaying gizmos (and having the princess selected), you’ll see the mounts will rotate with our move direction.

Oh, and you can also hear the music we’ve added.


Next, we’ll randomize our combatants!

Share This Article :
  • Facebook
  • Twitter
  • LinkedIn
  • Pinterest
Updated on October 20, 2022
Table of Contents
  • Interaction Controller
    • Prefab Setup
      • Box Collider 2D
      • Create Prefab
    • Interaction Settings
      • Interaction Settings
  • Music
    • 0: Town
    • 1: Battle
    • 2: Victory
    • 4: Lost
  • Save Changes
  • Music Scene Setup
    • Forest Battle Scene
      • Add Game Starter
      • Add Music Player
    • Town Scene
      • Add Music Player
  • Combatant Prefab Setup
    • Add Face Camera Component
    • Add Equipment Viewer
      • Equipment Viewer Settings
      • Display Conditions
  • Testing
Sitemap
  • Features
  • Showcase
  • Guide
    • Documentation
    • Tutorials
    • API
  • ORK 2 Hub
    • Tutorials
    • Plugins
    • API
  • Support
  • Forum
  • Get ORK
  • Contact
  • Blog
  • Makinom
  • gamingislove.com
Categories
  • News (59)
  • ORK 2 (137)
    • Tutorial (137)
      • Game tutorial (50)
      • Gameplay (32)
      • How-to (55)
  • Release (129)
Search

© 2015 Gaming is Love e.U.

Disclosure: This site may contain affiliate links, which means I may receive a commission if you click a link and purchase something that I have recommended. While clicking these links won’t cost you any money, they will help me fund my development projects while recommending great assets!