ORK Framework Logo - RPG Editor for Unity
  • Features
  • Showcase
  • Guide
    • Documentation
    • Tutorials
    • API
  • ORK 2
    • Tutorials
    • Plugins
    • API
  • Support
  • Forum
  • Get ORK

2D RPG Quickstart

  • START 2D RPG Quickstart
  • 01 Initial Setup
  • 02 Player Setup
  • 03 Music & Scenes
  • 04 UI System Setup
  • 05 UI Boxes
  • 06 Flying Texts
  • 07 Status Values
  • 08 Status Effects
  • 09 First Abilities
  • 10 Fighter Setup
  • 11 First Enemies & Battle AI
  • 12 Battle System Setup
  • 13 Animating Battle Start and End
  • 14 Random Battles
  • 15 Animating Actions
  • 16 Player Battle HUD
  • 17 Elemental Attacks
  • 18 Animating More Actions
  • 19 Inventory & Loot
  • 20 Equipment
  • 21 Loot, Start Equipment & Viewers
  • 22 Magic Abilities
  • 23 Caster Setup
  • 24 More Enemies
  • 25 Start Menu & Save Games
  • 26 Menu Screens
  • 27 Interactions
  • 28 Item Collectors
  • END 2D RPG Quickstart

3D RPG Quickstart

  • START 3D RPG Quickstart
  • 01 Initial Setup
  • 02 Player Setup
  • 03 Music & Scenes
  • 04 UI System Setup
  • 05 UI Boxes
  • 06 Flying Texts
  • 07 Status Values
  • 08 Status Effects
  • 09 First Abilities
  • 10 Fighter Setup
  • 11 First Enemies & Battle AI
  • 12 Battle System Setup
  • 13 Animating Battle Start and End
  • 14 Random Battles
  • 15 Animating Actions
  • 16 Player Battle HUD
  • 17 Elemental Attacks
  • 18 Animating More Actions
  • 19 Inventory & Loot
  • 20 Equipment
  • 21 Loot, Start Equipment & Viewers
  • 22 Magic Abilities
  • 23 Caster Setup
  • 24 More Enemies
  • 25 Start Menu & Save Games
  • 26 Menu Screens
  • 27 Interactions
  • 28 Item Collectors
  • END 3D RPG Quickstart

Status System Setup

  • START Status System Setup
  • 01 Status Values
  • 02 Status Development
  • 03 Attack/Defence Modifiers
  • 04 Status Effects
  • 05 Formulas
  • 06 Ability & Item Types
  • 07 Abilities Part 1: Attacks
  • 08 Abilities Part 2: Support & Sabotage
  • 09 Abilities Part 3: Elemental Magic
  • 10 Items
  • 11 Equipment Part 1: Slots & Slot Set Templates
  • 12 Equipment Part 2: Weapons
  • 12.5 (Optional) Equipment Part 2.5: Weapons
  • 13 Equipment Part 3: Shields, Armor & Accessories
  • 13.5 (Optional) Equipment Part 3.5: Shields, Armor & Accessories
  • 14 Equipment Part 4: Available Equipment Templates
  • 15 Loot
  • 16 Battle AIs
  • 17 Combatants Part 1: General Settings
  • 18 Combatants Part 2: Players
  • 19 Combatants Part 3: Enemies
  • 20 Combatant Groups
  • END Status System Setup

3D RPG Playground

  • START 3D RPG Playground
  • 01 Player Setup
  • 02 Start Menu
  • 03 First Interaction
  • 04 Music
  • 05 Areas
  • 06 Collecting Items
  • 07 Displaying Equipment
  • 08 Combatant Prefabs, Icons & Portraits
  • 09 Combatant Animations
  • 10 Camera Positions
  • ANIM 01 Battle Start/End Schematics
  • ANIM 02 Use, Cast & Camera
  • ANIM 03 Abilities & Items
  • ANIM 04 Physical Attacks
  • ANIM 05 Special Actions
  • BATTLE 01 Battle Menu
  • BATTLE 02 Prepare for Battle
  • TURN 01 Turn Based Setup
  • TURN 02 Turn Order HUD
  • ATB 01 Active Time Setup
  • ATB 02 Cast Times
  • ATB 03 Timebar HUD
  • BATTLE 03 The First Battle
  • BATTLE 04 Hunting Move AI
  • BATTLE 05 Spawning Combatants
  • 11 Save Games
  • MENU 01 UI Boxes
  • MENU 02 Template HUDs
  • MENU 03 Overview Menu
  • MENU 04 Menu Screens
  • 12 Shop
  • BATTLE 06 Random Battles
  • DUNGEON 01 Enter the Dungeon
  • DUNGEON 02 The Trapdoor
  • DUNGEON 03 Enemies on Level 1 & 2
  • DUNGEON 04 Traps on Level 3
  • DUNGEON 05 Going Deeper
  • 13 Bestiary (+MENU+ANIM)
  • QUEST 01 Hunting Quests (+MENU)
  • QUEST 02 Guard NPC
  • QUEST 03 Forest Ruin Cheese
  • QUEST 04 Witch NPC with Cheese
  • QUEST 05 Quest Mark HUDs
  • 14 Research Trees (+MENU)
  • CRAFT 01 Crafting Materials
  • CRAFT 02 Crafting Recipes
  • CRAFT 03 Crafting Menu
  • CRAFT 04 Crafting Proficiency & Critical Crafting
  • CRAFT 05 Materials Loot
  • 15 Changing Choice Dialogue
  • 16 Follow Me!
  • BATTLE 07 Sequence Loot Dialogue

3D Action RPG

  • START 3D Action RPG
  • 01 Status System Setup
  • 02 Player Setup
  • 03 Player Weapon
  • 04 Player Attacks
  • 05 Enemy: Chomper
  • 06 Chomper Attack
  • 07 Hit & Death
  • 08 HUDs
  • 09 Rolling on the Floor
  • 10 Enemy: Spitter
  • 11 Spit Attack
  • 12 Potion
  • 13 Grenade
  • 14 Item HUD
  • 15 Enemy: Grenadier
  • 16 Grenadier Melee Attacks
  • 17 Grenadier Flamethrower
  • 18 Item Drops
  • END 3D Action RPG

2D Grid Battle RPG

  • START 2D Grid Battle RPG
  • 01 Player Setup
  • 02 Prefab & Music Setup
  • 03 Randomizing Combatants
  • 04 UI Setup
  • 05 Battle Start, End & Phase Schematics
  • 06 Battle System Setup
  • 07 Battle Grid Setup
  • 08 Grid Move
  • 09 Forest Battle Grid
  • 10 Battle AI
  • 11 Ability Ranges
  • 12 Death & Use Schematics
  • 13 Attack Schematic
  • 14 Shoot Schematics
  • 15 Battle Selection Interaction
  • END 2D Grid Battle RPG

Schematics

  • Simple Start Schematic
  • Battle Start Schematic
  • Battle End Schematic
  • Moving to Target and Back
  • Animating a Base Attack
  • Animating a Magic Ability
  • Grid Movement
  • Open and Close UI Animations
  • Flying Text Mover

UI Setups

  • Unity UI: Initial Setup
  • Unity UI: TextMesh Pro Setup
  • Unity UI: UI Box
  • Unity UI: Flying Text
  • Unity UI: Dragging Notification
  • Unity UI: Canvas with Screen Space Camera
  • Unity UI: Interaction HUD
  • Unity UI: Simple Player HUD
  • Unity UI: Quest HUD
  • Unity UI: Shortcuts HUD
  • Unity UI: Currency HUD
  • Unity UI: Tooltip HUD
  • Unity UI: Control HUD
  • Unity UI: Attack Modifiers
  • Unity UI: Defence Modifiers

Gameplay Bits

  • Combining Input Origins
  • Combining Status Value Flying Texts
  • Fun With Flying Text
  • HUD Effects With Conditional Schematics
  • Inventory Containers
  • Multi Interaction Controllers
  • World Space HUD
  • World Space Dialogue
  • Home
  • Guide
  • Tutorials
  • 2D RPG Quickstart
  • 03 Music & Scenes

03 Music & Scenes

Table of Contents
  • Music
    • 0: Town
    • 1: Forest
    • 2: Battle
    • 3: Victory
    • 4: Lost
  • Save Changes
  • Town Scene Setup
    • Add Music Player
    • Add Scene Changer
      • Transform
      • Scene Changer
      • Circle Colider 2D
      • Box Colider 2D
  • Forest Scene Setup
    • Spawn Point 0
      • Transform
    • Music Player
    • Scene Changer (to Town)
      • Transform
      • Scene Changer > Target Scene 0
    • Scene Changer (to Deep Forest)
      • Transform
      • Scene Changer > Target Scene 0
      • Box Colider 2D
    • Add Spawn Point
      • Transform
      • Spawn Point
    • Add Camera Border
  • Deep Forest Scene Setup
    • Spawn Point 0
      • Transform
    • Scene Changer (to Forest)
      • Transform
      • Scene Changer > Target Scene 0
      • Box Colider 2D
    • Add Camera Border
  • Battle Forest Scene and Battle Deep Forest Scene Setup
    • Add Spawn Point
      • Transform
  • Start Menu Scene Setup
    • Add Game Starter
    • Add Music Player
  • Testing

In this tutorial we’ll add music and connect our game scenes.

We’ll set up:

  • music clips in the editor
  • add music and scene connections to our game scenes

Let’s get to it!

Music #

We’ll start with setting up the music.

Open the editor and navigate to Game > Music, we’ll change the Default music and add additional music.

You can find the used audio clips in Assets/Tutorial Assets/NinjaAdventure/Musics/.

0: Town #

  • Name
    Set to Town.
  • Audio Clip
    Select 4 – Village.
  • Loop Clip
    Enable this setting.

1: Forest #

  • Name
    Set to Forest.
  • Audio Clip
    Select 13 – Mystical.
  • Loop Clip
    Enable this setting.

2: Battle #

  • Name
    Set to Battle.
  • Audio Clip
    Select 17 – Fight.
  • Loop Clip
    Enable this setting.

3: Victory #

  • Name
    Set to Victory.
  • Audio Clip
    Select 3 – Revelation.
  • Loop Clip
    Enable this setting.

4: Lost #

  • Name
    Set to Lost.
  • Audio Clip
    Select 7 – Sad Theme.
  • Loop Clip
    Enable this setting.

Save Changes #

That’s it for the setup.

Don’t forget to save your changes by clicking on Save Settings at the bottom of the editor.

Town Scene Setup #

Next, we’ll set up the music and scene connections of our 3 game scenes – Town, Forest and Deep Forest. The rest of the scenes are used in a different way (for the start menu and battle scenes).

We’ll start with the Town, which should still be open from the last tutorial, otherwise you’ll find it at Assets/Scenes/.

We’ll add a Music Player and Scene Changer (to connect to the Forest scene).

Add Music Player #

Music Players are used to, well, play music. The default setup will automatically play it when the level is loaded, but you can change that in the component’s Start Settings (we’ll keep the default setup, though).

Use the scene hierarchy context menu (Makinom > Music Player) or the scene wizard (Create Object > Music Player) to create a Music Player in the scene.

  • Play Type
    Select Fade To.
  • Music Clip
    Select Town.
  • Fade Time
    Set to 1.
  • Interpolation
    Select Linear.

It also doesn’t matter where you place the music player.

Save the changes you’ve made in the scene.

Add Scene Changer #

Scene Changers are used to load a new scene and (optionally) spawn the player in it. The default setup will load the new scene when the player walks into the trigger of the game object (and can be changed, like the music player).

Use the scene hierarchy context menu (Makinom > Scene Changer (2D)) or the scene wizard (Create Object > Scene Changer 2D) to create a Scene Changer in the scene.

We’ll change some settings in the inspector of the newly game object.

Transform #

We’ll place a scene changer at the exit of the town to load into the Forest scene.

  • Position
    Set to X=-20, Y=-1, Z=0.

Scene Changer #

We’ll set the already added Target Scene 0 to change to the Forest scene.

  • Target Scene
    Set to: Forest
  • Position Type
    Select Spawn Point.
  • Spawn ID
    Select Value > Value.
  • Value
    Set to 0.

With this setup, we’ll spawn the player at spawn point with the spawn ID 0 in the Forest scene.

Circle Colider 2D #

The default setup comes with a Circle Colider (set up as Trigger), but we’ll use a Box Colider 2D instead.

So, remove this component.

Box Colider 2D #

Add a Box Colider 2D component using the Add Component button or the component menu.

  • Is Trigger
    Enable this setting.
  • Size
    Set to X=1, Y=4.

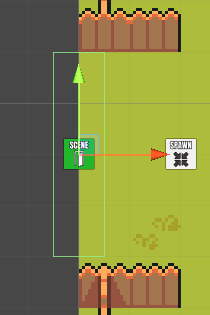
The finished scene changer should be placed like this.

Forest Scene Setup #

Before opening the Forest scene, select the following game objects in Town scene:

  • ORK Game Starter
  • Spawn Point 0
  • Music Player
  • Scene Changer

Copy them to the clipboard (e.g. via CTRL+C on Windows), this’ll make our setup in the next scene a bit shorter.

Now, open the Forest scene (Assets/Scenes/) and paste the copied game objects into the scene.

The ORK Game Starter can be left as it is, we just need it to be able to start playing directly in the scene to quickly test things out if we want.

Spawn Point 0 #

We’ll move the spawn point (spawn ID 0) to the right side of the forest and change it’s rotation on the Z-axis to face the player the other way.

The default rotation of 0 will have the player face to the right side – to face to the left, the rotation needs to be 180.

Transform #

  • Position
    Set to X=18, Y=-1, Z=0.
  • Rotation
    Set to X=0, Y=0, Z=180.

Music Player #

We’ll change the music to use the Forest music.

  • Music Clip
    Select Forest.

Scene Changer (to Town) #

Like the spawn point, we’ll move the scene changer to the right side of the forest (and update it’s target scene).

Transform #

  • Position
    Set to X=20, Y=-1, Z=0.

Scene Changer > Target Scene 0 #

  • Target Scene
    Set to: Town

Scene Changer (to Deep Forest) #

Now, create a duplicate of the Scene Changer and move the new copy to the left side of the forest.

We’ll connect it to the Deep Forest scene.

Transform #

  • Position
    Set to X=-20, Y=-3.5, Z=0.

Scene Changer > Target Scene 0 #

  • Target Scene
    Set to: Deep Forest

Box Colider 2D #

We’ll adjust the size to fit the exit.

  • Size
    Set to X=1, Y=3.

Add Spawn Point #

Next, we’ll add a new spawn point. Creating a new one instead of copying the existing spawn point will automatically set it to use a new, unused Spawn ID.

Use the scene hierarchy context menu to create a new spawn point: Makinom > Spawn Point

The Spawn ID should be set to 1.

Transform #

  • Position
    Set to X=-18, Y=-3.5, Z=0.

Spawn Point #

  • Use Rotation
    Enable Z.

Add Camera Border #

Select the Camera Border game object and add a Camera Border component to it using the component menu.

That’s it for the scene, save your changes.

Deep Forest Scene Setup #

Like before, select the following game objects in Forest scene:

  • ORK Game Starter
  • Spawn Point 0
  • Music Player
  • Scene Changer (one of them)

Copy them to the clipboard.

Now, open the Deep Forest scene (Assets/Scenes/) and paste the copied game objects into the scene.

This time, ORK Game Starter and Music Player can be left as they are, since it already plays the Forest music.

Spawn Point 0 #

We’ll again adjust it’s position – but the rotation is already what we need (Z=180).

Transform #

  • Position
    Set to X=18, Y=9.5, Z=0.

Scene Changer (to Forest) #

Adjust the position, target scene and spawn ID (we now spawn at spawn point 1).

Transform #

  • Position
    Set to X=20, Y=9.5, Z=0.

Scene Changer > Target Scene 0 #

  • Target Scene
    Set to: Forest
  • Value (Spawn ID)
    Set to 1.

Box Colider 2D #

If you’ve copied the bigger scene changer, adjust the size of the colider.

  • Size
    Set to X=1, Y=3.

Add Camera Border #

Select the Camera Border game object and add a Camera Border component to it using the component menu.

That’s it for the scene, save your changes.

Battle Forest Scene and Battle Deep Forest Scene Setup #

The setup for the Battle Forest and Battle Deep Forest scene is the same – all we need to do is add a Spawn Point at the center (X=0, Y=0, Z=0).

We’ll later use this to spawn the battle.

Add Spawn Point #

Use the scene hierarchy context menu to create a new spawn point: Makinom > Spawn Point

The Spawn ID should be set to 0.

Transform #

  • Position
    Set to X=0, Y=0, Z=0.

Start Menu Scene Setup #

And lastly, open the Start Menu scene.

We’ll add a music player to stop whatever music is playing and a game starter (but not set up to start the game).

Add Game Starter #

Use the scene hierarchy context menu to add an ORK Game Starter: ORK Framework > ORK Game Starter

We can keep the default setup – i.e. the Project asset is already selected and Start Game is disabled.

Add Music Player #

Use the scene hierarchy context menu: Makinom > Music Player

  • Play Type
    Select Stop.

Save the changes you’ve made in the scene.

Testing #

Open the Town, Forest or Deep Forest scene and hit play.

You can now move between scenes and enjoy how the music changes. Though, the scene changes look a bit off, because we’re missing the screen fades without having a UI system set up.


So, next, we’ll set up the UI system!

Share This Article :
  • Facebook
  • Twitter
  • LinkedIn
  • Pinterest
Updated on March 6, 2023
Table of Contents
  • Music
    • 0: Town
    • 1: Forest
    • 2: Battle
    • 3: Victory
    • 4: Lost
  • Save Changes
  • Town Scene Setup
    • Add Music Player
    • Add Scene Changer
      • Transform
      • Scene Changer
      • Circle Colider 2D
      • Box Colider 2D
  • Forest Scene Setup
    • Spawn Point 0
      • Transform
    • Music Player
    • Scene Changer (to Town)
      • Transform
      • Scene Changer > Target Scene 0
    • Scene Changer (to Deep Forest)
      • Transform
      • Scene Changer > Target Scene 0
      • Box Colider 2D
    • Add Spawn Point
      • Transform
      • Spawn Point
    • Add Camera Border
  • Deep Forest Scene Setup
    • Spawn Point 0
      • Transform
    • Scene Changer (to Forest)
      • Transform
      • Scene Changer > Target Scene 0
      • Box Colider 2D
    • Add Camera Border
  • Battle Forest Scene and Battle Deep Forest Scene Setup
    • Add Spawn Point
      • Transform
  • Start Menu Scene Setup
    • Add Game Starter
    • Add Music Player
  • Testing
Sitemap
  • Features
  • Showcase
  • Guide
    • Documentation
    • Tutorials
    • API
  • ORK 2 Hub
    • Tutorials
    • Plugins
    • API
  • Support
  • Forum
  • Get ORK
  • Contact
  • Blog
  • Makinom
  • gamingislove.com
Categories
  • News (60)
  • ORK 2 (137)
    • Tutorial (137)
      • Game tutorial (50)
      • Gameplay (32)
      • How-to (55)
  • Release (130)
Search

© 2015 Gaming is Love e.U.

Disclosure: This site may contain affiliate links, which means I may receive a commission if you click a link and purchase something that I have recommended. While clicking these links won’t cost you any money, they will help me fund my development projects while recommending great assets!