
In this tutorial we’ll set up use ranges and affect ranges for the abilities.
We’ve already set up the default use range (in Battles > Battle System > General Settings) using the Range 1 battle range template, i.e. directly neighboring cells.
This use range is already enough for most of our abilities, and we’ll also stick with it for all of our items – i.e. items can only be used on the user itself and combatants right beside the user. However, we’ll update our ranged abilities to use the Range 5 battle range template.
We’ll also add a new battle range template for all bow/shooting abilities – they’ll have a larger range, but can only be used in a forward cone.
Additionally, we’ll add an affect range (using Range 1 template) to most of the elemental magic abilities and also change them to target a grid cell (via None target range) instead of a combatant.
Since we’ll use the same setup for multiple abilities, we’ll create new target selection templates that’ll use the use range and affect range settings we want.
We’ll also set up the equipment prefabs that’ll be used by our equipment viewers.
Let’s get to it.
Shoot Battle Range Template #
Open the Makinom editor, navigate to Templates > Battle Range Templates and add a new template.
- Name
Set to: Shoot Range
Grid Shape #
- Shape Type
Select Mask.
This allows us to set up which cells are used in a cell mask. - Range (Cells)
Set to 8. - Local Space
Enable this setting.
The grid shape will rotate with the combatant using it, e.g. our archer’s rotation on the grid will determine which enemies can be shot.
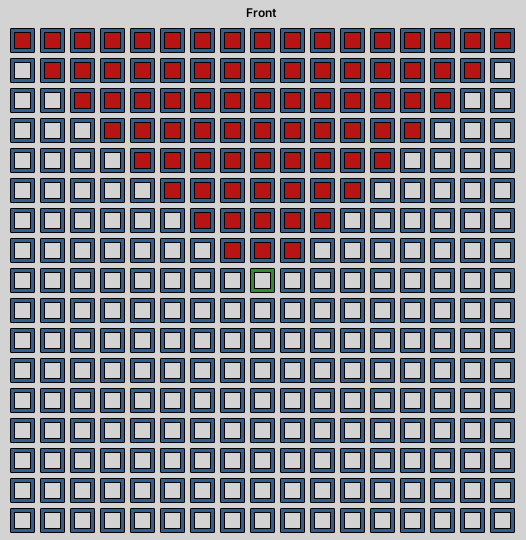
Grid Mask #
The grid mask determines the cells that will be used.
Click on Create Mask to create the actual grid mask based on the Range setting. When you cange the range, you need to recreate the mask.
You’ll get a rather large, empty grid mask. You can select and deselect cells by clicking on them.
I’m sorry, but you’ll now have to do a lot of clicking to create a cone from the center (green cell) to the front. It should look like this:
Line of Sight #
We’ll also use line of sight.
- Use Line of Sight
Enable this setting. - LOS Blocked Cells
Enable this setting. - LOS Allied Combatants
Disable this setting. - LOS Enemy Combatants
Disable this setting.
Target Selection Templates #
Navigate to Templates > Target Selection Templates and add a new template.
Enemy Single Range 5 #
First, we’ll set up a target selection to target a single enemy with a use range of 5.
- Name
Set to: Enemy Single Range 5
Target Settings #
- Target Type
Select Enemy. - Target Range
Select Single.
Use Range Setting #
- Own Use Range
Enable this setting.
Click on Add Range.
- Range Type
Select Template. - Template
Select Range 5.
Enemy Single Shoot Range #
Copy the Enemy Single Range 5 template, this time we’ll use the Shoot Range.
- Name
Set to: Enemy Single Shoot Range
Use Range Setting > Range 0 #
- Template
Select Shoot Range.
Enemy Group Shoot Range #
Copy the Enemy Single Shoot Range template, we also need a Group version for the Round Shot ability.
- Name
Set to: Enemy Group Shoot Range
Target Settings #
- Target Range
Select Group.
Enemy Cell Affect Range #
Copy the Enemy Single Range 5 template, we’ll set up another version that targets a cell instead of a combatant and uses an affect range to get targets.
- Name
Set to: Enemy Cell Affect Range
Target Selection Settings > Target Settings #
- Target Range
Select None. - Select Target Cell
Enable this setting.
Affect Range Setting #
The affect range will use combatants around the actual target (in our case, the selected cell) as targets.
- Affect Range
Select Execution.
The affected targets are selected when the action starts executing.
Click on Add Range.
- Range Type
Select Template. - Template
Select Range 1.
Ally Single Range 5 #
The last template will be for targeting single allies – copy the Enemy Single Range 5 template and change the target type.
- Name
Set to: Ally Single Range 5
Target Settings #
- Target Type
Select Ally.
Updating Abilities #
Navigate to Status > Abilities.
Updating Ally Single Range 5 #
The use range setup is the same for all abilities.
We’ll update:
- heal
- cure
- regeneration
- faster
Also, keep in mind that heal has 3 levels (although we probably don’t use them in this tutorial).
Target Selection Settings #
- Target Selection Type
Select Template. - Template
Select Ally Single Range 5.
Updating Enemy Single Range 5 #
The use range setup is the same for all abilities.
We’ll update:
- drain
- slower
- shut up!
- study
- light
Also, keep in mind that light has 3 levels (although we probably don’t use them in this tutorial).
Target Selection Settings #
- Target Selection Type
Select Template. - Template
Select Enemy Single Range 5.
Updating Shoot Abilities #
We’ll update:
- shoot
- double shot
- round shot
Target Selection Settings #
- Target Selection Type
Select Template. - Template
Shoot, Double Shot: Select Enemy Single Shoot Range.
Round Shot: Select Enemy Group Shoot Range.
Updating Cell Affect Range #
Again, the setup is the same for all abilities.
We’ll update:
- fire
- water
- quake
- wind
- dark
- electro
Again, keep in mind that the elemental magic abilities have 3 levels.
Target Selection Settings #
- Target Selection Type
Select Template. - Template
Select Enemy Cell Affect Range.
Equipment Prefabs #
Since we’re already dealing with repeating setups on different things, we’ll also add the prefabs for our equipment that’ll be used by the Equipment Viewer component we already set up.
Navigate to Inventory > Equipment.
We’ll update all daggers, swords, axes, hammers, bows and saves. The setup is the same for all, just with different prefabs.
You can find the prefabs in Assets/Tutorial Assets/Prefabs/Weapons/.
Item Settings > Prefab Settings #
- Viewer Prefab
Daggers: Select Dagger.
Swords: Select Sword.
Axes: Select Axe.
Hammers: Select Hammer.
Bows: Select Bow.
Staves: Select Staff.
Save Changes #
And that’s it for the ability range and equipment setup.
Don’t forget to save your changes by clicking on Save Settings at the bottom of the editor.
Testing #
Hit play in the Forest Battle 1 scene – place a ranger, wizard and cleric for this test.
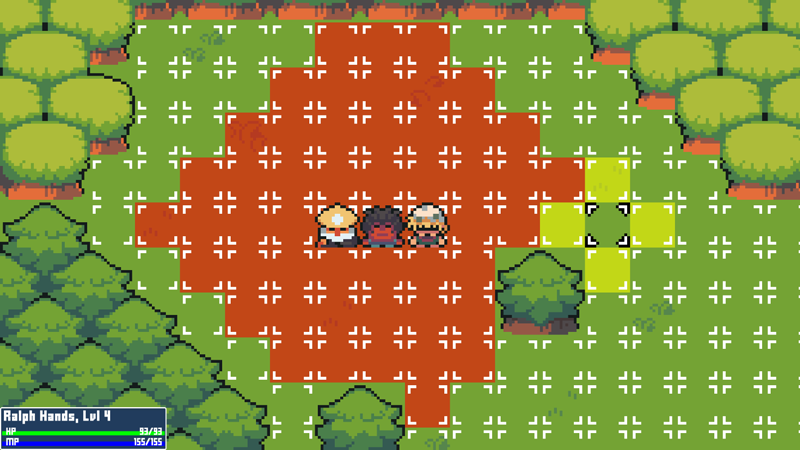
E.g. using the wizard, you can use the Fire ability, which highlights it’s use range and the affect range around the selected cell.
Next, we’ll start animating our actions with schematics.


