ORK Framework Logo - RPG Editor for Unity
  • Features
  • Showcase
  • Guide
    • Documentation
    • Tutorials
    • API
  • ORK 2
    • Tutorials
    • Plugins
    • API
  • Support
  • Forum
  • Get ORK

2D RPG Quickstart

30
  • START 2D RPG Quickstart
  • 01 Initial Setup
  • 02 Player Setup
  • 03 Music & Scenes
  • 04 UI System Setup
  • 05 UI Boxes
  • 06 Flying Texts
  • 07 Status Values
  • 08 Status Effects
  • 09 First Abilities
  • 10 Fighter Setup
  • 11 First Enemies & Battle AI
  • 12 Battle System Setup
  • 13 Animating Battle Start and End
  • 14 Random Battles
  • 15 Animating Actions
  • 16 Player Battle HUD
  • 17 Elemental Attacks
  • 18 Animating More Actions
  • 19 Inventory & Loot
  • 20 Equipment
  • 21 Loot, Start Equipment & Viewers
  • 22 Magic Abilities
  • 23 Caster Setup
  • 24 More Enemies
  • 25 Start Menu & Save Games
  • 26 Menu Screens
  • 27 Interactions
  • 28 Item Collectors
  • END 2D RPG Quickstart

3D RPG Quickstart

30
  • START 3D RPG Quickstart
  • 01 Initial Setup
  • 02 Player Setup
  • 03 Music & Scenes
  • 04 UI System Setup
  • 05 UI Boxes
  • 06 Flying Texts
  • 07 Status Values
  • 08 Status Effects
  • 09 First Abilities
  • 10 Fighter Setup
  • 11 First Enemies & Battle AI
  • 12 Battle System Setup
  • 13 Animating Battle Start and End
  • 14 Random Battles
  • 15 Animating Actions
  • 16 Player Battle HUD
  • 17 Elemental Attacks
  • 18 Animating More Actions
  • 19 Inventory & Loot
  • 20 Equipment
  • 21 Loot, Start Equipment & Viewers
  • 22 Magic Abilities
  • 23 Caster Setup
  • 24 More Enemies
  • 25 Start Menu & Save Games
  • 26 Menu Screens
  • 27 Interactions
  • 28 Item Collectors
  • END 3D RPG Quickstart

Status System Setup

24
  • START Status System Setup
  • 01 Status Values
  • 02 Status Development
  • 03 Attack/Defence Modifiers
  • 04 Status Effects
  • 05 Formulas
  • 06 Ability & Item Types
  • 07 Abilities Part 1: Attacks
  • 08 Abilities Part 2: Support & Sabotage
  • 09 Abilities Part 3: Elemental Magic
  • 10 Items
  • 11 Equipment Part 1: Slots & Slot Set Templates
  • 12 Equipment Part 2: Weapons
  • 12.5 (Optional) Equipment Part 2.5: Weapons
  • 13 Equipment Part 3: Shields, Armor & Accessories
  • 13.5 (Optional) Equipment Part 3.5: Shields, Armor & Accessories
  • 14 Equipment Part 4: Available Equipment Templates
  • 15 Loot
  • 16 Battle AIs
  • 17 Combatants Part 1: General Settings
  • 18 Combatants Part 2: Players
  • 19 Combatants Part 3: Enemies
  • 20 Combatant Groups
  • END Status System Setup

3D RPG Playground

53
  • START 3D RPG Playground
  • 01 Player Setup
  • 02 Start Menu
  • 03 First Interaction
  • 04 Music
  • 05 Areas
  • 06 Collecting Items
  • 07 Displaying Equipment
  • 08 Combatant Prefabs, Icons & Portraits
  • 09 Combatant Animations
  • 10 Camera Positions
  • ANIM 01 Battle Start/End Schematics
  • ANIM 02 Use, Cast & Camera
  • ANIM 03 Abilities & Items
  • ANIM 04 Physical Attacks
  • ANIM 05 Special Actions
  • BATTLE 01 Battle Menu
  • BATTLE 02 Prepare for Battle
  • TURN 01 Turn Based Setup
  • TURN 02 Turn Order HUD
  • ATB 01 Active Time Setup
  • ATB 02 Cast Times
  • ATB 03 Timebar HUD
  • BATTLE 03 The First Battle
  • BATTLE 04 Hunting Move AI
  • BATTLE 05 Spawning Combatants
  • 11 Save Games
  • MENU 01 UI Boxes
  • MENU 02 Template HUDs
  • MENU 03 Overview Menu
  • MENU 04 Menu Screens
  • 12 Shop
  • BATTLE 06 Random Battles
  • DUNGEON 01 Enter the Dungeon
  • DUNGEON 02 The Trapdoor
  • DUNGEON 03 Enemies on Level 1 & 2
  • DUNGEON 04 Traps on Level 3
  • DUNGEON 05 Going Deeper
  • 13 Bestiary (+MENU+ANIM)
  • QUEST 01 Hunting Quests (+MENU)
  • QUEST 02 Guard NPC
  • QUEST 03 Forest Ruin Cheese
  • QUEST 04 Witch NPC with Cheese
  • QUEST 05 Quest Mark HUDs
  • 14 Research Trees (+MENU)
  • CRAFT 01 Crafting Materials
  • CRAFT 02 Crafting Recipes
  • CRAFT 03 Crafting Menu
  • CRAFT 04 Crafting Proficiency & Critical Crafting
  • CRAFT 05 Materials Loot
  • 15 Changing Choice Dialogue
  • 16 Follow Me!
  • BATTLE 07 Sequence Loot Dialogue

3D Action RPG

20
  • START 3D Action RPG
  • 01 Status System Setup
  • 02 Player Setup
  • 03 Player Weapon
  • 04 Player Attacks
  • 05 Enemy: Chomper
  • 06 Chomper Attack
  • 07 Hit & Death
  • 08 HUDs
  • 09 Rolling on the Floor
  • 10 Enemy: Spitter
  • 11 Spit Attack
  • 12 Potion
  • 13 Grenade
  • 14 Item HUD
  • 15 Enemy: Grenadier
  • 16 Grenadier Melee Attacks
  • 17 Grenadier Flamethrower
  • 18 Item Drops
  • END 3D Action RPG

2D Grid Battle RPG

17
  • START 2D Grid Battle RPG
  • 01 Player Setup
  • 02 Prefab & Music Setup
  • 03 Randomizing Combatants
  • 04 UI Setup
  • 05 Battle Start, End & Phase Schematics
  • 06 Battle System Setup
  • 07 Battle Grid Setup
  • 08 Grid Move
  • 09 Forest Battle Grid
  • 10 Battle AI
  • 11 Ability Ranges
  • 12 Death & Use Schematics
  • 13 Attack Schematic
  • 14 Shoot Schematics
  • 15 Battle Selection Interaction
  • END 2D Grid Battle RPG

Schematics

10
  • Simple Start Schematic
  • Battle Start Schematic
  • Battle End Schematic
  • Moving to Target and Back
  • Animating a Base Attack
  • Animating a Magic Ability
  • Animating Target Selection
  • Grid Movement
  • Open and Close UI Animations
  • Flying Text Mover

UI Setups

16
  • Unity UI: Initial Setup
  • Unity UI: TextMesh Pro Setup
  • Unity UI: UI Box
  • Unity UI: Flying Text
  • Unity UI: Dragging Notification
  • Unity UI: Canvas with Screen Space Camera
  • Unity UI: Interaction HUD
  • Unity UI: Simple Player HUD
  • Unity UI: Quest HUD
  • Unity UI: Battle Actions HUD
  • Unity UI: Shortcuts HUD
  • Unity UI: Currency HUD
  • Unity UI: Tooltip HUD
  • Unity UI: Control HUD
  • Unity UI: Attack Modifiers
  • Unity UI: Defence Modifiers

Gameplay Bits

13
  • 2.5D Setup
  • Body Part Weakpoint
  • Click Attack
  • Combining Input Origins
  • Combining Status Value Flying Texts
  • Fun With Flying Text
  • HUD Effects With Conditional Schematics
  • Inventory Containers
  • Local Multiplayer
  • Multi Interaction Controllers
  • Target Selection Lines
  • World Space HUD
  • World Space Dialogue
  • Home
  • Guide
  • Tutorials
  • Schematics
  • Grid Movement
View Categories

Grid Movement

Create a schematic to follow a path on a battle grid.

In this tutorial we’ll create a simple schematic to animate the grid move action. We’ll follow the selected path cell by cell, performing possible grid cell events on the cells we move over/to.

Movement is handled using the Change Position node – the setup described here will use the Auto move component selection. This’ll try to select the appropriate component for movement, but this might not result in the desired outcome for all setups. If movement doesn’t work in your setup, try one of the different move components based on your setup (e.g. Character Controller or Combatant Movement Component).

Grid Move Schematic #

This schematic will move the user of a battle action (e.g. the grid move action) to the action’s target. You can also use it in other battle actions – schematics can also set a grid path for any action. The user of the action is the Machine Object of the schematic.

The grid move action provides the path from the user’s current position to the target position, we’ll simply go through this path cell by cell, moving from cell to cell.

Navigate to Schematics and start working on a new schematic.

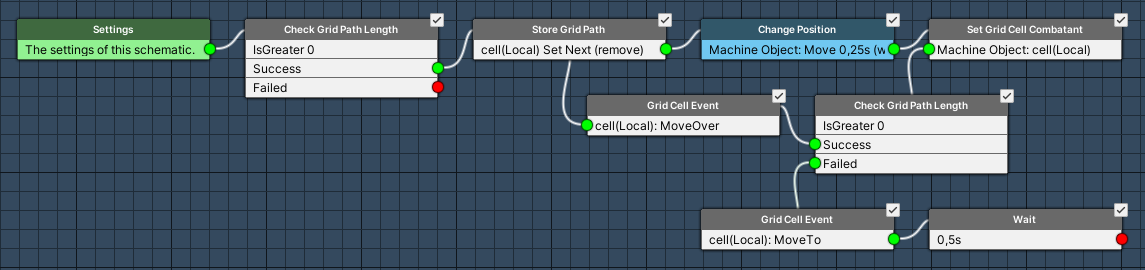
You can download the finished schematic here:

Download Schematic


Check Grid Path Length #

Add Node > Battle > Grid Path > Check Grid Path Length

We’ll first check if there even is a grid path, i.e. if it’s length is greater than 0.

  • Check Type
    Select Is Greater.
  • Check Value
    Select Value > Value.
    Set the value to 0.

Store Grid Path #

Add Node > Battle > Grid Path > Store Grid Path

This node is used to store a cell from the path into selected data – you can either store the whole path, the next or last cell.

We’ll store the next cell on the path and also remove the cell from the path, so that we can later continue with the next cell after this one.

  • Data Key
    Set to cell.
  • Data Origin
    Select Local.
  • Change Type
    Select Set.
  • Cell Selection
    Select Next.
  • Remove Cell
    Enable this setting.

Change Position #

Add Node > Movement > Movement > Change Position

We’ll now move the user (Machine Object) to the stored cell.

  • Object (Moving Object)
    Select Machine Object.
  • Move Component
    Select Auto.
    Please note that you might need to use a different selection based on your setup.
  • To Object
    Enable this setting.
  • Object
    Select Selected Data.
  • Data Key
    Set to cell.
  • Data Origin
    Select Local.

We’ll move to the cell instead of setting directly to the position.

  • Move
    Enable this setting.
  • Wait
    Enable this setting.
    We wait for the movement to finish before continuing.
  • Move By Speed
    Disable this setting.
    We’ll interpolate to the new position.
  • Time
    Select Value > Value.
    Set the value to 0.25.

You can also enable Move By Speed and move at a fixed speed instead.

Set Grid Cell Combatant #

Add Node > Battle > Grid Cell > Set Grid Cell Combatant

We’ll register the combatant on the cell we just moved to – this’ll update the combatant’s cell highlight.

  • Object (Combatant Settings)
    Select Machine Object.
  • Set As
    Select Move.
    This’ll register the combatant as moving on the cell.
    In case another combatant is already on the cell, it’ll not replace it.
  • Object (Grid Cell Settings)
    Select Selected Data.
  • Data Key
    Set to cell.
  • Data Origin
    Select Local.

Check Grid Path Length #

Copy the first Check Grid Path Lengt node.

We’re done with our move to the next cell, so we’ll check if we finished the path.

Grid Cell Event #

Add Node > Battle > Grid Cell Event > Grid Cell Event

We don’t use grid cell events in our tutorial, but it’s always good to have them included in your grid move in case you later add them.

Grid cell events allow to perform certain things when a combatant moves over or moves to a cell, or starts/ends their turn on a cell. E.g. you can change status effects, use schematics or an ability on the combatant.

This node is connected to the Success slot of the previous Check Grid Path Length node, i.e. we still have some of the path left to go.

The Next slot of this node is connected back to the Store Grid Path node.

  • Start Type
    Select Move Over.
    We’re continuing on the path, i.e. we move over this cell.
  • Wait
    Enable this setting.
  • Object (Cell Object)
    Select Selected Data.
  • Data Key
    Set to cell.
  • Data Origin
    Select Local.
  • Object (Combatant)
    Select Machine Object.

Grid Cell Event #

Copy the previous Grid Cell Event.

This node is connected to the Failed slot of the previous Check Grid Path Length node, i.e. we’re done with our move.

  • Start Type
    Select Move To.
    We’re done with the path, i.e. we move to this cell.

Wait (Optional) #

Add Node > Base > Wait

We’ll wait for a short time, just to slow things down a bit.

  • Time
    Select Value > Value.
    Set the value to 0.5.

And that’s it for the schematic. Click on Save Schematic to save it, e.g. as GridMove.

Using the Schematic #

The schematic is used to animate the grid move action – the default animation for all combatants is set up in Battles > Battle Grid Settings in the Move Command settings.

Navigate to Battles > Battle Grid Settings.

Move Command > Default Battle Animation #

This is where we set up our grid move schematic – combatants can optionally override the default animation.

Click on Add Battle Animation.

  • Schematic Asset
    Select the GridMove schematic.


Check out the 2D Grid Battle RPG tutorial series for a complete setup using battle grids.

Share This Article :
  • Facebook
  • X
  • LinkedIn
  • Pinterest
Table of Contents
  • Grid Move Schematic
    • Check Grid Path Length
    • Store Grid Path
    • Change Position
    • Set Grid Cell Combatant
    • Check Grid Path Length
    • Grid Cell Event
    • Grid Cell Event
    • Wait (Optional)
  • Using the Schematic
    • Move Command > Default Battle Animation
Sitemap
  • Features
  • Showcase
  • Guide
    • Documentation
    • Tutorials
    • API
  • ORK 2 Hub
    • Tutorials
    • Plugins
    • API
  • Support
  • Forum
  • Get ORK
  • Contact
  • Blog
  • Makinom
  • gamingislove.com
Categories
  • News (69)
  • ORK 2 (137)
    • Tutorial (137)
      • Game tutorial (50)
      • Gameplay (32)
      • How-to (55)
  • Release (149)
Search

© 2015 Gaming is Love e.U.

Disclosure: This site may contain affiliate links, which means I may receive a commission if you click a link and purchase something that I have recommended. While clicking these links won’t cost you any money, they will help me fund my development projects while recommending great assets!