ORK Framework Logo - RPG Editor for Unity
  • Features
  • Showcase
  • Guide
    • Documentation
    • Tutorials
    • API
  • ORK 2
    • Tutorials
    • Plugins
    • API
  • Support
  • Forum
  • Get ORK

2D RPG Quickstart

  • START 2D RPG Quickstart
  • 01 Initial Setup
  • 02 Player Setup
  • 03 Music & Scenes
  • 04 UI System Setup
  • 05 UI Boxes
  • 06 Flying Texts
  • 07 Status Values
  • 08 Status Effects
  • 09 First Abilities
  • 10 Fighter Setup
  • 11 First Enemies & Battle AI
  • 12 Battle System Setup
  • 13 Animating Battle Start and End
  • 14 Random Battles
  • 15 Animating Actions
  • 16 Player Battle HUD
  • 17 Elemental Attacks
  • 18 Animating More Actions
  • 19 Inventory & Loot
  • 20 Equipment
  • 21 Loot, Start Equipment & Viewers
  • 22 Magic Abilities
  • 23 Caster Setup
  • 24 More Enemies
  • 25 Start Menu & Save Games
  • 26 Menu Screens
  • 27 Interactions
  • 28 Item Collectors
  • END 2D RPG Quickstart

3D RPG Quickstart

  • START 3D RPG Quickstart
  • 01 Initial Setup
  • 02 Player Setup
  • 03 Music & Scenes
  • 04 UI System Setup
  • 05 UI Boxes
  • 06 Flying Texts
  • 07 Status Values
  • 08 Status Effects
  • 09 First Abilities
  • 10 Fighter Setup
  • 11 First Enemies & Battle AI
  • 12 Battle System Setup
  • 13 Animating Battle Start and End
  • 14 Random Battles
  • 15 Animating Actions
  • 16 Player Battle HUD
  • 17 Elemental Attacks
  • 18 Animating More Actions
  • 19 Inventory & Loot
  • 20 Equipment
  • 21 Loot, Start Equipment & Viewers
  • 22 Magic Abilities
  • 23 Caster Setup
  • 24 More Enemies
  • 25 Start Menu & Save Games
  • 26 Menu Screens
  • 27 Interactions
  • 28 Item Collectors
  • END 3D RPG Quickstart

Status System Setup

  • START Status System Setup
  • 01 Status Values
  • 02 Status Development
  • 03 Attack/Defence Modifiers
  • 04 Status Effects
  • 05 Formulas
  • 06 Ability & Item Types
  • 07 Abilities Part 1: Attacks
  • 08 Abilities Part 2: Support & Sabotage
  • 09 Abilities Part 3: Elemental Magic
  • 10 Items
  • 11 Equipment Part 1: Slots & Slot Set Templates
  • 12 Equipment Part 2: Weapons
  • 12.5 (Optional) Equipment Part 2.5: Weapons
  • 13 Equipment Part 3: Shields, Armor & Accessories
  • 13.5 (Optional) Equipment Part 3.5: Shields, Armor & Accessories
  • 14 Equipment Part 4: Available Equipment Templates
  • 15 Loot
  • 16 Battle AIs
  • 17 Combatants Part 1: General Settings
  • 18 Combatants Part 2: Players
  • 19 Combatants Part 3: Enemies
  • 20 Combatant Groups
  • END Status System Setup

3D RPG Playground

  • START 3D RPG Playground
  • 01 Player Setup
  • 02 Start Menu
  • 03 First Interaction
  • 04 Music
  • 05 Areas
  • 06 Collecting Items
  • 07 Displaying Equipment
  • 08 Combatant Prefabs, Icons & Portraits
  • 09 Combatant Animations
  • 10 Camera Positions
  • ANIM 01 Battle Start/End Schematics
  • ANIM 02 Use, Cast & Camera
  • ANIM 03 Abilities & Items
  • ANIM 04 Physical Attacks
  • ANIM 05 Special Actions
  • BATTLE 01 Battle Menu
  • BATTLE 02 Prepare for Battle
  • TURN 01 Turn Based Setup
  • TURN 02 Turn Order HUD
  • ATB 01 Active Time Setup
  • ATB 02 Cast Times
  • ATB 03 Timebar HUD
  • BATTLE 03 The First Battle
  • BATTLE 04 Hunting Move AI
  • BATTLE 05 Spawning Combatants
  • 11 Save Games
  • MENU 01 UI Boxes
  • MENU 02 Template HUDs
  • MENU 03 Overview Menu
  • MENU 04 Menu Screens
  • 12 Shop
  • BATTLE 06 Random Battles
  • DUNGEON 01 Enter the Dungeon
  • DUNGEON 02 The Trapdoor
  • DUNGEON 03 Enemies on Level 1 & 2
  • DUNGEON 04 Traps on Level 3
  • DUNGEON 05 Going Deeper
  • 13 Bestiary (+MENU+ANIM)
  • QUEST 01 Hunting Quests (+MENU)
  • QUEST 02 Guard NPC
  • QUEST 03 Forest Ruin Cheese
  • QUEST 04 Witch NPC with Cheese
  • QUEST 05 Quest Mark HUDs
  • 14 Research Trees (+MENU)
  • CRAFT 01 Crafting Materials
  • CRAFT 02 Crafting Recipes
  • CRAFT 03 Crafting Menu
  • CRAFT 04 Crafting Proficiency & Critical Crafting
  • CRAFT 05 Materials Loot
  • 15 Changing Choice Dialogue
  • 16 Follow Me!
  • BATTLE 07 Sequence Loot Dialogue

3D Action RPG

  • START 3D Action RPG
  • 01 Status System Setup
  • 02 Player Setup
  • 03 Player Weapon
  • 04 Player Attacks
  • 05 Enemy: Chomper
  • 06 Chomper Attack
  • 07 Hit & Death
  • 08 HUDs
  • 09 Rolling on the Floor
  • 10 Enemy: Spitter
  • 11 Spit Attack
  • 12 Potion
  • 13 Grenade
  • 14 Item HUD
  • 15 Enemy: Grenadier
  • 16 Grenadier Melee Attacks
  • 17 Grenadier Flamethrower
  • 18 Item Drops
  • END 3D Action RPG

2D Grid Battle RPG

  • START 2D Grid Battle RPG
  • 01 Player Setup
  • 02 Prefab & Music Setup
  • 03 Randomizing Combatants
  • 04 UI Setup
  • 05 Battle Start, End & Phase Schematics
  • 06 Battle System Setup
  • 07 Battle Grid Setup
  • 08 Grid Move
  • 09 Forest Battle Grid
  • 10 Battle AI
  • 11 Ability Ranges
  • 12 Death & Use Schematics
  • 13 Attack Schematic
  • 14 Shoot Schematics
  • 15 Battle Selection Interaction
  • END 2D Grid Battle RPG

Schematics

  • Simple Start Schematic
  • Battle Start Schematic
  • Battle End Schematic
  • Moving to Target and Back
  • Animating a Base Attack
  • Animating a Magic Ability
  • Grid Movement
  • Open and Close UI Animations
  • Flying Text Mover

UI Setups

  • Unity UI: Initial Setup
  • Unity UI: TextMesh Pro Setup
  • Unity UI: UI Box
  • Unity UI: Flying Text
  • Unity UI: Dragging Notification
  • Unity UI: Canvas with Screen Space Camera
  • Unity UI: Interaction HUD
  • Unity UI: Simple Player HUD
  • Unity UI: Quest HUD
  • Unity UI: Shortcuts HUD
  • Unity UI: Currency HUD
  • Unity UI: Tooltip HUD
  • Unity UI: Control HUD
  • Unity UI: Attack Modifiers
  • Unity UI: Defence Modifiers

Gameplay Bits

  • Combining Input Origins
  • Combining Status Value Flying Texts
  • Fun With Flying Text
  • HUD Effects With Conditional Schematics
  • Inventory Containers
  • Multi Interaction Controllers
  • World Space HUD
  • World Space Dialogue
  • Home
  • Guide
  • Tutorials
  • 3D RPG Playground
  • BATTLE 03 The First Battle

BATTLE 03 The First Battle

Table of Contents
  • Adding the Battle
    • Battle Component
      • Battle Settings
      • Combatant Settings
  • Testing
    • Transform (Battle)
  • Getting the gang back together
    • Join Group (2)
    • Join Group (3)
    • Join Group (4)
    • Join Group (5)
    • Join Group (6)
  • Testing Again

In this tutorial we’ll set up the first battle of the game.

This tutorial continues the sub-series for setting up battles.

It is finally time to add our first battle to the game. We’ll set up a single, non-repeatable battle using a Battle component.

Learn more about the different ways to add battles to your scenes in this documentation.

Adding the Battle #

Open the World scene (Assets/Scenes/) if you don’t have it open already.

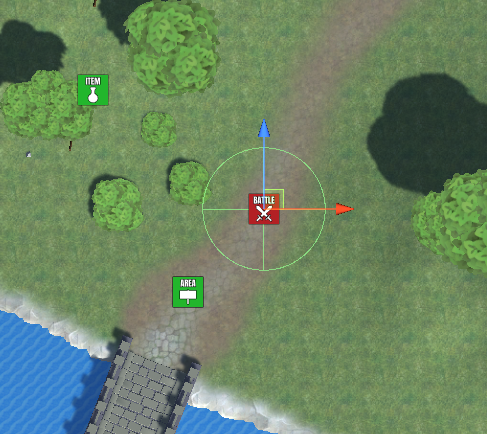
You can either use the scene hierarchy context menu (ORK Framework > Battle > Battle (3D)) or the Makinom scene wizard (Create Game Object > Battle (3D)) to create a ready-to-use battle. It’ll add a new game object with a Battle component and a Sphere Collider (uses as trigger) attached. The battle starts when the player enters the trigger.

Add the battle a short distance away from the bridge outside of town.

Battle Component #

Let’s take a look at the Battle component’s setup in the inspector.

We’ll use a scene ID to remember if this battle was already finished or not – this works the same as with Item Collectors.

  • Use Scene ID
    Enable this setting.
    The scene ID is already set to 0, since this is the first battle added to the scene.

Battle Settings #

Since this is the first battle of the game, we want the player to not be able to escape from it.

  • Can Escape
    Disable this setting.

The rest of the battle settings are usually not used very often, unless you want to override something, e.g. using a different battle system or battle start/end schematic.

Combatant Settings #

This is where you can add combatants or combatant groups that’ll be part of the battle.

There’s already a combatant added, so let’s set it up correctly.

  • Faction
    Select Enemies.
    It’s crucial to use a faction that is an enemy of the player, otherwise the battle won’t start.
  • Use Group
    Disable this setting.
    We’ll use a defined, single combatant.
  • Combatant
    Select Wasp.

You can leave the rest of the settings as they are.

Don’t forget to save the scene.

Testing #

Hit play and test your first battle – run out of town and along the road until you enter the battle’s trigger.

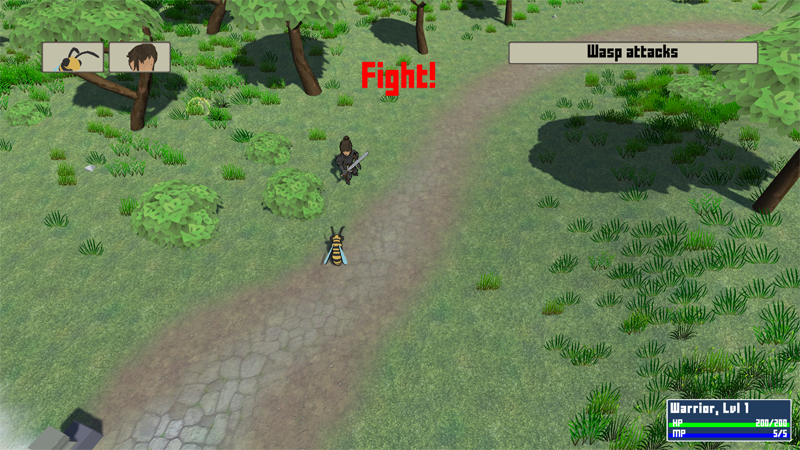
Allright – everything seems to be working!

The battle starts, camera zooms in, actions animate – great!

I’d adjust the rotation of the battle a bit, though.

Transform (Battle) #

  • Rotation
    Set to X=0, Y=-135, Z=0.

Hit play and test again.

Much better.

For future references – since the player spots are placed at positive Z axis and the enemy at negative Z axis in the battle’s local space, you can determine how combatants are placed based on the blue arrow of the game object:

The player will be placed in the direction of the blue arrow, the enemy in the other direction.

Getting the gang back together #

Let’s make things a bit easier and allow us to test more actions. We’ll adjust our start game schematic, adding the rest of the player combatants to the player group.

Open the StartGame schematic, e.g. by double clicking on it.

Duplicate the Join Group node 5 times and change their Combatant setting. Don’t forget to connect them with the other nodes.

The first 3 combatants you join to the player grup will be part of the initial battle group, participating in battles. You can switch them with the others using Switch in the battle menu.

Join Group (2) #

  • Combatant
    Select Rogue.

Join Group (3) #

  • Combatant
    Select Cleric.

Join Group (4) #

  • Combatant
    Select Ranger.

Join Group (5) #

  • Combatant
    Select Wizard.

Join Group (6) #

  • Combatant
    Select Monk.

Save the changes by clicking on Save Schematic.

Testing Again #

Hit play again and run to the first battle.

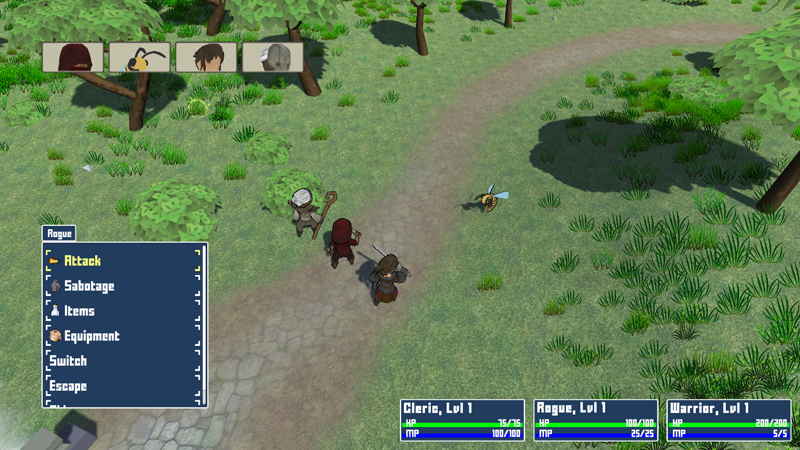
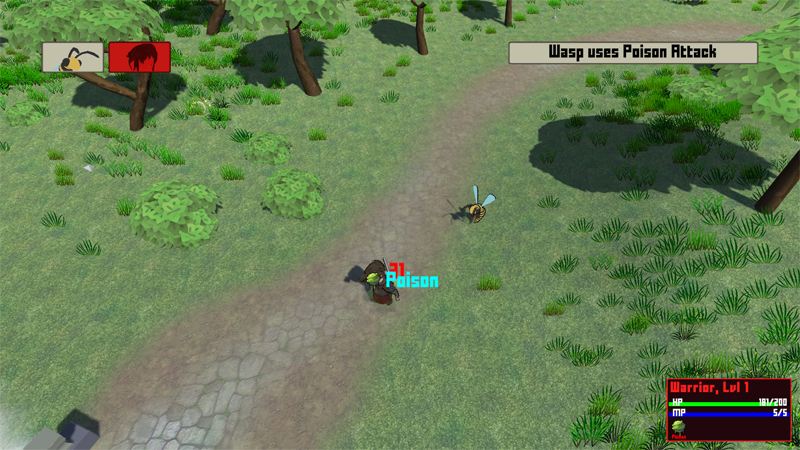
Now the tides have turned!

You’ll notice that suddenly the rogue has the first action isntead of the wasp, as he’s faster.


That’s it for our first battle.

Next, we’ll set up a simple move AI to allow enemies to hunt the player.

Share This Article :
  • Facebook
  • Twitter
  • LinkedIn
  • Pinterest
Updated on December 17, 2021
Table of Contents
  • Adding the Battle
    • Battle Component
      • Battle Settings
      • Combatant Settings
  • Testing
    • Transform (Battle)
  • Getting the gang back together
    • Join Group (2)
    • Join Group (3)
    • Join Group (4)
    • Join Group (5)
    • Join Group (6)
  • Testing Again
Sitemap
  • Features
  • Showcase
  • Guide
    • Documentation
    • Tutorials
    • API
  • ORK 2 Hub
    • Tutorials
    • Plugins
    • API
  • Support
  • Forum
  • Get ORK
  • Contact
  • Blog
  • Makinom
  • gamingislove.com
Categories
  • News (60)
  • ORK 2 (137)
    • Tutorial (137)
      • Game tutorial (50)
      • Gameplay (32)
      • How-to (55)
  • Release (130)
Search

© 2015 Gaming is Love e.U.

Disclosure: This site may contain affiliate links, which means I may receive a commission if you click a link and purchase something that I have recommended. While clicking these links won’t cost you any money, they will help me fund my development projects while recommending great assets!