
Battles can be added to your scenes in different ways.
You’ll use either one or multiple of the available methods to start a battle, depending the situation or style of your game.
Generally, all ways (except for Real Time Battle Areas) involve using a Battle component in some way, either directly by setting it up in the scene, or it being created automatically at runtime to manage the battle. When a Battle component is used, the battle is refered to as an arena battle.
This document only focuses on adding battles to your scenes – if you want to learn more about ORK Framework’s battle systems, see this documenation for details.
If you want to learn more about setting up Battle Grids for your battles, see this documentation.
Battle Components #
The Battle component is used to place a battle at a specific location.
![]()
The battle can either be started directly by the component via various start types (e.g. Trigger Enter or upon Interaction), fighting the enemy combatants that are defined in it, or the component can be used to pre-place battles for other battle starters (e.g. Combatant Spawners or Random Battle Areas).
The Battle Spots defined in Battles > Battle Spots are used to place the combatants participating in battle based on the location of the Battle component’s game object. Optionally, the battle spots can be overridden in the Battle component to manually place them using game objects in the scene.
Additionally, Battle components can override some default battle settings, e.g. the used battle system, battle start/end schematics or player/enemy advantages. E.g. overriding the battle start schematic allows you to have a special battle intro for a bossfight.
Setup for none-start use #
If you want to use a Battle component to place battles for other battle starters like Combatant Spawners or Random Battle Areas, set them up with the following things in mind:
- don’t use a Scene ID
- don’t add combatants
- don’t use any start type, e.g. click on the None button in the Start Settings
Basically, you don’t want the battle to start on it’s own or mark itself as finished after a battle.
Combatant Spawners #
Combatant Spawner components will spawn the defined combatants in the scene.
![]()
You can either use them to spawn combatants at defined positions or within an area by using triggers (colliders). The combatants can optionally respawn after a defined amount of time and be remembered (position, status) when the player leaves the scene.
The spawned combatants can use the Move AI to move around on their own, e.g. enemis can hunt the player based on the settings of their move AI. Spawned combatants will initiate battles with the player upon coming close to the player – this is based on the Auto Start Battles settings of the combatant (default in Combatants > Combatants > General Settings, each combatant can override it).
Battle position #
The battle takes place at the position the player encountered the enemy – this’ll automatically generate a Battle component (on an empty game object).
Optionally, Combatant Spawners can also define a game object with a Battle component or use the nearest Battle game object. This allows to have battles take place at specific locations or override some default battle settings via the Battle component.
Combatant Despawner #
The Combatant Despawner component can be used to manage despawning combatants when out of range or after time.
The despawner handles all combatants in the scene, e.g. create an empty game object and add the Combatant Despawner component to it.
Block Combatant Spawn #
The Block Combatant Spawn component can be used to block combatants from spawning within a defined area. The area is defined by a collider with Is Trigger enabled.
![]()
Can also be used if the component’s game object or it’s child objects where hit by the raycast finding the spawn position. E.g. add the component at the root of your level’s blocking architecture to prevent combatants from spawing there (game objects still need colliders on them to be able to hit them with the raycast).
Random Battle Areas #
Use a Random Battle Area component to add random encounters to your scenes.
![]()
The area in which random battles can happen is defined through a trigger (collider) – when the player moves within the area, random battles can happen.
You can define minimum and maximum distances between battles as well as the random encounter chance. Additionally, the random encounter rate is influenced by the Random Battle Factor (set up in Battles > Battle Systems > General Settings), which can be changed through various things (e.g. equipment, status effects and a setting changable in option menus in-game).
Battle position #
The battle takes place at the position the player is when a random encounter happens – this’ll automatically generate a Battle component (on an empty game object).
Optionally, Random Battle Areas can also define a game object with a Battle component or use the nearest Battle game object. This allows to have battles take place at specific locations or override some default battle settings via the Battle component.
Real Time Battle Areas #
The Real Time Battle Area component is used to create a whole area for fighting real time battles.
![]()
You can either limit the area by using a trigger (collider), or use the whole scene for the real time battles.
Real Time Battle Areas don’t use battle spots or battle start/end schematics.
Using Schematics #
Battles can be started via schematics using the Start Battle node.
This requires the used game object to either be a combatant (e.g. added through an Add Combatant component or being spawned by a Combatant Spawner) or have a Battle component attached and set up correctly. You can also add additional combatants to the battle in the node.
The schematic starting the battle will continue after the battle ended.
Tip: Teleport Battles #
You want your fight to take place in a different scene? This can be done by changing scenes in the battle start/end schematics.
Teleport Battle Start Schematic #
In the battle start schematic, use the following nodes (in that order, but you can also use other nodes between them):
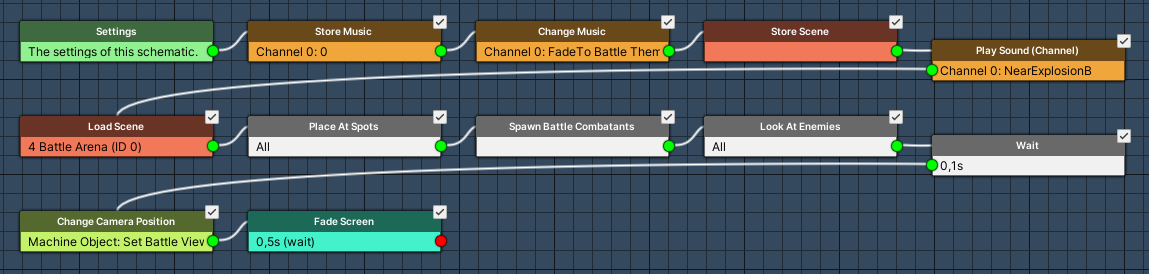
- Store Scene
Stores the current scene and location – we’ll use this to return to it in the battle end event. - Load Scene
Load your battle scene.
It’s crucial to enable Spawn Machine Object, this’ll spawn the battle’s game object instead of the player. E.g. use a Spawn Point in the scene to place the battle. - Spawn Battle Combatants
Naturally, you’ll need to spawn the player and enemy combatants after the scene change.
Here’s an example setup of a teleport battle start schematic.
Teleport Battle End Schematic #
The battle end schematic simply needs to return to the previously stored scene:
- Load Scene
Use the Stored scene origin to return to the previous scene we stored in the battle start event.
Disable Spawn Machine Object here, since we now want to spawn the player again.
Here’s an example setup of a teleport battle end schematic.


