
In this tutorial we’ll set up the bestiary.
This tutorial also continues the sub-series for animating battles and setting up menu screens.
The bestiary can be used to catalog enemies and their status information. Using the bestiary will conceal an enemy’s various status informations until it is made aware to the player, e.g. an attack with an element (attack modifier) can reveal that information. Our rogue’s Study ability will scan the enemy, learning all status information (and displaying it).
In this tutorial, we’ll set up:
- HUD template to show bestiary information
- bestiary setup
- study ability schematic
- bestiary menu screen
Let’s get to it – we’ll start with the prefabs for the HUD template. We need to set up 2 prefabs, one for individual attack modifier attributes (our elements) and one for the HUD template.
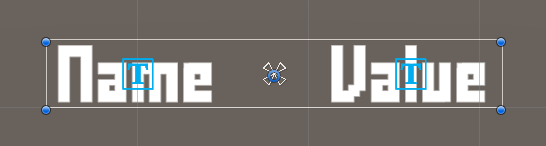
Attack Modifier Attribute Prefab #
Use the scene hierarchy’s context menu to create a ready-to-use setup: ORK Framework > HUD > Attack Modifier > Attack Modifier Attribute – Name+Value (for prefabs)
Select the root Attack Modifier Attribute game object, we’ll adjust it’s height and add a Layout Element component to let layout groups know about the element’s preferred height.
Rect Transform #
- Height
Set to 30.
Layout Element #
Add a Layout Element component using the component menu.
- Preferred Height
Enable this setting.
Set the value to 30.
Remove Images #
Since our attack modifiers don’t use any icons, we can remove the 2 Image child objects.
Remove the Attack Modifier Attribute > Name > Image child object.
Remove the Attack Modifier Attribute > Value > Image child object.
TextMeshPro – Text (UI) #
Adjust the TextMeshPro – Text (UI) components on the Text child objects to your liking (both for Name and Value).
I’m sticking with the default font size of 20.
Create Prefab #
Create a prefab out of the Attack Modifier Attribute game object (without the canvas).
Remove the game object from the scene.
HUD Prefab #
Next, we’ll set up the prefab we’ll use for our HUD.
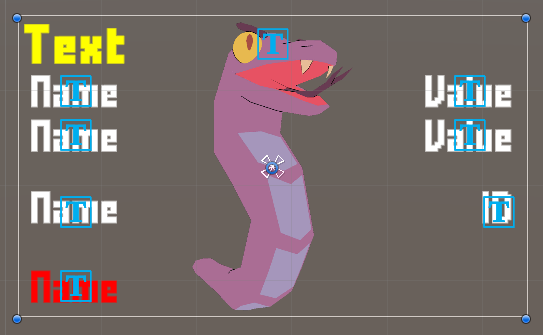
We’ll show:
- a portrait
- name and level
- size attribute
- max HP/MP
- list all attack modifier attributes (elements) with their values
Create HUD #
Use the scene hierarchy’s context menu to create a HUD with a vertical layout: Makinom > HUD > HUD (Vertical Layout)
The HUD will be used as a template, i.e. it’s position and size is determined by whatever is using it. We’ll adjust the size a bit for our design process, though.
Rect Transform #
- Width
Set to 400.
Content Size Fitter #
Add a Content Size Fitter component to the HUD using the component menu. We’ll adjust the height based on the HUD’s content.
- Vertical Fit
Select Preferred Size.
Portrait #
Add a portrait to the HUD game object using the scene hierarchy’s context menu: Makinom > HUD > Content > Portrait Content (Sprite)
The portrait shouldn’t be part of the layout group and just stick to the HUD’s size in the background.
Layout Element #
Add a Layout Element component using the component menu.
- Ignore Layout
Enable this setting.
Rect Transform #
Select the stretch stretch anchor presets, i.e. stretching both horizontally and vertically.
- Left, Top, Right, Bottom
Set to 0.
HUD Portrait Content #
- Portrait Type
Select Default.
The portrait’s Image (displaying the sprite) is already set up to preserve it’s aspect ratio, so we don’t need to do anything else.
However, we now have a white image in the background, so maybe change it to one of the combatant portraits for our setup process, or we don’t see much.
Name and Level #
Add a status text to the HUD game object using the scene hierarchy’s context menu: ORK Framework > HUD > Content > Status Text Content
ORK HUD Status Text Content #
This component handles the content that’ll be displayed. We’ll show the name and level of the combatant.
- Status Type
Select Combatant Information.
This should be the default setup on newly created components. - Text
Set to: <name>, Level <level>
TextMeshPro – Text (UI) #
Style the text to your liking, e.g. I’m using bold, font size 25 and a yellow text.
- Font Style
Select B (bold) - Font Size
Set to 25. - Vertex Color
Select a yellow color with full alpha.
Max HP #
Instead of using a Status Value List component to spawn prefabs from status value UI setup, we’ll add the status values individually this time. The benefit is that it doesn’t have to spawn prefabs, which gives a small performance improvement.
Add a status value to the HUD game object using the scene hierarchy’s context menu: ORK Framework > HUD > Status Value > Status Value – Name+Value+Bar (single)
Rename the added Status Value game object, e.g. to MaxHP.
HUD Status Value #
This component defines the status value that will be displayed.
- Status Value
Select Maximum Health Points.
Layout Element #
Add a Layout Element component to the MaxHP game object using the component menu.
- Preferred Height
Enable this setting.
Set the value to 30.
Remove Value Bar #
Remove the Value Bar child object, since we don’t show a value bar.
Remove Images #
Since our status values don’t use any icons, we can remove the 2 Image child objects.
Remove the MaxHP > Name > Image child object.
Remove the MaxHP > Value > Image child object.
Name #
Select the MaxHP > Name child object and change the ORK HUD Status Text Content.
We’ll display the short name (i.e. MaxHP) instead of the name.
- Text
Set to: <shortname>
TextMeshPro – Text (UI) #
Adjust the TextMeshPro – Text (UI) components on the Text child objects to your liking (both for Name and Value).
I’m sticking with the default font size of 20.
Max MP #
Duplicate the MaxHP game object and change the name to MaxMP.
HUD Status Value #
- Status Value
Select Maximum Magic Points.
Space #
We’ll add an empty game object to create a small space between the status values and the next element (the size).
Add an empty game object to the HUD game object using the scene hierarchy context menu: Create Empty
Rename it to Space.
Layout Element #
Add a Layout Element component to the Space game object using the component menu.
- Preferred Height
Enable this setting.
Set the value to 20.
Size #
We’ll display the size of the combatant – i.e. we don’t need to list the defence modifier attributes, just display a single thing.
Add a defence modifier ID (i.e. the attribute of the combatant) to the HUD game object using the scene hierarchy’s context menu: ORK Framework > HUD > Defence Modifier > Defence Modifier ID – Name+ID (single)
HUD Defence Modifier ID #
This component defines the defence modifier that will be displayed.
- Defence Modifier
Select Size.
Layout Element #
Add a Layout Element component to the Defence Modifier ID game object using the component menu.
- Preferred Height
Enable this setting.
Set the value to 30.
Remove Images #
Since our defence modifiers don’t use any icons, we can remove the 2 Image child objects.
Remove the Defence Modifier ID > Name > Image child object.
Remove the Defence Modifier ID > ID > Image child object.
TextMeshPro – Text (UI) #
Adjust the TextMeshPro – Text (UI) components on the Text child objects to your liking (both for Name and ID).
I’m sticking with the default font size of 20.
Attack Modifiers #
Beside listing the attributes with their values, we’ll also add the attack modifier’s name as a header.
Add an attack modifier to the HUD game object using the scene hierarchy’s context menu: ORK Framework > HUD > Attack Modifier > Attack Modifier – Name (single)
HUD Attack Modifier #
This component defines the attack modifier that will be displayed.
- Attack Modifier
Select Element.
Vertical Layout Group #
Add a Vertical Layout Group component to the Attack Modifier game object using the component menu.
- Top
Set to 20. - Spacing
Set to 5. - Control Child Size
Enable Width and Height.
HUD Attack Modifier Attribute List #
Add an HUD Attack Modifier Attribute List component to the Attack Modifier game object using the component menu.
- Prefab
Select the Attack Modifier Attribute prefab we created earlier.
Remove Image #
As with the others, we can remove the Image child object.
Remove the Attack Modifier > Name > Image child object.
Remove the Defence Modifier ID > ID > Image child object.
TextMeshPro – Text (UI) #
Adjust the TextMeshPro – Text (UI) component on the Text child objects to your liking (Name).
I’m sticking with the default font size of 20, but use a red text color.
And with that, our HUD prefab is finished. The result will look something like this (with a dummy portrait image):
You can remove the used portrait image now.
Create Prefab #
Create a prefab out of the HUD game object (without the canvas), e.g. name it Bestiary HUD.
We’re now done with the prefab setup, if you’ve created the prefabs in one of the regular scenes, don’t forget to remove the Canvas again.
HUD Setup #
Open the editor and navigate to UI > HUDs, add a new HUD and change the following settings.
Since the HUD is only used as a tempalte we don’t need to set up any display conditions or other settings.
HUD Settings #
- Name
Set to Bestiary Template. - HUD Type
Select Combatant. - Auto Display
Disable this setting.
It’ll only be used as a template.
Unity UI #
- UI Layer
Select HUDs. - HUD Prefab
Select the Bestiary HUD prefab we just created.
Bestiary #
It’s time to set up the bestiary – navigate to Game > Game Settings.
ORK Game Settings > Bestiary Settings #
You can control how the different status information is learned (automatically, scanning a combatant like withour Study ability will learn all information).
- Use Bestiary
Enable this setting. - Auto Add Entry
Enable this setting.
Encountering an enemy will create a bestiary entry for it, even if we don’t know anything else about it. - Level Separation
Enable this setting.
We’ll have separate entries for the different levels of the combatants (each needs to be encountered on it’s own).
You can also further separate entries, e.g. by faction or class (but we don’t need that in our game). - Faction
Select Enemies.
Status Value Settings #
Status values shouldn’t be learned, unless we use the Study ability on the combatant.
- Learn On
Select None. - No Value Bars
Enable this setting.
Combatants we don’t know the status values of will not display value bars.
You can leave the rest of the settings as they are, learning attack modifiers on Attack (i.e. when we attack a combatant with an attribute) and the defence modifier ID (i.e. the size) on Encounter, since we can see how big the enemy is.
Menu Requirement #
We’ll set up a menu requirement template, as we only want the bestiary menu to be available when we have entries.
Navigate to Templates > Menu Requirement and add a new requirement.
Base Settings #
- Name
Set to Bestiary.
General Requirement #
- Has Bestiary Entries
Enable this setting.
Bestiary Menu Screen #
Next, we’ll set up the bestiary menu.
Navigate to UI > Menu Screens and add a new menu screen.
Menu Screen Settings #
We’ll use the same setup as in the other menu screens.
- Name
Set to Bestiary. - Remember Selection
Enable this setting. - Pause Notifications
Enable this setting. - Block Notifications
Enable this setting. - Block Flying Texts
Enable this setting. - Pause Game
Enable this setting. - Freeze Pause
Enable this setting.
Bestiary (Type) Part #
The Bestiary (Type) part is used to display bestiary entries by combatant type. There’s also another version available that displays them by area they where encountered in.
Scroll down to the bottom of the settings to see the Add Menu Part button.
Click on the Add Menu Part button and select Bestiary (Type).
The default setup will already show all types and sort them by name (which is ok for us).
Type Box Settings #
Lists the combatant types that are available.
- Type Box
Select Blue Top Right Fit. - Add Back Button
Select Last.
Bestiary Box Settings #
Lists the combatants from the selected combatant type.
- Display Bestiary>Entry
Select Sequence.
An entry will only be displayed after we accepted a combatant from the bestiary list. - Bestiary Box
Select Blue Menu Center Scroll. - Add Back Button
Select Last.
We’ll change the Bestiary Content Layout to show the name and level of the listed combatants.
- Content Type
Select Custom. - Add Icon
Enable this setting.
The combatant’s icon will be added to the custom content. - Default Content
Set to: <name>, Level <level>
Entry Box Settings #
Displays the selected bestiary entry – this is where we’ll use our HUD.
- Entry Box
Select Blue Center Fit.
We add our HUD to the Entry Page 0.
- Add HUD
Enable this setting. - HUD
Select Bestiary Template.
That’s it for the bestiary menu screen.
Updating Overview Menu Screen #
Select the Overview menu screen, we’ll now add a button for the bestiary, but only display it if we have entries (menu requirement).
Button List 0 #
Scroll down to Menu Item 4, the button for the Group menu screen.
Copy Menu Item 4.
Menu Item 5 #
This is the copied button, let’s change it.
- Menu Screen
Select Bestiary. - Text (Button Content)
Set to Bestiary.
If a button is dislayed (or active) can depend on Requirements.
- Hide
Enable this setting.
The button is not added if the rquirement invalid. - Use Menu Requirement
Enable this setting. - Menu Requirement
Select Bestiary.
Save Changes #
That’s it for the editor setup for now – don’t forget to save your changes by clicking on Save Settings at the bottom of the editor.
Study Schematic #
Now, we’ll handle the Study abilities schematic. Navigate to Schematics and set up a new schematic.

Calculate Action #
Add Node > Battle > Action Outcome > Calculate Action
This’ll calculate the ability’s outcome, including scanning the target.
No further settings needed.
Bestiary Dialogue #
Add Node > UI > Dialogue > Bestiary Dialogue
This node shows bestiary information, we’ll display the target’s (Starting Object) information.
- Use Object
Enable this setting. - Object (Object Settings)
Select Starting Object. - UI Box
Select Blue Center Fit.
Like in the menu screen, we add our HUD to the Entry Page 0.
- Add HUD
Enable this setting. - HUD
Select Bestiary Template.
And that’s it for the schematic. Click on Save Schematic to save it, e.g. as Study.
Study Ability #
All that’s left to do is use the schematic in our ability – navigate to Status > Abilities, select the Study ability and change the following settings.
Battle Animation #
We’ll use the ability start/end animations.
Click on Add Battle Animation.
- Schematic Asset
Select the Study schematic.
Save Changes #
And that’s it for the bestiary setup!
Don’t forget to save your changes by clicking on Save Settings at the bottom of the editor.
Testing #
Now, it’s time to test the bestiary. Hit play, start a new game (if you start via the start menu) and open the menu – no bestiary in sight, good.
Run to the first battle, switch out a combatant for the rogue and use the Study ability on the target.

Notice how the target selection doesn’t show the HP/MP values and value bar any longer? That’s because we don’t know that yet.

The bestiary dialogue shows the combatant’s information.

And we now see the HP/MP values and value bars in our target selection.
After the battle, check out the menu screen – we now have access to the bestiary. This isn’t related to scanning the enemy, encountering it alone has already added the entry (due to our setup), but it wouldn’t have any information.

Everything seems to be working, success!
Next, we’ll start looking into quests.


