Create a 2D top down RPG with grid battles in this ORK 3 tutorial series.
About this Tutorial Series #
This short tutorial series will focus on setting up a Phase battle system using Battle Grids for a 2D top down RPG. It’ll use the status system setup tutorial series as it’s base, using the set up status system and combatants.
Phase battles let each faction (e.g. player and enemies) select and perform their actions in their own phase. In combination with battle grids this allows creating very tactical battle systems.
It’ll only cover setting up specific features and mechanics for this and doesn’t touch anything else:
- setting up a non-battle player
- randomized combatant names and appearance
- Phase battle system setup (including battle start/end and phase change schematics)
- grid battle setup
- animating actions
- a minimal amount of UI setup (battle menu, HUD)
There’ll be no start menu or other menus (beside the battle menu) or focus on the leveling system or other game mechanics. The game starts right in a Town scene, where the player can teleport to a Forest Battle scene by talking to an NPC.
If you want to learn more about setting up a detailed status system, check out the status system setup tutorial series (which this tutorial series is based on). If you want to learn more about all kinds of features related to setting up a complete game, check out the 3D RPG Playground tutorial series.
This tutorial series is completed.
Download the Tutorial Assets #
The assets provided for this tutorial series are not for commercial use.
You can download the tutorial assets here (you only need this pack):
Please note!
This package requires using at least Unity 2020.3.
It’s recommended to use LTS (long term support) versions.
Used Assets #
You don’t need to download them separately, all you need is included in the tutorial assets pack download above.
The tutorial uses the Ninja Advanture asset pack by PIXEL ARCHIPEL (assets available under CC0). Huge thanks to them for providing these awesome assets to the world!
The tutorial assets don’t contain the full content of the pack (mainly stripped music to keep it small).
First Steps #
Before getting started with the actual 2D Grid Battle RPG tutorials, we’ll have to do some basic setup in the Unity project.
1. Create a new Unity project #
Use the Unity Hub to create a new Unity project.
Use at least Unity 2020.3 or newer.
Use the 2D template to create the project, this should provide the project with the needed 2D packages (sprites, tilemaps).
2. Layer Setup #
First, after creating the new Unity project, we’ll set up 2 new layers that’ll be used by the tutorial assets.
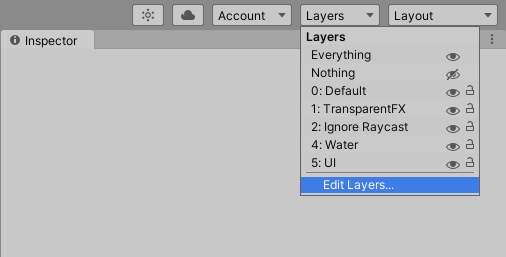
Open Unity’s layer settings, either via the Layers popup in the upper right corner:
Or via the Unity menu: Edit > Project Settings… > Tags and Layers
If your project already had layer 10 or 11 set up, you probably started with a project that has something else set up, e.g. by using a different project template. That shouldn’t have an impact on the tutorials in most cases.
Change the following layers.
- User Layer 10
Set to Combatants.
Is used by combatants - User Layer 11
Set to Blocked.
Is used by blocking level architecture.
The tutorial assets are already set up to use those layers.
It’s generally a good idea to have things on different layers, e.g. for this tutorial, the ground is on the Default layer, while blocking level architecture is on the Blocked layer and the combatants on the Combatants layer. This makes it easy to use raycasting, e.g. for our grid generation to automatically place blocked cells on blocked areas of the scene.
3. 2D Physics Collision Matrix Setup #
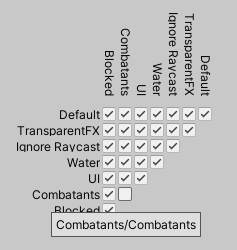
Next, we prevent combatants from colliding with each other – this is done by disabling collision between the Combatants layer and the … Combatants layer.
Open the project’s Physics 2D settings using the Unity menu: Edit > Project Settings… > Physics 2D
Disable the Combatants/Combatants toggle. This prevents any collision between the layer with itself.
4. Import ORK Framework #
Import ORK Framework (including Makinom) into your Unity project.
Use either ORK’s free test version or your paid version from the Unity Asset Store (via the Unity Package Manager).
5. Import Tutorial Assets Pack #
Import the tutorial assets pack you downloaded above.
6. Adding Scenes to Build Settings #
For being able to load scenes in a running game, they have to be added to Unity’s build settings. After importing the tutorial assets, we’ll add the scenes that are included in the package.
Open the build settings using the Unity menu: File > Build Settings…
Add the following scenes to the Scenes In Build:
- Assets/Scenes/Town
- Assets/Scenes/Forest Battle 1
You can delete the SampleScene that is included in each new Unity project. It’s located in Assets/Scenes/.
7. Follow the Status System Setup Tutorials #
This tutorial is based on the status system setup tutorial series.
Either follow the series to set up the status system, or download the completed setup and import it into your project.
You can also use a different status system setup if you want – just keep in mind to make the needed changes in the setup based on your system (e.g. using different items or equipment).
8. Initial Unity UI Setup #
Follow the initial setup tutorial for the Unity UI module, this includes:
- changing your project’s UI System Type to the Unity UI module
- setting up TextMesh Pro
- setting up the UI Environment scene (for prefab editing)
- creating a first UI box prefab
- creating default input prefabs
- creating a flying text prefab and setting it up in UI > UI Settings
You can also download the UI asset package provided in the initial setup tutorial and use them in your project setup instead of setting up the prefabs. You still need to set up TextMesh Pro and the UI Environment scene.
Ready! #
You should now have a set up Unity project with ORK/Makinom, the tutorial assets and Unity UI module setup (including TextMesh Pro and flying texts).
And with that, it’s time to start with the setup – we’ll start with setting up our (non-battle) player and some initial 2D related settings.
Download the Completed Project #
If you only want to test out the project or compare it with your own setup, you can download the completed tutorial project (up to the last tutorial: 15 Battle Selection Interpolation):
Download Completed Tutorial Project
This is a Unity 2020.3 project, extract the content of the zip-file and open the project in Unity. The completed project comes with ORK 3’s free test version (you can import the full version from the Asset Store after purchase).
Missing Script References #
If you run into missing script reference warnings or don’t see any UI when playing, reimport the following folders (in that order):
- Assets/Gaming Is Love/Makinom 2/
- Assets/Tutorial Assets/_Created/
That should solve missing script references on the UI prefabs.
Detailed Setup Guide #
Here’s a detailed guide to setting up the completed project in Unity and reimporting the folders to avoid missing UI scripts:
- Download the completed Unity project (zip-file)
- Unzip the file
- Add the project to your Unity HUB
- Open the project with at least Unity 2020.3
- (Optional, only needed with missing script references)
Right-click on the folder Assets/Gaming Is Love/Makinom 2/ in the project view tab and select Reimport - (Optional, only needed with missing script references)
Right-click on the folder Assets/Tutorial Assets/_Created/ in the project view tab and select Reimport - Open the Town scene (Assets/Scenes/)
- Hit play
The completed project comes with ORK 3’s free test version – just import your full version into the project in case you want to use it.
Controls #
The finished project uses the following controls:
- WASD
Player movement - Arrow Keys
Navigate menus/grid - Enter
Accept/interact - Escape
Cancel


