ORK Framework Logo - RPG Editor for Unity
  • Features
  • Showcase
  • Guide
    • Documentation
    • Tutorials
    • API
  • ORK 2
    • Tutorials
    • Plugins
    • API
  • Support
  • Forum
  • Get ORK

2D RPG Quickstart

  • START 2D RPG Quickstart
  • 01 Initial Setup
  • 02 Player Setup
  • 03 Music & Scenes
  • 04 UI System Setup
  • 05 UI Boxes
  • 06 Flying Texts
  • 07 Status Values
  • 08 Status Effects
  • 09 First Abilities
  • 10 Fighter Setup
  • 11 First Enemies & Battle AI
  • 12 Battle System Setup
  • 13 Animating Battle Start and End
  • 14 Random Battles
  • 15 Animating Actions
  • 16 Player Battle HUD
  • 17 Elemental Attacks
  • 18 Animating More Actions
  • 19 Inventory & Loot
  • 20 Equipment
  • 21 Loot, Start Equipment & Viewers
  • 22 Magic Abilities
  • 23 Caster Setup
  • 24 More Enemies
  • 25 Start Menu & Save Games
  • 26 Menu Screens
  • 27 Interactions
  • 28 Item Collectors
  • END 2D RPG Quickstart

3D RPG Quickstart

  • START 3D RPG Quickstart
  • 01 Initial Setup
  • 02 Player Setup
  • 03 Music & Scenes
  • 04 UI System Setup
  • 05 UI Boxes
  • 06 Flying Texts
  • 07 Status Values
  • 08 Status Effects
  • 09 First Abilities
  • 10 Fighter Setup
  • 11 First Enemies & Battle AI
  • 12 Battle System Setup
  • 13 Animating Battle Start and End
  • 14 Random Battles
  • 15 Animating Actions
  • 16 Player Battle HUD
  • 17 Elemental Attacks
  • 18 Animating More Actions
  • 19 Inventory & Loot
  • 20 Equipment
  • 21 Loot, Start Equipment & Viewers
  • 22 Magic Abilities
  • 23 Caster Setup
  • 24 More Enemies
  • 25 Start Menu & Save Games
  • 26 Menu Screens
  • 27 Interactions
  • 28 Item Collectors
  • END 3D RPG Quickstart

Status System Setup

  • START Status System Setup
  • 01 Status Values
  • 02 Status Development
  • 03 Attack/Defence Modifiers
  • 04 Status Effects
  • 05 Formulas
  • 06 Ability & Item Types
  • 07 Abilities Part 1: Attacks
  • 08 Abilities Part 2: Support & Sabotage
  • 09 Abilities Part 3: Elemental Magic
  • 10 Items
  • 11 Equipment Part 1: Slots & Slot Set Templates
  • 12 Equipment Part 2: Weapons
  • 12.5 (Optional) Equipment Part 2.5: Weapons
  • 13 Equipment Part 3: Shields, Armor & Accessories
  • 13.5 (Optional) Equipment Part 3.5: Shields, Armor & Accessories
  • 14 Equipment Part 4: Available Equipment Templates
  • 15 Loot
  • 16 Battle AIs
  • 17 Combatants Part 1: General Settings
  • 18 Combatants Part 2: Players
  • 19 Combatants Part 3: Enemies
  • 20 Combatant Groups
  • END Status System Setup

3D RPG Playground

  • START 3D RPG Playground
  • 01 Player Setup
  • 02 Start Menu
  • 03 First Interaction
  • 04 Music
  • 05 Areas
  • 06 Collecting Items
  • 07 Displaying Equipment
  • 08 Combatant Prefabs, Icons & Portraits
  • 09 Combatant Animations
  • 10 Camera Positions
  • ANIM 01 Battle Start/End Schematics
  • ANIM 02 Use, Cast & Camera
  • ANIM 03 Abilities & Items
  • ANIM 04 Physical Attacks
  • ANIM 05 Special Actions
  • BATTLE 01 Battle Menu
  • BATTLE 02 Prepare for Battle
  • TURN 01 Turn Based Setup
  • TURN 02 Turn Order HUD
  • ATB 01 Active Time Setup
  • ATB 02 Cast Times
  • ATB 03 Timebar HUD
  • BATTLE 03 The First Battle
  • BATTLE 04 Hunting Move AI
  • BATTLE 05 Spawning Combatants
  • 11 Save Games
  • MENU 01 UI Boxes
  • MENU 02 Template HUDs
  • MENU 03 Overview Menu
  • MENU 04 Menu Screens
  • 12 Shop
  • BATTLE 06 Random Battles
  • DUNGEON 01 Enter the Dungeon
  • DUNGEON 02 The Trapdoor
  • DUNGEON 03 Enemies on Level 1 & 2
  • DUNGEON 04 Traps on Level 3
  • DUNGEON 05 Going Deeper
  • 13 Bestiary (+MENU+ANIM)
  • QUEST 01 Hunting Quests (+MENU)
  • QUEST 02 Guard NPC
  • QUEST 03 Forest Ruin Cheese
  • QUEST 04 Witch NPC with Cheese
  • QUEST 05 Quest Mark HUDs
  • 14 Research Trees (+MENU)
  • CRAFT 01 Crafting Materials
  • CRAFT 02 Crafting Recipes
  • CRAFT 03 Crafting Menu
  • CRAFT 04 Crafting Proficiency & Critical Crafting
  • CRAFT 05 Materials Loot
  • 15 Changing Choice Dialogue
  • 16 Follow Me!
  • BATTLE 07 Sequence Loot Dialogue

3D Action RPG

  • START 3D Action RPG
  • 01 Status System Setup
  • 02 Player Setup
  • 03 Player Weapon
  • 04 Player Attacks
  • 05 Enemy: Chomper
  • 06 Chomper Attack
  • 07 Hit & Death
  • 08 HUDs
  • 09 Rolling on the Floor
  • 10 Enemy: Spitter
  • 11 Spit Attack
  • 12 Potion
  • 13 Grenade
  • 14 Item HUD
  • 15 Enemy: Grenadier
  • 16 Grenadier Melee Attacks
  • 17 Grenadier Flamethrower
  • 18 Item Drops
  • END 3D Action RPG

2D Grid Battle RPG

  • START 2D Grid Battle RPG
  • 01 Player Setup
  • 02 Prefab & Music Setup
  • 03 Randomizing Combatants
  • 04 UI Setup
  • 05 Battle Start, End & Phase Schematics
  • 06 Battle System Setup
  • 07 Battle Grid Setup
  • 08 Grid Move
  • 09 Forest Battle Grid
  • 10 Battle AI
  • 11 Ability Ranges
  • 12 Death & Use Schematics
  • 13 Attack Schematic
  • 14 Shoot Schematics
  • 15 Battle Selection Interaction
  • END 2D Grid Battle RPG

Schematics

  • Simple Start Schematic
  • Battle Start Schematic
  • Battle End Schematic
  • Moving to Target and Back
  • Animating a Base Attack
  • Animating a Magic Ability
  • Grid Movement
  • Open and Close UI Animations
  • Flying Text Mover

UI Setups

  • Unity UI: Initial Setup
  • Unity UI: TextMesh Pro Setup
  • Unity UI: UI Box
  • Unity UI: Flying Text
  • Unity UI: Dragging Notification
  • Unity UI: Canvas with Screen Space Camera
  • Unity UI: Interaction HUD
  • Unity UI: Simple Player HUD
  • Unity UI: Quest HUD
  • Unity UI: Shortcuts HUD
  • Unity UI: Currency HUD
  • Unity UI: Tooltip HUD
  • Unity UI: Control HUD
  • Unity UI: Attack Modifiers
  • Unity UI: Defence Modifiers

Gameplay Bits

  • Combining Input Origins
  • Combining Status Value Flying Texts
  • Fun With Flying Text
  • HUD Effects With Conditional Schematics
  • Inventory Containers
  • Multi Interaction Controllers
  • World Space HUD
  • World Space Dialogue
  • Home
  • Guide
  • Tutorials
  • UI Setups
  • Unity UI: Canvas with Screen Space Camera

Unity UI: Canvas with Screen Space Camera

Table of Contents
  • Canvas Prefab Setup
    • Adding the Camera
      • Rect Transform
      • Camera
      • Audio Listener
    • Canvas
    • Create Prefab
  • UI Layer Setup
    • Unity UI
    • Save Settings
  • Test Setup
    • UI Box Setup
    • UI Box Prefab Setup
    • Testing
  • Tip! UI Backgrounds

Create a screen space camera canvas to show rotated UI.

The Unity UI module uses a Canvas for each UI layer. The default setup uses them as Screen Space – Overlay, but you can use a prefab with a custom setup for your canvas.

This tutorial will create a canvas with a Screen Space – Camera setup, which allows to display rotated UI to give a 3D effect to it. However, Unity will draw Overlay canvases always above Camera canvases, so keep that in mind when building your UI.

Your project’s UI system should already be set to use the Unity UI module. If not, check the initial setup tutorial for the Unity UI module.

Canvas Prefab Setup #

A Screen Space – Camera canvas requires a camera to render it’s content, we’ll include that in our prefab setup.

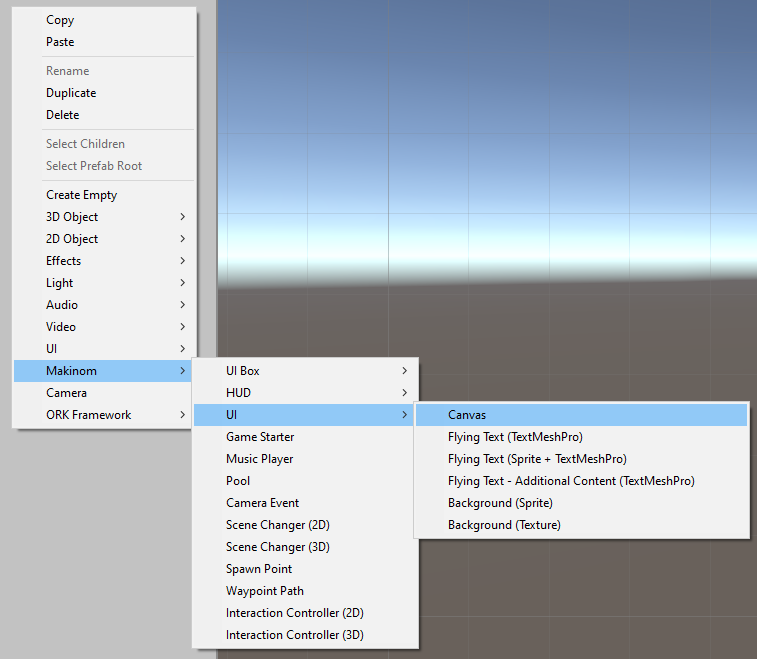
Use the scene hierarchy’s context menu to create a canvas with the setup used in your project: Makinom > UI > Canvas

Adding the Camera #

Now, use the scene hierarchy’s context menu on the Canvas game object and add a camera: Camera

The created Camera game object should be a child object of the Canvas.

Rect Transform #

We’ll position the camera to show the complete canvas.

  • Pos X
    Set to 0.
  • Pos Y
    Set to 0.
  • Pos Z
    Set to -935.2.

Camera #

Change the following settings of the Camera component.

  • Clear Flags
    Select Depth Only.
  • Culling Mask
    Select only the UI layer (or any layer your UI is displayed on).
    You can clear the selection by first selecting Nothing.

Audio Listener #

The created camera setup includes an Audio Listener component. Having multiple of them in a scene will create issues (and constant warnings in the console while playing).

So, remove the Audio Listener component from the camera.

Canvas #

Select the Canvas game object and change the following settings of the Canvas component.

  • Render Mode
    Select Screen Space – Camera.
  • Render Camera
    Select the Camera from the child object we created.

Create Prefab #

That’s already everything we need to do. Create a prefab out of the Canvas, e.g. save it as Canvas Screen Space Camera.

You can now remove the canvas from the scene.

UI Layer Setup #

Next, we’ll use the prefab in a UI layer – all UI using that layer will use the canvas with the screen space camera setup and is able to display it’s rotation in 3D.

Open the Makinom editor and navigate to UI > UI Layers, either create a new UI layer or change an existing one. I’ll create a new one.

  • Name
    Set to: Screen Space Camera

Unity UI #

  • Canvas Prefab
    Select the Canvas Screen Space Camera prefab we created.

The Sorting Order defines the draw order of canvases, but keep in mind that overlay canvases (the default setup) will always be drawn above camera canvases (or world space canvases).

If you have multiple UI layers using a camera canvas setup, you can set their sorting order to make sure they’re ordered correctly.

  • Set Sorting Order
    Enable this setting.
  • Sorting Order
    Set to the value you want.
    Higher values will be drawn above lower values, e.g. match them with the ID/index in the UI layer list.

Save Settings #

That’s it – don’t forget to save the changes you did in the Makinom editor via the Save Settings button at the bottom.

Tip!

Multiple UI layers can use the same canvas prefab – each layer will create it’s own instance of the prefab.

Use the sorting order settings to ensure their correct drawing order.

Test Setup #

To test your new canvas screen space camera setup, you’ll need to change one of your UI boxes to be dispalyed on the UI layer using the canvas.

UI Box Setup #

Navigate to UI > UI Boxes and select one of the UI boxes (e.g. one used in a menu screen).

  • UI Layer
    Select the Screen Space Camera layer (or whatever layer you used for the canvas prefab).

Save the changes in the editor.

UI Box Prefab Setup #

Now, open the prefab used by the UI box for editing, we’ll change it’s rotation in the Rect Transform component.

  • Rotation
    Set to X=-10, Y=-30, Z=-5.

Save the changes to the prefab.

Testing #

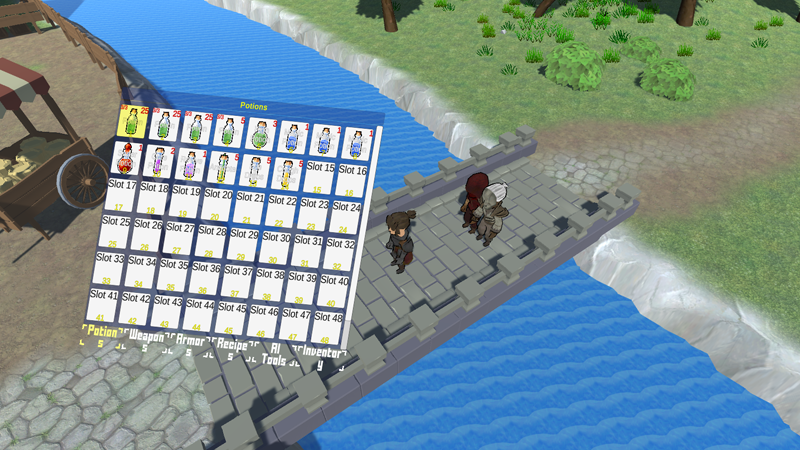
Hit play and bring up the menu that uses the UI box, e.g. I’m using an inventory container slot menu.

You can see, the UI box is rotated and has a 3D look to it.

As a comparison, here’s how this would look without a Screen Space – Camera canvas.

Kinda flat, isn’t it?

Tip! UI Backgrounds #

If you want to have backgrounds in your menu screens using camera canvas setups, keep in mind that they’re always drawn below regular canvases.

I.e. you need to place your UI backgrounds also on a UI layer using a camera canvas setup.

Share This Article :
  • Facebook
  • Twitter
  • LinkedIn
  • Pinterest
Updated on March 10, 2023
Table of Contents
  • Canvas Prefab Setup
    • Adding the Camera
      • Rect Transform
      • Camera
      • Audio Listener
    • Canvas
    • Create Prefab
  • UI Layer Setup
    • Unity UI
    • Save Settings
  • Test Setup
    • UI Box Setup
    • UI Box Prefab Setup
    • Testing
  • Tip! UI Backgrounds
Sitemap
  • Features
  • Showcase
  • Guide
    • Documentation
    • Tutorials
    • API
  • ORK 2 Hub
    • Tutorials
    • Plugins
    • API
  • Support
  • Forum
  • Get ORK
  • Contact
  • Blog
  • Makinom
  • gamingislove.com
Categories
  • News (60)
  • ORK 2 (137)
    • Tutorial (137)
      • Game tutorial (50)
      • Gameplay (32)
      • How-to (55)
  • Release (130)
Search

© 2015 Gaming is Love e.U.

Disclosure: This site may contain affiliate links, which means I may receive a commission if you click a link and purchase something that I have recommended. While clicking these links won’t cost you any money, they will help me fund my development projects while recommending great assets!