
In this tutorial we’ll add an interaction to the town.
To connect the Town to the Forst Battle 1 scene, we’ll have an NPC that lets us select a battle to fight and loads that battle’s scene. We only have one battle in this short tutorial series, but this’ll let you add additional battles if you want. You can also use a similar way as the 3D RPG Playground’s guard giving out hunting quests and make battles be based on quest progressions. We’ll keep it simple in this tutorial, though.
We’ll set up:
- the schematic for the battle selection
- an NPC in the Town scene
Let’s get to it!
Battle Selection Schematic #
This’ll be a simple schematic, a dialogue to select the battle and loading the battle scene.
Navigate to Schematics and start working on a new schematic.
Settings #
We don’t want the player to move around during the interaction, so we’ll block the player controls.
- Block Player Control
Enable this setting.
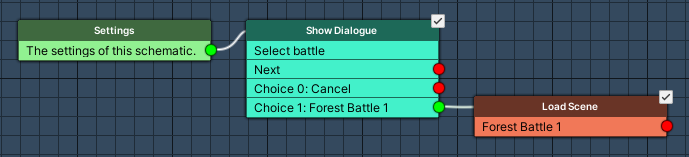
Show Dialogue #
Add Node > UI > Dialogue > Show Dialogue
We’ll show a Choice dialogue, you can later add additional battles here if you want.
Choices can optionally also be only available when defined conditions are met – you can use that to have new battles available after previous battles are won, e.g. using variable conditions.
- Dialogue Type
Select Choice. - UI Box
Select Battle Menu. - Text (Message Content)
Set to: Select battle
Choice Settings #
Click on Add Choice.
- Text (Choice 0)
Set to: Cancel
Click on Add Choice.
- Text (Choice 1)
Set to: Forest Battle 1
Load Scene #
Add Node > Game > Scene > Load Scene
We’ll now load the Forest Battle 1 scene – remember, we only fade out the screen, the fade in will be handled by the battle start schematic.
This node is connected to the Choice 1 slot of the Show Dialogue node.
Target Scene 0 #
We define the scene we want to load in the already added Target Scene 0 settings.
- Target Scene
Set to: Forest Battle 1 - Position Type
Select None.
We don’t spawn the player in the loaded scene.
Screen Fade Settings #
To only fade out the screen, we’ll use a custom screen fade setup instead of the default setup (defined in Game > Game Settings).
- Own Screen Fade
Enable this setting.
We can keep the default setup for Screen Fade Out, but we’ll disable fading back in.
- Fade In (Screen Fade In)
Disable this setting.
And that’s it for the schematic. Click on Save Schematic to save it, e.g. as BattleSelection.
Scene Setup #
Open the Town scene (found in Assets/Scenes/).
We’ll add an NPC to the scene – I’m using the Woman prefab, you can find it in Assets/Tutorial Assets/NinjaAdventure/Actor/Characters/Woman/.
I’m placing my NPC the middle of the left side of town.

The prefab is also a variant of the combatant prefab, so it already has some setup on it.
Interaction Machine #
Add an Interaction Machine component to the game object using the component menu.
Start Settings #
- Interact
Enable this setting.
We can start the interaction via the player’s Interaction Controller.
Machine Execution Settings #
- Schematic Asset
Select the BattleSelection schematic.
And that’s it – don’t forget to save the scene.
Interaction HUD (Optional) #
Follow the interaction HUD tutorial for Unity UI to set up a HUD prefab and HUD.
Use the HUDs UI layer we added in a previous tutorial for the interaction HUD. I’m also using the move from above and move to above schematics from the UI animations schematics to animate this HUD.
Testing #
Hit play, walk to the NPC and interact with it.
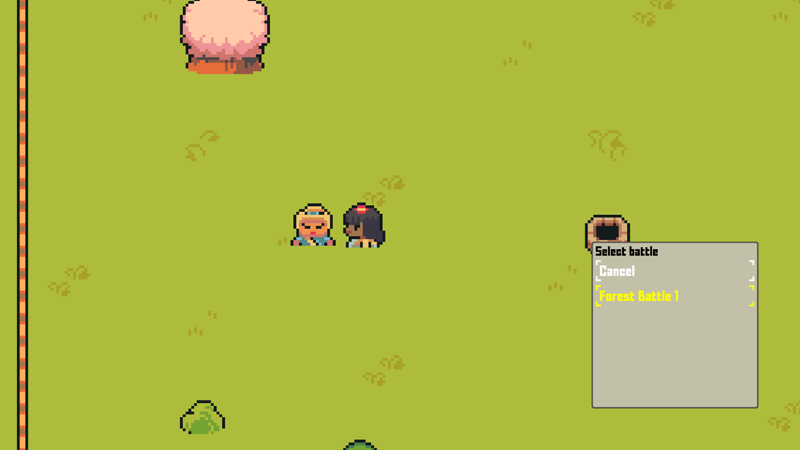
We can select the battle and get transfered to the battle scene, great!
That’s it – we’re done with the 2D Grid Battle RPG tutorials. Allow me to say some final words in the next and final part of this tutorial series.


