
In this tutorial we’ll add the hunting quest NPC to the game.
This tutorial continues the sub-series for setting up quests.
With our hunting quests set up, we now need to add an NPC that’ll give us those quests (using a schematic).
Hunting Quests Schematic #
This schematic will handle selecting/accepting quests and reporting back from the dragon hunt quest. We’ll use selected data to get all available hunting quests (i.e. either not yet started or already finished, repeatable quests) and let the player select a quest from the list.
Navigate to Schematics and start with a new schematic.

Settings #
- Block Player Control
Enable this setting.
Check Quest Conditions #
Add Node > Game > Quest > Check Quest Conditions
We’ll first check if the Report to the guard task is active – if yes, we’ll handle that case, otherwise list the available quests.
Click on Add Task Condition.
- Is Valid
Enable this setting. - Quest Task
Select Report to the guard. - Check Status
Select Active.
Show Dialogue #
Add Node > UI > Dialogue > Show Dialogue
This node is connected to the Success slot of the Check Quest Conditions node.
- Dialogue Type
Select Message. - Wait
Enable this setting. - UI Box
Select Beige Bottom Dialogue. - Show Title
Enable this setting. - Text (Title Content)
Set to: Guard - Text (Message Content)
Set to: You killed the dragon?
Wonderful, here’s your reward.
Change Task Status #
Add Node > Game > Quest > Change Task Status
We’ll now finish the task and the quest.
- Quest Task
Select Report to the guard. - Status
Select Finished. - Get Rewards
Enable this setting. - Check Quest Finished
Enable this setting.
The quest will be checked if all of it’s tasks are finished and finish the quest in that case.
Select Quest #
Add Node > Game > Quest > Select Quest
This node is used to store quests into selected data. We’ll use those stored quests in the next node to list them in a dialogue.
This node is connected to the Failed slot of the Check Quest Conditions node.
- Data Key
Set to list. - Data Origin
Select Local. - Change Type
Select Set.
The Quest Settings handle which quests will be used – we’ll only use available quests, i.e. not yet started or already finished, repeatable quests. Quests can also define conditions to make them available.
- Use Available Quests
Enable this setting. - Limit Quest Type
Enable this setting. - Quest Type
Select Hunting.
Selected Data Count #
Add Node > Value > Selected Data > Selected Data Count
We’ll check how many quests are stored in the selected data list.
- Data Key
Set to list. - Data Origin
Select Local. - Check Type
Select Is Greater. - Check Value
Select Value > Value.
Set the value to 0.
Show Dialogue #
Add Node > UI > Dialogue > Show Dialogue
Copy the previous Show Dialogue node.
This node is connected to the Failed slot of the Selected Data Count node.
- Text (Message Content)
Set to: Seems like there’s nothing else to do for you.
Show Dialogue #
Add Node > UI > Dialogue > Show Dialogue
Copy the previous Show Dialogue node.
This node is connected to the Success slot of the Selected Data Count node.
- Text (Message Content)
Set to: Up for a challenge?
We’ve got some pests to hunt down.
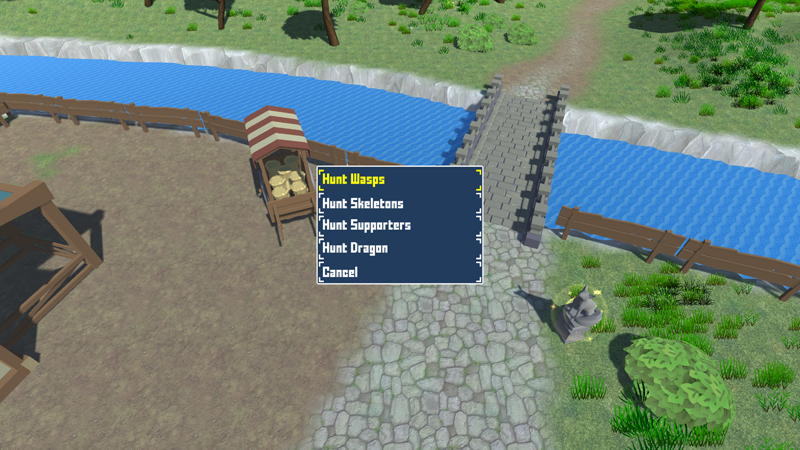
Selected Data Choice #
Add Node > UI > Dialogue > Selected Data Choice
This node lists content stored in selected data and let’s the player select one in a choice dialogue.
We’ll use it to select a quest.
- UI Box
Select Blue Center Fit. - Allow Cancel
Enable this setting. - Add Cancel Button
Select Last.
The Origin Selected Data defines which selected data will be listed as button inputs.
- Selected Key (Origin Selected Data)
Set to list. - Data Origin (Origin Selected Data)
Select Local.
The Store Selected Data defines where the selected content will be stored in.
- Selected Key (Store Selected Data)
Set to quest. - Data Origin (Store Selected Data)
Select Local. - Change Type
Select Set.
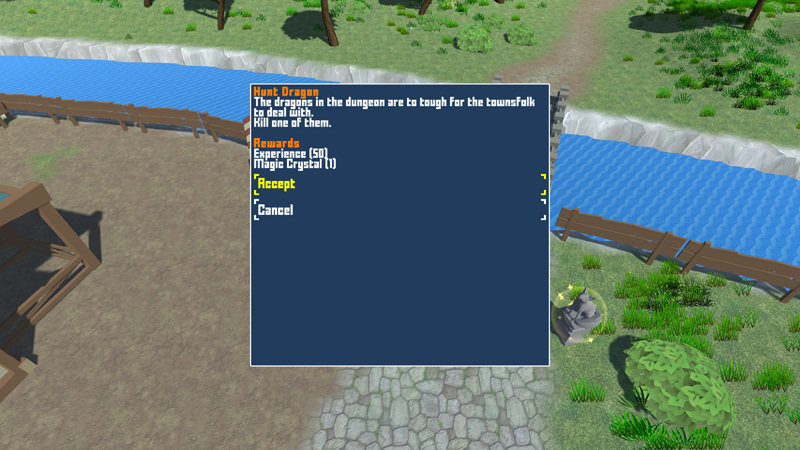
Quest Choice #
Add Node > UI > Dialogue > Quest Choice
Shows the information of a quest using a quest layout. Please note that this node only shows the information and doesn’t add the quest when accepting the dialogue.
This node is connected to the Accept slot of the Selected Data Choice node. The node’s Cancel slot will link back to the Selected Data Choice node.
- Use Selected Data
Enable this setting.
We’ll use the quest we just selected. - Selected Key
Set to quest. - Data Origin
Select Local. - UI Box
Select Blue Menu Center Scroll. - Allow Cancel
Enable this setting. - Use Choice
Enable this setting. - Add Cancel Button
Select Last. - Text (Accept Button)
Set to: Accept
Add Quest #
Add Node > Game > Quest > Add Quest
We also need to add the quest, as the Quest Choice node only shows information.
This node is connected to the Accept slot of the Quest Choice node.
- Use Selected Data
Enable this setting. - Selected Key
Set to quest. - Data Origin
Select Local.
Show Dialogue #
Add Node > UI > Dialogue > Show Dialogue
Copy the previous Show Dialogue node.
This node is connected to the Success slot of the Add Quest node.
- Text (Message Content)
Set to: Good luck!
And that’s it for the schematic – save it, e.g. as HuntingQuests.
Adding the Guard NPC #
Open the World scene (Assets/Scenes/), we’ll add our quest NPC at the bridge into town, just across from the fox statue.
You can find the NPC prefabs in Assets/Tutorial Assets/Prefabs/NPCs/ – I’m using the Knight_Male prefab.

Interaction Machine #
Add an Interaction Machine component to the NPC’s game object, either using the component menu or the Makinom scene wizard.
Learn more about interaction machines in this Makinom documentation.
Start Settings #
- Interact
Enable this setting. - Mouse Up As Button
Enable this setting in case you also want to start the interaction by clicking on the NPC.
Machine Execution Settings #
- Schematic Asset
Select the HuntingQuests schematic you created.
Expand the Object Turn Settings, we’ll let the player and NPC turn to each other.
- Turn Starting Object
Enable this setting. - Turn Machine Object
Enable this setting.
And that’s it – save the scene.
Optional: Quest HUD #
Do you want to show a quest HUD in your game?
Follow this UI tutorial on setting up a quest HUD – you can also download the finished prefab setup and only need to set up the HUD in the editor.
With the quest HUD set up, we’ll now add a Display Condition to it.
Display Conditions > Game State Condition #
We’ll check fo our game state managing battle HUDs.
Click on Add Game State.
- Condition Type
Select Game State. - Game State
Select In Control. - Check State
Select Active.
Schematics #
I’m also using the move from left and move to left schematics from the UI animations schematics to animate the HUD.
- Own Schematics
Enable this setting. - Before Open Schematic
Select the UIMoveFromLeftFadeIn schematic. - Wait
Enable this setting. - Before Close Schematic
Select the UIMoveToLeftFadeOut schematic. - Wait
Enable this setting.
Testing #
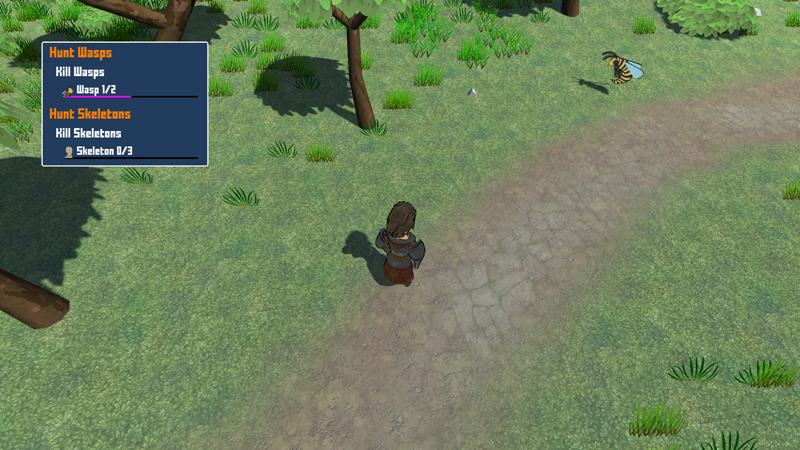
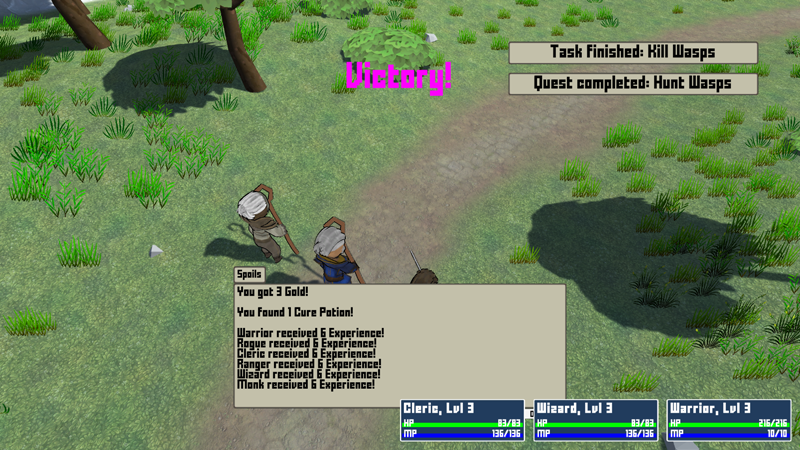
Hit play, run to the guard NPC and accept some quests.
Killing quest enemies will automatically increase the counter.
And display notifications when finishing tasks/quests.
Next, we’ll add another quest, fetching an item for an NPC.


