Create a 3D top down RPG with turn based battles from scratch in this ORK 3 tutorial series.
About this Tutorial Series #
This tutorial series is a quickstart into ORK 3 without any prior knowledge (except for basic Unity knowledge). The goal is to create a small top down 3D RPG with a Turn Based battles, setting up the entire project from scratch (only using provided assets).
The game will have a player group with 2 members (a physical fighter and a magical caster) and random encounters, taking place in separate battle scenes. It’ll also contain a small in-game menu, save games, items and equipment – everything you need for a small game.
The tutorials will mostly cover the basics and setting up specific features and mechanics:
- player and some combatants
- UI system and UI prefabs
- simple status system
- abilities, items and equipment
- Turn Based battle system
- battle start/end schematics to load the battle scene and return
- animating actions
- battle menu, player HUD, simple menu system, dialogue
- auto saving after scene changes and battles
- an interaction and some item collectors
If you want to learn more about setting up a detailed status system, check out the status system setup tutorial series (not used by this tutorial series).
If you want to learn more about all kinds of features related to setting up a complete game, check out the 3D RPG Playground tutorial series.
For a 2D version check out the 2D RPG Quickstart tutorial series.
This tutorial series is completed.
Download the Tutorial Assets #
The assets provided for this tutorial series are not for commercial use.
You can download the tutorial assets here (you only need this pack):
Please note!
This package requires using at least Unity 2020.3.
It’s recommended to use LTS (long term support) versions.
Used Assets & Special Thanks #
You don’t need to download them separately, all you need is included in the tutorial assets pack download above.
I’d like to thank Jean Moreno (JMO) for letting me use some of his Cartoon FX particle effects in this tutorial. The used particle effects are coming from the Cartoon FX Free, Cartoon FX Remaster and Cartoon FX 2 Remaster assets.
Remember, the tutorial assets are not for commercial use, if you want to use JMO’s effects, please purchase them in the Unity Asset Store.
Another special thanks to Quaternius, who provides a large range of free 3D assets under the CC0 license. If you like Quaternius’ work, consider joining their Patreon to support them!
First Steps #
Before getting started with the actual 3D RPG Quickstart tutorials, we’ll have to do some basic setup in the Unity project.
1. Create a new Unity project #
Use the Unity Hub to create a new Unity project.
Use at least Unity 2020.3 or newer.
Use the 3D template to create the project.
2. Layer Setup #
First, after creating the new Unity project, we’ll set up 2 new layers that’ll be used by the tutorial assets.
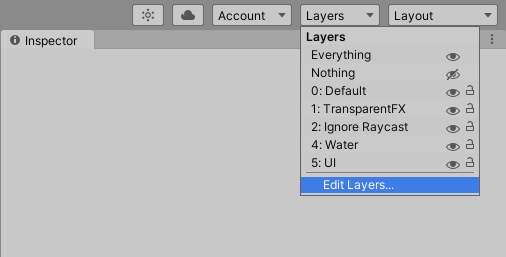
Open Unity’s layer settings, either via the Layers popup in the upper right corner:
Or via the Unity menu: Edit > Project Settings… > Tags and Layers
If your project already had layer 10 set up, you probably started with a project that has something else set up, e.g. by using a different project template. That shouldn’t have an impact on the tutorials in most cases.
Change the following layer.
- User Layer 10
Set to Combatants.
As the name suggests, this is the layer the prefabs of our combatants, but also their equipment, will be placed on. The tutorial assets are already set up that way.
Why? It’s generally a good idea to have things on different layers, e.g. for this tutorial, the ground (and other scene assets) are on the Default layer and the combatants on layer 10 (Combatants). This makes it easy to use raycasting for positions on the ground without being blocked by combatants.
3. Import ORK Framework #
Import ORK Framework (including Makinom) into your Unity project.
Use either ORK’s free test version or your paid version from the Unity Asset Store (via the Unity Package Manager).
4. Import Tutorial Assets Pack #
Import the tutorial assets pack you downloaded above.
5. Adding Scenes to Build Settings #
For being able to load scenes in a running game, they have to be added to Unity’s build settings. After importing the tutorial assets, we’ll add the scenes that are included in the package.
Open the build settings using the Unity menu: File > Build Settings…
Add the following scenes to the Scenes In Build:
- Assets/Scenes/Start Menu
- Assets/Scenes/World
- Assets/Scenes/Dungeon
- Assets/Scenes/Forest Battle Arena
- Assets/Scenes/Dungeon Battle Arena
You can delete the SampleScene that is included in each new Unity project. It’s located in Assets/Scenes/.
Ready! #
You should now have a set up Unity project with ORK/Makinom and the tutorial assets.
And with that, it’s time to start with the setup – we’ll start with the initial setup of our project.
Download the Completed Project #
If you only want to test out the project or compare it with your own setup, you can download the completed tutorial project (up to the last tutorial: 28 Item Collectors):
Download Completed Tutorial Project
This is a Unity 2020.3 project, extract the content of the zip-file and open the project in Unity. The completed project comes with ORK 3’s free test version (you can import the full version from the Asset Store after purchase).
Missing Script References #
If you run into missing script reference warnings or don’t see any UI when playing, reimport the following folders (in that order):
- Assets/Gaming Is Love/Makinom 2/
- Assets/Tutorial Assets/_Created/
That should solve missing script references on the UI prefabs.
Detailed Setup Guide #
Here’s a detailed guide to setting up the completed project in Unity and reimporting the folders to avoid missing UI scripts:
- Download the completed Unity project (zip-file)
- Unzip the file
- Add the project to your Unity HUB
- Open the project with at least Unity 2020.3
- (Optional, only needed with missing script references)
Right-click on the folder Assets/Gaming Is Love/Makinom 2/ in the project view tab and select Reimport - (Optional, only needed with missing script references)
Right-click on the folder Assets/Tutorial Assets/_Created/ in the project view tab and select Reimport - Open the Start Menu scene (Assets/Scenes/)
- Hit play
The completed project comes with ORK 3’s free test version – just import your full version into the project in case you want to use it.
Controls #
The finished project uses the following controls:
- WASD
Player movement - Arrow Keys
Navigate menus - Space
Accept/interact - Escape
Cancel - F1
Call menu.


