

ORK 4 RPG Framework is now available as a public beta (latest version BETA 8).
ORK 4 is an RPG development tool and currently supports Unity. Support for other C#-capable game engines is planned for the future (e.g. Godot).

Downloads
Since this is a beta version, things can change and there’s no guaranteed compatibility between beta versions or beta and production ready versions.
There are no breaking changes planned during the beta phase, though.
Latest version: BETA 8
Please note that the beta versions are limited versions of ORK 4, i.e. there is a setup limit on data assets (100 for each during the beta phase) and built games will automatically end after 5 minutes. No watermark.
Please consider providing feedback and report bugs in the community forum.
Documentation
You can find the ORK 4 documentation here.
The documentation is still growing, so far you’ll find information on the ORK editor, all editor sections and sub-sections, the schematic editor and some important features.
Tutorials
Follow ORK 4’s Quickstart 3D tutorials for Unity to learn using ORK and it’s most important features.
The quickstart tutorials will be expanded upon with smaller tutorial series to add more features to the project.
Extensions
Download extensions for ORK 4 here or use the ORK extension manager in Unity.
URP Assets
Download some of the ORK 3 tutorial assets converted to Universal Render Pipeline (due to the built-in render pipeline getting deprecated in Unity 6 in the future).
More assets will follow.
3D Quickstart RPG
Assets for the 3D Quickstart RPG tutorial series:
Download 3D Quickstart RPG Assets for URP
3D RPG Playground
Assets for the 3D RPG Playground tutorial series:
Download 3D RPG Playground Assets for URP
Quick Start
Open the ORK 4 editor:
- Unity menu: Window > Gaming Is Love > ORK Framework
- Keyboard shortcut: CTRL + ALT + O (Windows), CMD + ALT + O (Mac)
Open the schematic editor:
- Unity menu: Window > Gaming Is Love > Schematic Editor
- Keyboard shortcut: CTRL + ALT + M (Windows), CMD + ALT + M (Mac)
The rest is similar to how you remember it from ORK 3, you can even follow the old tutorial series with ORK 4.
Due to many settings having moved, split up or combined, you’ll sometimes need to adjust for that. Make use of the search in the section selection and main settings area to find what you’re looking for.
Requirements
Currently only Unity 6 or newer is supported. The following packages are required:
- Input System
- Unity UI
These packages are usually part of any new Unity project – if not, import them using the Unity package manager.
Your Unity project has to use either Both input systems or the Input System Package, this can be set up in your Unity project’s Player settings (Edit > Project Settings… > Player).
It’s recommended to use one of the long-term support versions of Unity, e.g. Unity 6 LTS or Unity 6.3 LTS.
Due to the upcoming breaking changes in Unity (e.g. built-inrender pipeline being deprecated) the official ORK 4 release version might require an even newer Unity version.
Current State
How far along is ORK 4?
It’s basically production ready, thoroughly tested with multiple project setups (going through ORK 3 tutorial series) and there are no big or breaking changes planned during the beta phase.
I’ll mainly use the beta phase to provide documentation and tutorials for ORK 4, as well as make some changes/additions to the editor based on your feedback. As said, there are no big changes planned and you can consider ORK 4 ready for use.
If all goes well, the official release might already be in early September (2026).
What’s new in ORK 4?
If you already use or know ORK 3, you’ll feel right at home with ORK 4 – it’s an evolution that builds upon what ORK 3 offers. However, there are a lot of changes, and many are ‘under the hood’ that’ll not be noticed by the regular user.
ORK 4 was developed with 2 goals in mind:
- making the setup easier
- supporting multiple game engines
I’ll let you decide if the first goal was achieved. The second goal lead to a lot of structural changes to separate engine-dependent features from ORK’s core functionality, without causing performance issues. We’ll see if that paid off once I start working on a first non-Unity version later this year.
Now, let’s look at the major changes you’ll find in ORK 4.
No More Makinom
ORK and Makinom have merged back together – ORK 4 is a single, standalone product. This already makes the setup (and terminology) a lot easier.
Makinom was originally developed based on ORK 2 to have a basis for multiple genre-frameworks like ORK that could extend it, but I never had enough time to really start working on other products like ORK. So, back together at last!
If you’re enjoying Makinom 2 on it’s own (without ORK), it’ll not go away. While there’ll not be a Makinom 3, Makinom 2 will continue to be updated for the time being.
New Editor
The main editor has been updated – while the overall setup experience remains the same, the navigation has been completely revamped.
Also, you now open the ORK editor using the keyboard shortcut CTRL+ALT+O (Mac OS: CMD+ALT+O) and the Unity menu: Window > Gaming Is Love > ORK Framework
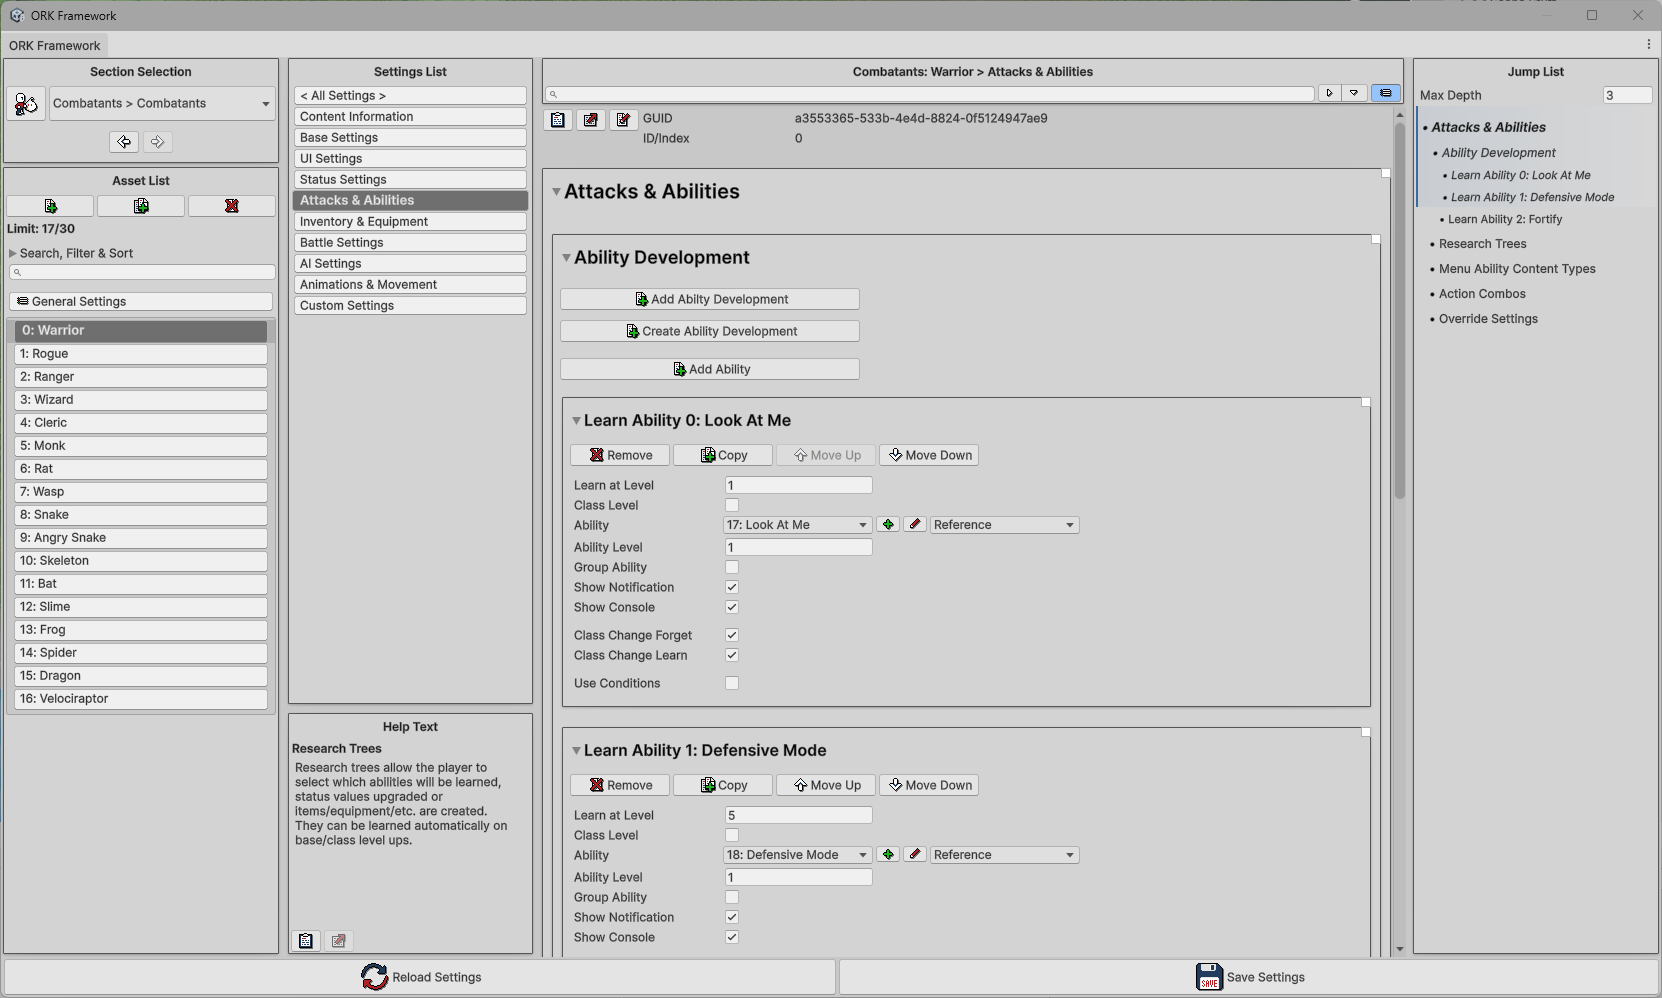
Section Navigation
The section and sub-section navigation has been combined into a searchable dropdown. You can find it in the upper left corner of the editor.
If you click on the section icon button, you’ll start the dropdown in the main section selection. If you click on the text button, you’ll start in the section of your currently selected sub-section.
You can also bring up the section dropdown using the keyboard shortcut CTRL+Space. and navigate it using the arrow keys (and Enter to accept).
You can see the new section selection in action here:

There are now more sections, e.g. UI has been split into 3 separate sections.
Many sub-sections have been split into separate ones to make them less cluttered and features easier to find. E.g. there now standalone sub-sections for flying texts, use cost display, etc.
The sub-sections have also been moved around and rearranged thematically (e.g. animations are now found in the Combatants section).
You can also favorite sub-sections by clicking on their star on the right side in the dropdown selection. This allows you to create your own little section with your most important sub-sections.
Asset List
The asset list is displayed below the section selection and will only be shown for sub-sections with data lists (e.g. items, combatants, etc.), otherwise the settings list will be displayed there.
If you’ve used ORK 3, you’ll already know how to operate it – you can add, copy and remove individual data assets, as well as drag+drop them to change their order. Additionally, there are search and filters available to navigate the list.
Settings List
The settings list is right of the section selection and asset list (for data list sub-sections), or below the section selection for non-data list sub-sections.
It lists all main foldouts of the sub-section/data you’re currently viewing as individual buttons. Clicking on a button will limit the view to that part of the settings.
For content with levels (abilities, equipment), you’ll also find the level selection here.
Help Text
The help text is always displayed below the settings list.
If you’re unfamiliar with ORK, the help text shows information about the content you currently hover over (e.g. a setting or foldout). The editor settings (found in Editor > Editor Settings allow you to change how to cause the help text to change, e.g. via hover or clicking on a ‘?’ button).
Main Settings Display
In the middle, you’ll find the actual settings of the sub-section or data list item you currently have selected.
On the top you’ll find a search field to search for settings as well as a header to let you know where you’re currently at (showing the name of the sub-section, data list item as well as the current main foldout you’re viewing).
Jumplist
The jumplist can be found at the right side of the editor and can be toggled on and off (either via the editor settings or using the button in the main settings display’s search bar).
It shows a more detailed overview of the foldout hierarchy of the settings, highlights what’s currently viewed and lets you quickly jump to a foldout or limit the view to a main foldout.
The Max Depth field allows you to control how deep in the foldout hierarchy it’ll display.
Standalone Schematic Editor
You might have noticed that the section list no longer contains Schematics. That’s because schematics now have their own, standalone editor.
You can open the schematic editor using CTRL+ALT+M (Mac OS: CMD+ALT+M) and using the Unity menu: Window > Gaming Is Love > Schematic Editor

Overall, the schematic editor hasn’t changed much and works the same as in ORK 3. Yes, the look of the nodes and grid has been refreshed a bit and disconnected nodes now also show an icon to make it clear that they’re not reachable.
However, as you can see above the grid: You can now open multiple schematics at the same time, copy content between them, etc.
The + button in the upper left corner allows you to open schematics, create new ones, open the editor settings and lists the recently opened schematics for quick access.
Also, the editor will warn you on close if you have unsaved changes and allow you to save them if you want. This can be turned off in the editor settings.
Double Precision
Often requested and now finally here: int is long and float is double!
If you don’t know what that means, don’t worry – in short, you’re now able to use much higher values than before. E.g. an int has a value range of -2,147,483,648 to 2,147,483,647, a long has a value range of -9,223,372,036,854,775,808 to 9,223,372,036,854,775,807.
This is used in most value fields (where it makes sense), e.g. the number value type selections, for status values, quantities, variables, etc.
Formulas also operate in double now (previously float).
Extensible Variable System
Speaking of values, the variables have also been reworked and are now an extensible system. If you need a different value type (or other thing, e.g. some data set with different values) to be available in the variable system, you can add that via scripts.
This’ll probably not be used by 99% of users, but the 1% that needs it will love it.
Due to the double precision update, int variables are now long variables, float variables are now double variables. This should be reflected in all help texts and settings as well – please let me know if you find int variables or float variables mentioned anywhere.
Fewer Types
ORK 3 had types – lots of types. Item types, ability types, combatant types, … there where 20 different types.
ORK 4 has 5 types: Damage types, console types, battle grid cell types and 2 more types, merging all others into them.
Organizer Types
Organizer types are used manage different functionalities and are not exposed to the player.
They replace animation types, portrait types, sound types and formula types.
Content Types
Content types are used for type separation of various content and are exposed to the player (e.g. via menus or other information displays).
They replace area types, quest types, log types, status value types, status effect types, ability types, item types, AI types, crafting types, combatant types and research types.
This change was made to reduce clutter in the editor and reduce the needed setup – e.g. anything sold in shops had to have an item type, so an ability had it’s own ability type as well as an item type, same for quests, combatants, etc.
Two-Way Modifiers
Attack and defence modifiers now have an attack and a defence value for each attribute.
This might sound complex, but it’s relatively simple: They can now use a value from the attacker and the defender to impact the final damage outcome.
E.g. a fireball ability uses the element Fire (i.e. Element attack modifier, Fire attribute) – the damage calculation now uses the user’s attack value of that attribute and the target’s defence value of that attribute.
If the user/attacker is good with fire (i.e. having a higher attack value) it’ll do more damage, if the target has a good fire defence (i.e. having a lower defence value) it’ll receive less damage.
Keep in mind that modifiers are percent-based, so a value of 100 is 100%, 50 is 50%, etc.
Player/Camera Controls
Player and camera controsl now each have their own sub-section in the Controls section.
Additionally, player and camera control types are now extensible, making it easier to integrate custom controls into the editor.
Simplification
ORK always had a lot of features and functionalities – but often it’s hard to find what you’re looking for in a sea of settings. To make things easiser, many settings have been reorganized both in big and small scale.
E.g. big scale changes: Abilities and items still offer the same functionality as before, but their settings have been heavily reorganized to improve visibility, and some settings completely removed and added as new status change types (e.g. revive or stealing).
E.g. small scale changes: Status value/effect changes of abilities and items have been reorganized to have the important things (i.e. the actual change setup) right at the top and keep the rest under an Options foldout (that’s also closed by default).
Consolidation
This affects mainly components and UI – ORK 3 had a lot of different components that handled the same or similar tasks for different content.
The different machine components? Gone, there is now only one machine component that can handle all start types (and is extensible in case you want to add your own).
The clutter of UI components? Merged into a few with a type selection for the different functionalities. One HUD content provider component, one HUD list component, one HUD text content component and one HUD value bar content component.
Overlay Toolbar
Do you know about Unity’s scene view overlays?
There is now an ORK Toolbar available for that – it offers the same functionality as the scene view hierarchy context menu, but it’s a searchable dropdown, making finding what you’re looking for a lot easier.
Due to the changes in HUD components this might also get less cluttered in future updates as many of the separate setups are no longer needed (since you only have to change a type selection to change a status value to a status effect display).
To add it, open the overlay menu using the 3 dots in the upper right corner of the scene view:

Enable the ORK Toolbar under the Custom overlays (and have Enable Overlays enabled):

And you’re good to go, have the ORK toolbar float around or dock it where you like:

Other Changes
Here are a few of the other changes:
- Scene objects have been renamed to Object Content (both in the editor and in the components)
- Schematics: Actors and dialogue speakers are now separate things and allow you to use more content information for dialogue speakers (based on object content, either using an object’s component, a defined setup or a custom setup)
- Battle spots now have a placement UI similar to formations
- Menu requirements have been updated and offer more functionality
- AI behaviours have been removed, since their functionality can be completely handled by AI rulesets
- The combatant link feature (probalby not used by anyone) has been removed, since it can be completely handled by object selected data on a combatant
The ORK Extension Manager is currently not listed in the menu, but it’ll be back in future beta versions once more extensions are available.