
In this tutorial we’ll set up a timebar HUD.
A combatant’s timebar can either be displayed in the combatant’s own HUDs, or you can use a Timebar HUD and show them all on the same timebar, optionally including cast times.
We’ll use a Timebar HUD – for this, we need to set up 2 Combatant HUDs for the player and enemy combatants (due to different placement above and below our timebar) and the Timebar HUD itself.
Learn more about timebar HUDs in this documentation.
Player Timebar HUD Prefab Setup #
First, we’ll create the prefab for our player timebar HUD, we’ll simply display the combatant’s icon and use a box background image. Additionally, we’ll add a small arrow image to point it at the position on the timebar.
Use the scene hierarchy context menu to create a new HUD: Makinom > HUD > HUD (i.e. without any layout)
Let’s adjust the HUD game object to our needs.
Rect Transform #
Since the HUD itself will be placed on the Timebar HUD, we can ignore the positioning. However, the root of the HUD should just be a single point, we’ll add the rest as child objects.
- Width
Set to 0. - Height
Set to 0.
Arrow Image #
Use the context menu to add an Image component to the HUD game object: UI > Image
This’ll add a new child object, where we’ll adjust the Image component.
Image #
- Source Image
Select the TimebarArrow sprite.
Rect Transform #
The player should be displayed above the timebar, i.e. our arrow needs to point downwards and point at the HUD game object’s position.
Change the settings in this order:
- Rotation
Set to X=0, Y=0, Z=180. - Pivot
Set to X=0.5, Y=1. - Width
Set to 25. - Height
Set to 25. - Pos X
Set to 0. - Pos Y
Set to 0.
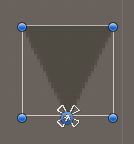
This’ll place the arrow like this:
Box and Icon #
Next, use the context menu on the HUD game object to add a Status Text Content child object: ORK Framework > HUD > Content > Status Text+Icon Content
This’ll add the Status Text Content child object with two own child objects, Image and Text. We don’t need text, so remove the Text child object.
We’re not using the Status Icon Content variant here (which would only have the icon), as that’d put the icon’s Image component directly on the created game object instead of adding another child object. For our setup, we need the icon as a child object, because we also display a box image around it.
Select the Status Text Content child object and change the following things.
Rect Transform #
- Pivot
Set to X=0.5, Y=0. - Width
Set to 60. - Height
Set to 60. - Pos X
Set to 0. - Pos Y
Set to 24.
ORK HUD Status Text Content #
- Status Type
Select Combatant Information. - Use Content Icon
Enable this setting.
This’ll use the combatant’s icon in the Image child object. - Text
Remove the text (i.e. no text at all).
Horizontal Layout Group #
- Padding
Set all to 3.
Image #
Add an Image component to the Status Text Content game object.
- Source Image
Select BoxBeige.
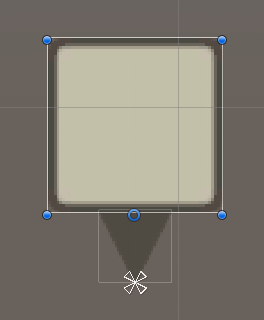
The finished HUD will look like this:
Create Prefab #
Create a prefab out of the HUD game object, e.g. naming it Player Timebar Icon HUD.
Don’t remove the game object from the scene yet, we’ll now adjust it and make another prefab for the enemy.
Enemy Timebar HUD Prefab Setup #
The enemy’s icon will be placed below the timebar, i.e. we’ll have to change the arrow and box locations (and rotation of the arrow).
Arrow #
Select the Image child object of the HUD game object.
Rect Transform #
- Rotation
Set to X=0, Y=0, Z=0.
And this already rotates and places the arrow as it should be.
Box and Icon #
Select the Status Text Content child object of the HUD game object.
Rect Transform #
- Pivot
Set to X=0.5, Y=1. - Pos Y
Set to -24.
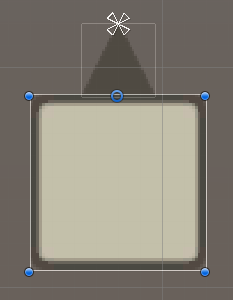
The finished HUD will look like this:
Create Prefab #
Create an original prefab out of the HUD game object, e.g. naming it Enemy Timebar Icon HUD.
Remove the HUD game object from the scene, but keep the canvas, we’ll now set up the timebar itself.
Timebar HUD Prefab Setup #
This’ll be pretty easy, we’ll use the scene hierarchy context menu to create a ready-to-use setup: ORK Framework > HUD > Timebar HUD with Cast Time
We’ll adjust it for our needs, mainly the placement.
Rect Transform #
The HUD should be placed in the upper left corner of the screen, with enough space to the top to show the player icons.
I’m using these settings:
Use the top left anchor preset.
- Pivot
Set to X=0, Y=1. - Pos X
Set to 150. - Pos Y
Set to -150. - Width
Set to 400. - Height
Set to 10.
Image #
Feel free to change the used images for the timebar and cast time bar.
I’m using this setup on the Timebar HUD game object.
- Source Image
Select BoxBlue. - Color
Select a white color with full alpha (i.e. A=255 or 1, depending on your color picker).
I’m using this setup on the Cast Time child object.
- Source Image
Select BoxBeige. - Color
Select a red color with full alpha (i.e. A=255 or 1, depending on your color picker).
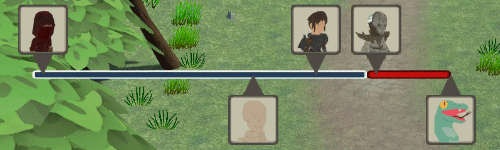
The finished HUD will look like this:

In case you’re wondering how the position of the individual combatant HUDs will be handled: Their position on the timebar is determined by the Empty Timebar Position and Max Timebar Position settings of the Timebar HUD component.
The position on the cast time bar is determined by the Empty Cast Position and Full Cast Position settings of the Timebar HUD component.
This points to empty game objects on the timebar to define those locations.
You can also separate those 2, having the cast time bar at a separate location.
Create Prefab #
Create a prefab out of the HUD game object, e.g. naming it Timebar HUD.
If you’ve done the setup in one of your game’s scenes, don’t forget to remove the canvas (with the HUD game object).
HUD Setups #
Now, we’ll set up the HUDs using our prefabs.
Navigate to UI > HUDs, we’ll add new HUDs.
Player Timebar Icon #
The player (and enemy) timebar HUD is just used as a template, i.e. we don’t display it on itself and don’t need to set up which combatants use it or display conditions.
HUD Settings #
- Name
Set to Player Timebar Icon. - HUD Type
Select Combatant. - Auto Display
Disable this setting.
Unity UI #
- UI Layer
Select HUDs. - HUD Prefab
Select the Player Timebar Icon HUD prefab we just created.
Enemy Timebar Icon #
Copy the Player Timebar Icon HUD and change the following settings.
HUD Settings #
- Name
Set to Enemy Timebar Icon.
Unity UI #
- HUD Prefab
Select the Enemy Timebar Icon HUD prefab we just created.
Timebar #
Add a new HUD, now we’ll set up the actual timebar.
HUD Settings #
- Name
Set to Timebar. - HUD Type
Select Timebar. - Auto Display
Enable this setting.
Timebar Settings > Player Combatants #
- Enabled
Enable this setting. - HUD
Select Player Timebar Icon.
Timebar Settings > Ally Combatants #
- Enabled
Enable this setting. - HUD
Select Player Timebar Icon.
Timebar Settings > Enemy Combatants #
- Enabled
Enable this setting. - HUD
Select Enemy Timebar Icon.
Display Conditions #
A Timebar type HUD will only be displayed during running Active Time battles, so we could just keep the display conditions as they are.
We’ll set up our Show Battle HUD game state check anyway, maybe we want to hide the battle HUDs in the future (e.g. during a ‘cinematic’ attack, or something like that).
Click on Add Game State.
- Condition Type
Select Game State. - Game State
Select Show Battle HUD. - Check State
Select Active.
Unity UI #
- UI Layer
Select HUDs. - HUD Prefab
Select the Timebar HUD prefab we just created.
Save Changes #
And that’s it!
Don’t forget to save your changes by clicking on Save Settings at the bottom of the editor.
Next, we’ll set up our first battle!


