ORK Framework Logo - RPG Editor for Unity
  • Features
  • Showcase
  • Guide
    • Documentation
    • Tutorials
    • API
  • ORK 2
    • Tutorials
    • Plugins
    • API
  • Support
  • Forum
  • Get ORK

2D RPG Quickstart

  • START 2D RPG Quickstart
  • 01 Initial Setup
  • 02 Player Setup
  • 03 Music & Scenes
  • 04 UI System Setup
  • 05 UI Boxes
  • 06 Flying Texts
  • 07 Status Values
  • 08 Status Effects
  • 09 First Abilities
  • 10 Fighter Setup
  • 11 First Enemies & Battle AI
  • 12 Battle System Setup
  • 13 Animating Battle Start and End
  • 14 Random Battles
  • 15 Animating Actions
  • 16 Player Battle HUD
  • 17 Elemental Attacks
  • 18 Animating More Actions
  • 19 Inventory & Loot
  • 20 Equipment
  • 21 Loot, Start Equipment & Viewers
  • 22 Magic Abilities
  • 23 Caster Setup
  • 24 More Enemies
  • 25 Start Menu & Save Games
  • 26 Menu Screens
  • 27 Interactions
  • 28 Item Collectors
  • END 2D RPG Quickstart

3D RPG Quickstart

  • START 3D RPG Quickstart
  • 01 Initial Setup
  • 02 Player Setup
  • 03 Music & Scenes
  • 04 UI System Setup
  • 05 UI Boxes
  • 06 Flying Texts
  • 07 Status Values
  • 08 Status Effects
  • 09 First Abilities
  • 10 Fighter Setup
  • 11 First Enemies & Battle AI
  • 12 Battle System Setup
  • 13 Animating Battle Start and End
  • 14 Random Battles
  • 15 Animating Actions
  • 16 Player Battle HUD
  • 17 Elemental Attacks
  • 18 Animating More Actions
  • 19 Inventory & Loot
  • 20 Equipment
  • 21 Loot, Start Equipment & Viewers
  • 22 Magic Abilities
  • 23 Caster Setup
  • 24 More Enemies
  • 25 Start Menu & Save Games
  • 26 Menu Screens
  • 27 Interactions
  • 28 Item Collectors
  • END 3D RPG Quickstart

Status System Setup

  • START Status System Setup
  • 01 Status Values
  • 02 Status Development
  • 03 Attack/Defence Modifiers
  • 04 Status Effects
  • 05 Formulas
  • 06 Ability & Item Types
  • 07 Abilities Part 1: Attacks
  • 08 Abilities Part 2: Support & Sabotage
  • 09 Abilities Part 3: Elemental Magic
  • 10 Items
  • 11 Equipment Part 1: Slots & Slot Set Templates
  • 12 Equipment Part 2: Weapons
  • 12.5 (Optional) Equipment Part 2.5: Weapons
  • 13 Equipment Part 3: Shields, Armor & Accessories
  • 13.5 (Optional) Equipment Part 3.5: Shields, Armor & Accessories
  • 14 Equipment Part 4: Available Equipment Templates
  • 15 Loot
  • 16 Battle AIs
  • 17 Combatants Part 1: General Settings
  • 18 Combatants Part 2: Players
  • 19 Combatants Part 3: Enemies
  • 20 Combatant Groups
  • END Status System Setup

3D RPG Playground

  • START 3D RPG Playground
  • 01 Player Setup
  • 02 Start Menu
  • 03 First Interaction
  • 04 Music
  • 05 Areas
  • 06 Collecting Items
  • 07 Displaying Equipment
  • 08 Combatant Prefabs, Icons & Portraits
  • 09 Combatant Animations
  • 10 Camera Positions
  • ANIM 01 Battle Start/End Schematics
  • ANIM 02 Use, Cast & Camera
  • ANIM 03 Abilities & Items
  • ANIM 04 Physical Attacks
  • ANIM 05 Special Actions
  • BATTLE 01 Battle Menu
  • BATTLE 02 Prepare for Battle
  • TURN 01 Turn Based Setup
  • TURN 02 Turn Order HUD
  • ATB 01 Active Time Setup
  • ATB 02 Cast Times
  • ATB 03 Timebar HUD
  • BATTLE 03 The First Battle
  • BATTLE 04 Hunting Move AI
  • BATTLE 05 Spawning Combatants
  • 11 Save Games
  • MENU 01 UI Boxes
  • MENU 02 Template HUDs
  • MENU 03 Overview Menu
  • MENU 04 Menu Screens
  • 12 Shop
  • BATTLE 06 Random Battles
  • DUNGEON 01 Enter the Dungeon
  • DUNGEON 02 The Trapdoor
  • DUNGEON 03 Enemies on Level 1 & 2
  • DUNGEON 04 Traps on Level 3
  • DUNGEON 05 Going Deeper
  • 13 Bestiary (+MENU+ANIM)
  • QUEST 01 Hunting Quests (+MENU)
  • QUEST 02 Guard NPC
  • QUEST 03 Forest Ruin Cheese
  • QUEST 04 Witch NPC with Cheese
  • QUEST 05 Quest Mark HUDs
  • 14 Research Trees (+MENU)
  • CRAFT 01 Crafting Materials
  • CRAFT 02 Crafting Recipes
  • CRAFT 03 Crafting Menu
  • CRAFT 04 Crafting Proficiency & Critical Crafting
  • CRAFT 05 Materials Loot
  • 15 Changing Choice Dialogue
  • 16 Follow Me!
  • BATTLE 07 Sequence Loot Dialogue

3D Action RPG

  • START 3D Action RPG
  • 01 Status System Setup
  • 02 Player Setup
  • 03 Player Weapon
  • 04 Player Attacks
  • 05 Enemy: Chomper
  • 06 Chomper Attack
  • 07 Hit & Death
  • 08 HUDs
  • 09 Rolling on the Floor
  • 10 Enemy: Spitter
  • 11 Spit Attack
  • 12 Potion
  • 13 Grenade
  • 14 Item HUD
  • 15 Enemy: Grenadier
  • 16 Grenadier Melee Attacks
  • 17 Grenadier Flamethrower
  • 18 Item Drops
  • END 3D Action RPG

2D Grid Battle RPG

  • START 2D Grid Battle RPG
  • 01 Player Setup
  • 02 Prefab & Music Setup
  • 03 Randomizing Combatants
  • 04 UI Setup
  • 05 Battle Start, End & Phase Schematics
  • 06 Battle System Setup
  • 07 Battle Grid Setup
  • 08 Grid Move
  • 09 Forest Battle Grid
  • 10 Battle AI
  • 11 Ability Ranges
  • 12 Death & Use Schematics
  • 13 Attack Schematic
  • 14 Shoot Schematics
  • 15 Battle Selection Interaction
  • END 2D Grid Battle RPG

Schematics

  • Simple Start Schematic
  • Battle Start Schematic
  • Battle End Schematic
  • Moving to Target and Back
  • Animating a Base Attack
  • Animating a Magic Ability
  • Grid Movement
  • Open and Close UI Animations
  • Flying Text Mover

UI Setups

  • Unity UI: Initial Setup
  • Unity UI: TextMesh Pro Setup
  • Unity UI: UI Box
  • Unity UI: Flying Text
  • Unity UI: Dragging Notification
  • Unity UI: Canvas with Screen Space Camera
  • Unity UI: Interaction HUD
  • Unity UI: Simple Player HUD
  • Unity UI: Quest HUD
  • Unity UI: Shortcuts HUD
  • Unity UI: Currency HUD
  • Unity UI: Tooltip HUD
  • Unity UI: Control HUD
  • Unity UI: Attack Modifiers
  • Unity UI: Defence Modifiers

Gameplay Bits

  • Combining Input Origins
  • Combining Status Value Flying Texts
  • Fun With Flying Text
  • HUD Effects With Conditional Schematics
  • Inventory Containers
  • Multi Interaction Controllers
  • World Space HUD
  • World Space Dialogue
  • Home
  • Guide
  • Tutorials
  • 3D RPG Playground
  • 11 Save Games

11 Save Games

Table of Contents
  • Save Game Menus
    • Save Game Settings
      • Save File Settings
    • Save Data Settings
    • File Settings
      • File Info
    • Pause Settings
    • Save Game Menu
      • Save Question Dialogue
    • Load Game Menu
      • Load Question Dialogue
    • Save Point Settings
      • Cancel Button
  • Save Points
    • Save Point Prefab
      • Save Point Component
    • Adding Save Points
  • Testing

In this tutorial we’ll set up save game menus and save points in the world.

Fighting enemies, getting loot and experience – we need to save our progress, or it was all for nought!

Save Game Menus #

Navigate to UI > Save Game Settings, we’ll take a look at the save games and set up the save menus.

Save Game Settings #

These settings handle the number of available save slots (and auto save slots) as well as where the save games are saved.

We’ll stick with the default setup:

  • Save Slots
    Set to 3.

Save File Settings #

  • Save File Type
    Select Persistent Data Path.

Save Data Settings #

These settings define which game data will be part of the save game.

We’ll stick with the default setup, which will save most of the data.

File Settings #

Define the name of save files and content included in the file’s information (e.g. game time, area).

We’ll adjust the File Info to include some information about the saved game, the rest will be kept at the default setup.

File Info #

  • Name
    Set to: <filename> (<time>)
    <playername>, Lvl <playerlevel>
    <area>

Pause Settings #

You can optionally pause the game while displaying save game menus, we’ll do that.

  • Pause Game
    Enable this setting.
  • Freeze Pause
    Enable this setting.
    This’ll set the time scale to 0, halting all animations, movement, etc.

Save Game Menu #

These settings handle the menu for saving the game.

  • UI Box
    Select Blue Center Fit.
  • Add Cancel Button
    Select Last.
    This’ll add a cancel button as the last input of the menu.
  • Text (Message Content)
    Set to: Select save file

Save Question Dialogue #

We’ll also show a dialogue to confirm saving the game.

  • Show Question
    Enable this setting.
  • UI Box
    Select Blue Center Fit.
  • Text (Message Content)
    Set to: Save to <filename>?
  • Use Choice
    Enable this setting.
  • Text (Yes Button)
    Set to: Save
  • Text (No Button)
    Set to: Cancel

Load Game Menu #

These settings handle the menu for loading a saved game.

  • UI Box
    Select Blue Center Fit.
  • Add Cancel Button
    Select Last.
  • Text (Message Content)
    Set to: Select file to load

Load Question Dialogue #

We’ll also show a dialogue to confirm loading the game.

  • Show Question
    Enable this setting.
  • UI Box
    Select Blue Center Fit.
  • Text (Message Content)
    Set to: Load <filename>?
  • Use Choice
    Enable this setting.
  • Text (Yes Button)
    Set to: Load
  • Text (No Button)
    Set to: Cancel

Save Point Settings #

We’ll use a save point to select saving or loading the game – these settings handle the save point menu’s setup.

  • Show Choice
    Enable this setting.
  • UI Box
    Select Blue Center Fit.

The default Save Button and Load Button setup is already what we need, but we’ll add a cancel button.

Cancel Button #

  • Add Cancel Button
    Select Last.

And that’s it for the editor setup – don’t forget to save your changes by clicking on Save Settings at the bottom of the editor.

Save Points #

We’ll now add save points to the World scene (Assets/Scenes/).

There’s already a prefab available we’ll use, we just need to add a Save Point component to it.

Save Point Prefab #

The SavePoint prefab is located in Assets/Tutorial Assets/Prefabs/ – open the prefab and add a Save Point component to it.

Yes, it’s a cute fox statue.

Save Point Component #

The default setup of the save point component is already all we need.

  • Save Point Type
    Select Save Point.

The save point is also set up to start on interaction.
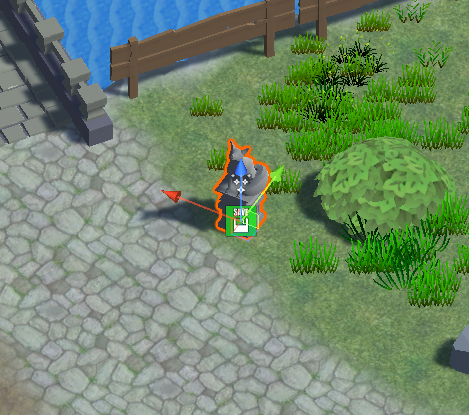
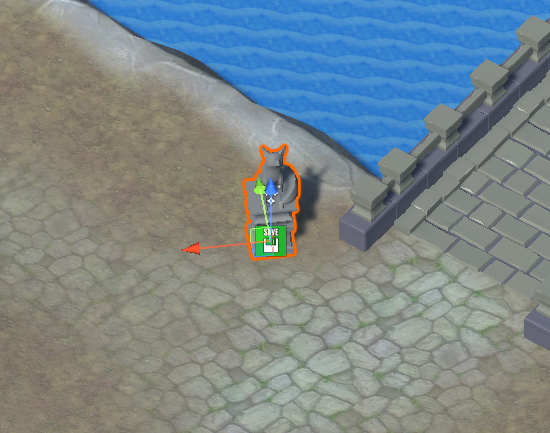
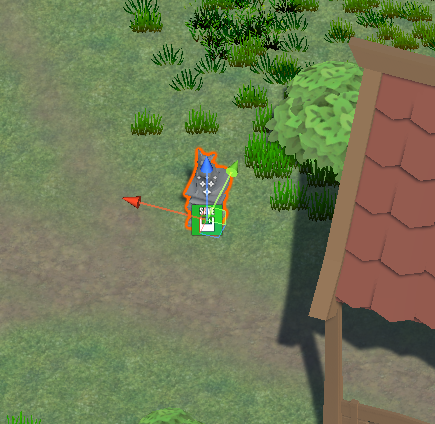
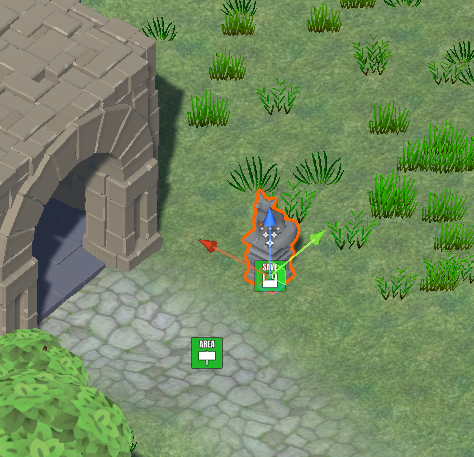
Adding Save Points #

We’ll add one to the town, e.g. place it near the bridge.

Add another one at the bridge connecting the forest and the swamp.

And another one at the outpost’s entrance.

And a last one at the entrance to the dungeon.

That should be enough – feel free to add more if you want.

Testing #

Hit play, run to a save point and interact with it.

You can now save and load the game!

The start menu now also has the Continue button available after saving the game.


Next, we’ll start setting up menu screens!

Share This Article :
  • Facebook
  • Twitter
  • LinkedIn
  • Pinterest
Updated on December 20, 2021
Table of Contents
  • Save Game Menus
    • Save Game Settings
      • Save File Settings
    • Save Data Settings
    • File Settings
      • File Info
    • Pause Settings
    • Save Game Menu
      • Save Question Dialogue
    • Load Game Menu
      • Load Question Dialogue
    • Save Point Settings
      • Cancel Button
  • Save Points
    • Save Point Prefab
      • Save Point Component
    • Adding Save Points
  • Testing
Sitemap
  • Features
  • Showcase
  • Guide
    • Documentation
    • Tutorials
    • API
  • ORK 2 Hub
    • Tutorials
    • Plugins
    • API
  • Support
  • Forum
  • Get ORK
  • Contact
  • Blog
  • Makinom
  • gamingislove.com
Categories
  • News (60)
  • ORK 2 (137)
    • Tutorial (137)
      • Game tutorial (50)
      • Gameplay (32)
      • How-to (55)
  • Release (130)
Search

© 2015 Gaming is Love e.U.

Disclosure: This site may contain affiliate links, which means I may receive a commission if you click a link and purchase something that I have recommended. While clicking these links won’t cost you any money, they will help me fund my development projects while recommending great assets!