
In this tutorial we’ll set up schematics to animate physical attack abilities.
This tutorial continues the sub-series for animating battles.
We’ll set up schematics for the different attack abilities (attack, poison attack, etc.) and bow attack abilities (shoot, double shot, round shot). The attacks will first move a step forward, attack and move a step back – this’ll be split into multiple schematics to keep things modular.
In total, there are 6 schematics to set up:
- move forward
- move backward
- attack
- bow attack (draw – shoot)
- double shot (draw – shot – shot)
- round shot (draw – shot for each target)
Sounds like a lot, but we’ll once again work with variations of a basic schematic – the attack schematic will be used as a basis for the bow attack, which will be the basis for double/round shot.
Setting up Sound Types #
First, we’ll set up some sound types, as we’ll this time play sounds using sound assignments on our combatants.
Sound Types #
Navigate to Base/Control > Sound Types, we’ll change the Default type and add an additional type.
0: Attack #
This’ll be played for attack ‘swings’.
- Name
Set to Attack.
1: Damage #
This’ll be played for attacks hitting a combatant.
- Name
Set to Damage.
Combatants General Settings #
Now, we’ll assign audio clips to those sounds as a default setup for all combatants.
Navigate to Combatants > Combatants > General Settings.
Animations & Movement > Sound Settings #
Click on Add Sound.
- Sound Type
Select Attack. - Audio Clip
Select swoosh01.
We’ll add multiple audio clips, one of them will be used randomly.
Click on Add Audio Clip.
- Audio Clip
Select swoosh02.
Click on Add Audio Clip.
- Audio Clip
Select swoosh03.
Alright, and another sound – click on Add Sound.
- Sound Type
Select Damage. - Audio Clip
Select hit03.
That’s it for the sounds – you can also overrule those default sounds and assign others for individual combatants and even equipment, e.g. assigning different attack sounds to different weapons.
Don’t forget to save your changes by clicking on Save Settings at the bottom of the editor.
Move Forward Schematic #
This schematic will move the user (Machine Object) forward for a short distance.
Navigate to Schematics.

Move Into Direction #
Add Node > Movement > Movement > Move Into Direction
This node moves a game object into a defined direction. We’ll use it to move forward a short distance.
- Object (Moving Object)
Select Machine Object. - Move Component
Select Auto. - Time
Select Value > Value.
Set the value to 0.2. - Wait
Enable this setting. - Speed Type
Select Value.
We’ll move at a fixed value for all combatants instead of using a combatant-based movement speed. - Speed
Select Value > Value.
Set the value to 5. - Vector3 Type (Direction)
Select Value > Direction. - Direction
Select Forward. - Local Space
Enable this setting.
And that’s it for the schematic. Click on Save Schematic to save it, e.g. as MoveForward.
Move Back Schematic #
Moving back works pretty much the same way, but we’ll add an additional node to set the combatant back on it’s position after the move to prevent the position from changing too much each time.
We’ll simply change what we need to for this variation and use Save Schematic As to save it as a new schematic.

Settings #
We need to add an actor to be able to use the combatant’s battle spot.
Actors #
Click on Add Actor.
- Actor Type
Select User Base.
Move Into Direction #
Add Node > Movement > Movement > Move Into Direction
We’ll change it to move back.
- Direction
Select Back.
Change Position #
Add Node > Movement > Movement > Change Position
We’ll set the user back on it’s battle spot (User Base actor).
- Object (Moving Object)
Select Machine Object. - Move Component
Select Auto. - To Object
Enable this setting. - Object
Select Actor 0: User Base.
And that’s it for the schematic. Click on Save Schematic As … to save it, e.g. as MoveBack.
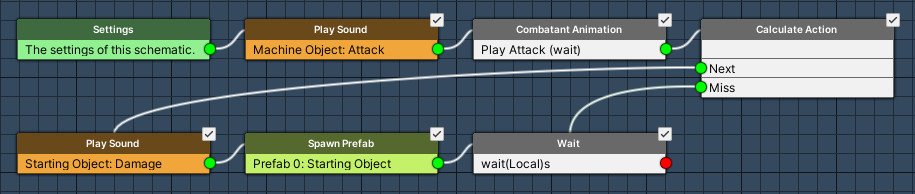
Attack Schematic #
This schematic will be used for physical attacks except for bow attacks (shoot, double shot, round shot).
Create a new schematic.
Settings #
We’ll add a prefab for the damage effect – some abilities will override the prefab with a custom one (e.g. poison attack).
Prefabs #
Click on Add Prefab.
- Auto Destroy After Time
Enable this setting. - Time
Set to 1. - Prefab
Select HitEffect.
Play Sound #
Add Node > Audio > Audio > Play Sound
Play the Attack sound type on the user.
- Object (Play On)
Select Machine Object. - Use Sound Type
Enable this setting. - Sound Type
Select Attack. - Play One Shot
Enable this setting.
Combatant Animation #
Add Node > Animation > Combatant > Combatant Animation
We’ll play the Attack animation.
- Object
Select Machine Object. - Animation Type
Select Attack. - Wait
Enable this setting. - Normalized Time
Set to 0.5. - Store Duration
Enable this setting.
We’ll also store the animation’s duration into a float variable and use it afterwards in a Wait node. - Normalized Time (Store Duration)
Set to 0.5. - Variable Key
Set to wait. - Variable Origin
Select Local.
Calculate Action #
Add Node > Battle > Action Outcome > Calculate Action
Now, we’ll calculate the outcome of the action – we’ll also use a separate Next slot in case the attack misses.
- Use ‘Miss’ Next
Enable this setting.
Play Sound #
Add Node > Audio > Audio > Play Sound
Play the Damage sound type on the target.
This node is connected to the Next slot of the Calculate Action node.
- Object (Play On)
Select Starting Object. - Use Sound Type
Enable this setting. - Sound Type
Select Damage. - Play One Shot
Enable this setting.
Spawn Prefab #
Add Node > Game Object > Prefab > Spawn Prefab
We’ll spawn the prefab on the target (Starting Object).
- Prefab
Select Prefab 0. - Use Prefab Rotation
Enable this setting. - Target Type
Select Object. - Object (Target Object)
Select Starting Object. - Spawn At
Select All.
Wait #
Add Node > Base > Wait
And now we’ll wait for the stored duration.
This node is connected to the Next slot of the Spawn Prefab node and the Miss slot of the Calculate Action node.
- Time
Select Variable > Float Variable. - Variable Key
Set to wait. - Variable Origin
Select Local.
And that’s it for the schematic. Click on Save Schematic to save it, e.g. as Attack.
Bow Attack Schematic #
The bow attack is similar to the attack schematic, but we’ll add an additional animation at the start and change the attack animation.
We’ll simply change what we need to for this variation and use Save Schematic As to save it as a new schematic.

Combatant Animation #
Add Node > Animation > Combatant > Combatant Animation
Copy the already added Combatant Animation node and add it between the Settings and Play Sound nodes – i.e. it’s connected to the Settings node’s slot and it’s own Next slot connects to the Play Sound node.
Change the used animation type, and we’ll wait for the whole duration (and not store the remaining time).
- Animation Type
Select Bow Draw. - Normalized Time
Set to 1. - Store Duration
Disable this setting.
Combatant Animation (after Play Sound) #
Change the animation type of the original node from Attack to Bow Shoot. The rest remains the same (waiting for 0.5 and storing the duration).
- Animation Type
Select Bow Shoot.
And that’s it for the schematic. Click on Save Schematic As … to save it, e.g. as BowAttack.
Double Shot Schematic #
Double shot attacks the same target twice – so we’ll make this easy by just copying some of the nodes and connecting them at the end.
Select all nodes from the 1st Play Sound to the Wait node at the end. You can select multiple nodes by either drag selecting or shift-clicking the nodes.
Copy the nodes, either via the context menu (Copy & Paste > Copy) or using the keyboard shortcut CTRL + D (Windows).
Drag the nodes downward (hold shift while dragging to drag them all) and connect the Wait node to the Play Sound node of the copied nodes.
The finished schematic will look something like this:
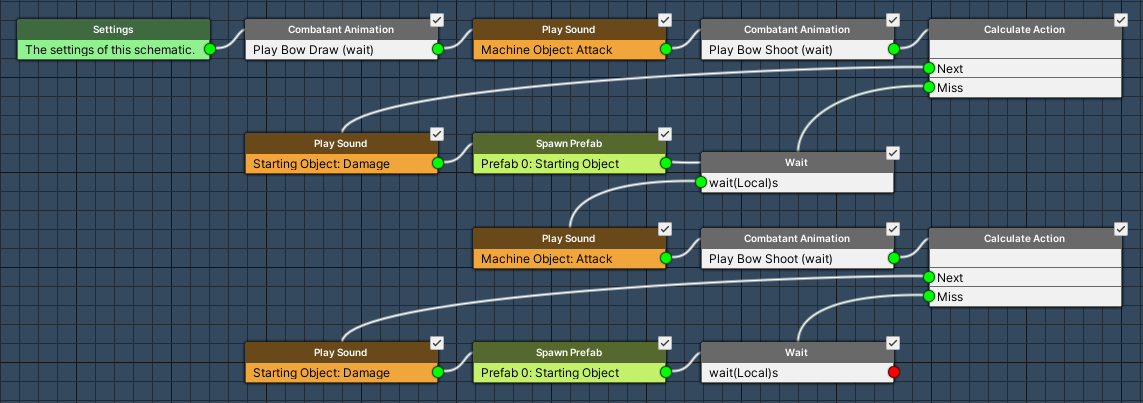
And that’s it for the schematic. Click on Save Schematic As … to save it, e.g. as DoubleShot.
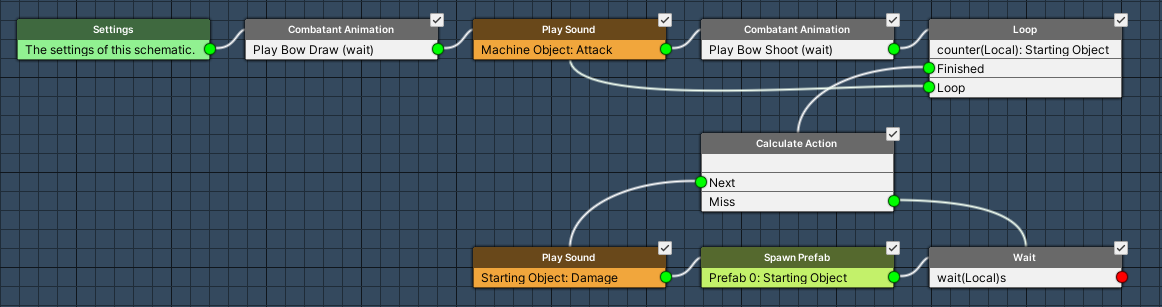
Round Shot Schematic #
Round shot will damage each enemy once – we’ll make this another variation of the original BowAttack schematic, where we’ll play the shoot animation once for each target using a Loop.
Open the BowAttack schematic you set up before and change the following settings.
Combatant Animation (2nd, using Bow Shoot) #
We’ll change the wait time to wait for the full animation, but still keep the stored duration.
Make sure to change the 2nd Combatant Animation node using the Bow Shoot animation type.
- Normalized Time (below Wait)
Set to 1.
Loop #
Add Node > Base > Loop
This node is an easy way to loop over some nodes a defined number of times – it uses an int variable to keep track of the counter.
Add this node after the Combatant Animation node, i.e. before the Calculate Action node.
The Loop node’s Loop slot connects back to the 1st Play Sound (Attack sound type) node, it’s Finished slot to the Calculate Action node.
- Max Count
Select Game Object > Game Object Count.
We’ll count the number of targets. - Object (Max Count)
Select Starting Object. - Variable Key
Set to counter. - Variable Origin
Select Local.
And with that we’ll play the sound and shoot animation for each target, afterwards the damage is calcualted (on all targets).
That’s it for the schematic. Click on Save Schematic As … to save it, e.g. as RoundShot.
Abilities #
Next, we’ll set up the battle animations for our attack and bow attack abilities.
Navigate to Status > Abilities and change the following abilities.
0: Attack #
We’ll move forward, attack and move back.
Battle Animation #
We’ll not use the ability start/end animations.
- Use Start Animation
Disable this setting. - Use End Animation
Disable this setting.
Click on Add Battle Animation.
- Schematic Asset
Select the MoveForward schematic.
Click on Add Battle Animation.
- Schematic Asset
Select the Attack schematic.
Click on Add Battle Animation.
- Schematic Asset
Select the MoveBack schematic.
1: Shoot #
This one just uses the bow attack.
Battle Animation #
- Use Start Animation
Disable this setting. - Use End Animation
Disable this setting.
Click on Add Battle Animation.
- Schematic Asset
Select the BowAttack schematic.
2: Poison Attack #
Like Attack, but we’ll also override the prefab.
Battle Animation #
- Use Start Animation
Disable this setting. - Use End Animation
Disable this setting.
Click on Add Battle Animation.
- Schematic Asset
Select the MoveForward schematic.
Click on Add Battle Animation.
- Schematic Asset
Select the Attack schematic.
We’ll replace the prefab in the Resource Overrides settings.
Click on Add Prefab Override.
- Auto Destroy After Time
Enable this setting. - Time
Set to 3. - Prefab
Select PoisonEffect.
Click on Add Battle Animation.
- Schematic Asset
Select the MoveBack schematic.
3: Slow Attack #
Like Poison Attack, but using a different prefab.
Battle Animation #
- Use Start Animation
Disable this setting. - Use End Animation
Disable this setting.
Click on Add Battle Animation.
- Schematic Asset
Select the MoveForward schematic.
Click on Add Battle Animation.
- Schematic Asset
Select the Attack schematic.
We’ll replace the prefab in the Resource Overrides settings.
Click on Add Prefab Override.
- Auto Destroy After Time
Enable this setting. - Time
Set to 3. - Prefab
Select NegativeEffect.
Click on Add Battle Animation.
- Schematic Asset
Select the MoveBack schematic.
4: Blind Attack #
Like Poison Attack, but using a different prefab.
Battle Animation #
- Use Start Animation
Disable this setting. - Use End Animation
Disable this setting.
Click on Add Battle Animation.
- Schematic Asset
Select the MoveForward schematic.
Click on Add Battle Animation.
- Schematic Asset
Select the Attack schematic.
We’ll replace the prefab in the Resource Overrides settings.
Click on Add Prefab Override.
- Auto Destroy After Time
Enable this setting. - Time
Set to 3. - Prefab
Select BlindEffect.
Click on Add Battle Animation.
- Schematic Asset
Select the MoveBack schematic.
5: Double Shot #
Simply uses it’s own schematic.
Battle Animation #
- Use Start Animation
Disable this setting. - Use End Animation
Disable this setting.
Click on Add Battle Animation.
- Schematic Asset
Select the DoubleShot schematic.
6: Round Shot #
Simply uses it’s own schematic as well.
Battle Animation #
- Use Start Animation
Disable this setting. - Use End Animation
Disable this setting.
Click on Add Battle Animation.
- Schematic Asset
Select the RoundShot schematic.
Save Changes #
And that’s it for the physical attack ability schematics!
Don’t forget to save your changes by clicking on Save Settings at the bottom of the editor.
Next, we’ll set up schematics for special actions.


