
In this tutorial we’ll set up the in-game menus.
In-game menus are created using menu screens. You can learn more about them in this documentation.
We’ll set up the following menu screens:
- overview
- inventory
- equipment
- ability
Let’s get to it!
Menu Screen Setup #
We’ll set up our menu background (using the prefab we created earlier) and add all menu screens we’ll use before doing their actual setup.
This way we can already use them in our Overview menu to open the individual menus from it.
Menu Screen General Settings #
Open the Makinom editor and navigate to UI > Menu Screens > General Settings.
General Backgrounds #
General backgrounds are displayed in all menu screens (unless they’re disabled by them). Unlike the Default Backgrounds (or individual backgrounds of menu screens), the general backgrounds will also stay on screen when transitioning between menus, as the other backgrounds are opened and closed with each menu screen.
Click on Add General Background.
- UI Layer
Select Background. - Prefab
Select the Menu Background prefab. - Before Open Schematic
Select the UIFadeIn schematic. - Wait
Enable this setting. - Before Close Schematic
Select the UIFadeOut schematic. - Wait
Enable this setting.
0: Overview #
Navigate to UI > Menu Screens and select the Default menu screen.
We’ll also set up the default settings for our menu screens – the others will just be copies adjusting the name.
- Name
Set to: Overview
Settings #
- Remember Selection
Enable this setting. - Single Screen
Enable this setting.
The menu screen can only be displayed alone instead of combined with other screens.
This is the default setup for new menu screens. - 2nd Call Closes
Enable this setting.
Calling the screen again (e.g. via an input key) will close it.
We’ll block controls and also block showing notifications or flying texts, e.g. using an item or healing magic in the menu will not show flying texts.
- Block Controls
Enable this setting. - Block Control Maps
Enable this setting.
Control maps allow binding actions to input keys.
We don’t use them in this tutorial series, but you can learn more about them in this documentation. - Pause Notifications
Enable this setting.
Already displayed notifications will be paused and hidden. - Block Notifications
Enable this setting. - Block Flying Texts
Enable this setting.
We’ll also pause the game.
- Pause Game
Enable this setting. - Freeze Pause
Enable this setting.
This’ll set the time scale to 0, halting all animation and other time-related functionality.
1: Inventory #
Copy the Overview menu and change the name.
- Name
Set to: Inventory
2: Equipment #
Copy the Inventory menu and change the name.
- Name
Set to: Equipment
3: Abilities #
Copy the Equipment menu and change the name.
- Name
Set to: Abilities
With that we’re ready for the actual setup of the mens.
Overview Menu Screen #
Select the Overview menu again, we’ll set up an input key to open the menu and add a menu part.
Menu parts are the individual parts that’ll display your menu’s content, each part handling a certain functionality, e.g. the Inventory part displaying item types and items in your inventory.
Menu Screen Settings > Settings > Call Screen Key #
- Use Call Key
Enable this setting. - Input Key
Select Menu. - Audio Type
Select Custom.
We’ll play an audio clip when opening the menu via the key. - Audio Clip
Select the Menu11 audio clip.
You can find it in Assets/Tutorial Assets/NinjaAdventure/Sounds/Menu/.
You can optionally use a Menu Requirement to limit the menu call to certain conditions. However, menu screens can only be called when the player can be controlled, so that’s enough for our game.
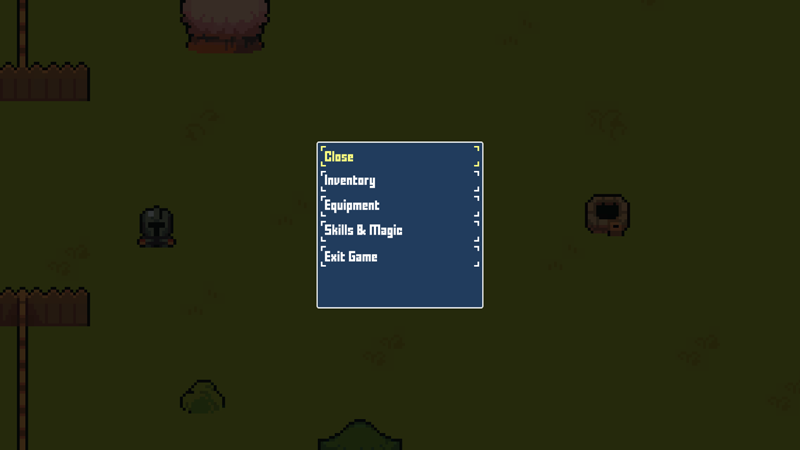
Button List Part #
The Button List part is used to display multiple buttons, each having different functionality – e.g. we’ll add buttons to close the menu, open other menu screens, call the save menu or exit the game.
Scroll down to the bottom of the settings to see the Add Menu Part button.
Click on the Add Menu Part button and select Button List.
- UI Box
Select Blue Center.
Click on Add Menu Item to add a button to the part.
- Type
Select Close. - Text (Button Content)
Set to: Close
Click on Add Menu Item to add another button.
- Type
Select Menu Screen. - Menu Screen
Select Inventory. - Text (Button Content)
Set to: Inventory
Copy the Menu Item 1 instead of adding a new button.
- Menu Screen
Select Equipment. - Select Combatant
Enable this setting.
We’ll select the combatant that’ll be the user of the menu we open. - Text (Button Content)
Set to: Equipment
Copy the Menu Item 2 instead of adding a new button.
- Menu Screen
Select Abilities. - Text (Button Content)
Set to: Skills & Magic
Click on Add Menu Item to add a new button.
- Type
Select Save. - Text (Button Content)
Set to: Save
Click on Add Menu Item to add a new button.
- Type
Select Exit Game. - Show Exit Question
Enable this setting. - Text (Button Content)
Set to: Exit Game
And with that, our first menu screen is completed.
Inventory Menu Screen #
The inventory menu will allow us to use items on our player group members.
Select the Inventory menu screen.
Inventory Part #
The Inventory part is used to display the contents of the player’s inventory.
Scroll down to the bottom of the settings to see the Add Menu Part button.
Click on the Add Menu Part button and select Inventory.
- Animate Use
Disable this setting.
Using items will only do their calculations, not use the battle animation schematics.
Default Action #
This defines what will happen when accepting an item – we’ll keep it at the default Use menu action, i.e. it’ll use the item.
Available Item Types #
- All Types
Enable this setting.
This’ll show all item types. - Show Empty Types
Disable this setting.
Item types without any content in the inventory will not be displayed. - Sort By
Select ID.
This’ll sort the item types by their ID/index, i.e. as they’re listed in the editor.
Type Box Settings #
- Type Display
Select UI Box.
The item types will be displayed in a UI box as a selection menu. - Box Display Mode
Select Multi.
The item types and item list will be displayed at the same time. - Type Box
Select Menu Small. - Add Back Button
Select Last.
The Type Content Layout settings handle the content displayed in the item type buttons, we’ll keep it at the default setup, displaying text and icon.
Item Box Settings #
- Item Box
Select Menu Big. - Sort By
Select ID. - Add Currency
Enable this setting. - Add Items
Enable this setting. - Add Equipment
Enable this setting. - Add Back Button
Select Last.
Like in the battle menu, we’ll want to display the item quantity – this is handled by the Item Content Layout settings, which defaults to showing this information in the additional content info.
We’ll stick with the default setup, since our button prefab already is set up to show the additional content info.
Description Part #
The Description part is used to display the description of the currently selected input of the menu screen.
Scroll down to the bottom of the settings to see the Add Menu Part button.
Click on the Add Menu Part button and select Description.
- UI Box
Select Menu Info. - Always Visible
Enable this setting.
We can leave the rest with the default setup.
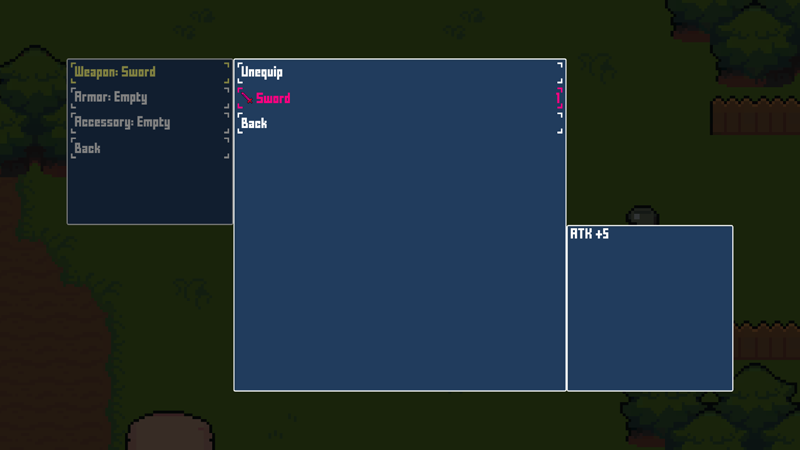
Equipment Menu Screen #
The equipment menu allows us to change a combatant’s equipment.
Select the Equipment menu screen.
Equipment Part #
The Equipment part is used to change the equipment of a combatant.
Scroll down to the bottom of the settings to see the Add Menu Part button.
Click on the Add Menu Part button and select Equipment.
Available Equipment Slots #
- All Equipment Slots
Enable this setting. - Sort By
Select ID.
Slot Box Settings #
- Equipment Slot Box
Select Menu Small. - Add Back Button
Select Last.
The Slot Content Layout settings handle the content of the equipment slot buttons. The default setup will display the content of the equipment slot as the button’s additional content title. We don’t use this and display the slot’s name and equipment in the button.
- Content Type (Main Content)
Select Custom. - Default Content
Set to: <slotname>: <name>
Remove the Additional Content Layout 0 settings.
We’ll display a different content for empty equipment slots using the Empty Content Layout settings.
- Use Empty Layout
Enable this setting. - Content Type (Main Content)
Select Custom. - Default Content
Set to: <slotname>: Empty
Equipment Box Settings #
- Show Equip Box
Enable this setting.
You can optionally disable showing an equipment box, e.g. combining the Equipment part (showing only equipment slots) with an Inventory part. - Display Slot>Equipment
Select Multi. - Equipment Box
Select Menu Big. - Add Equipped
Enable this setting.
This’ll also show the equipped equipment in the list. - Highlight Equipped Input
Enable this setting.
This’ll highlight the equipped equipment’s button with a defined color. - Color (Highlight)
Set to a pink color with full alpha. - Sort By
Select ID. - Add Back Button
Select Last. - Add Unequip Button
Select First.
Like in the inventory menu, we’ll want to display the equipment quantity – this is handled by the Equipment Content Layout settings, which defaults to showing this information in the additional content info. So, we can leave it as is.
Description Part #
Scroll down to the bottom of the settings to see the Add Menu Part button.
Click on the Add Menu Part button and select Description.
- UI Box
Select Menu Info. - Always Visible
Enable this setting.
Abilities Menu Screen #
The ability menu allows us to use a combatant’s abilities (if they’re useable in the field).
Select the Abilities menu screen.
Ability Part #
The Ability part is used to display and use the abilities of a combatant.
Scroll down to the bottom of the settings to see the Add Menu Part button.
Click on the Add Menu Part button and select Ability.
- Animate Use
Disable this setting.
Available Item Types #
- All Types
Enable this setting. - Sort By
Select ID.
Type Box Settings #
- Type Display
Select UI Box. - Display Types>Abilities
Select Multi. - Type Box
Select Menu Small. - Add Back Button
Select Last.
Ability Box Settings #
- Ability Box
Select Menu Big. - Sort By
Select ID. - Add Back Button
Select Last.
The Ability Content Layout settings handle the content of the ability buttons – like with the inventory part, we’ll display the use cost via the additional content info.
Description Part #
Scroll down to the bottom of the settings to see the Add Menu Part button.
Click on the Add Menu Part button and select Description.
- UI Box
Select Menu Info. - Always Visible
Enable this setting.
Save Changes #
And that’s it!
Don’t forget to save your changes by clicking on Save Settings at the bottom of the editor.
Testing #
Hit play in one of the game’s scenes (e.g. Town) and open the menu using the Menu input key (we’ve set it up using F1).
Great, all menus are working.
Next, we’ll add an interaction.


