ORK Framework Logo - RPG Editor for Unity
  • Features
  • Showcase
  • Guide
    • Documentation
    • Tutorials
    • API
  • ORK 2
    • Tutorials
    • Plugins
    • API
  • Support
  • Forum
  • Get ORK

2D RPG Quickstart

  • START 2D RPG Quickstart
  • 01 Initial Setup
  • 02 Player Setup
  • 03 Music & Scenes
  • 04 UI System Setup
  • 05 UI Boxes
  • 06 Flying Texts
  • 07 Status Values
  • 08 Status Effects
  • 09 First Abilities
  • 10 Fighter Setup
  • 11 First Enemies & Battle AI
  • 12 Battle System Setup
  • 13 Animating Battle Start and End
  • 14 Random Battles
  • 15 Animating Actions
  • 16 Player Battle HUD
  • 17 Elemental Attacks
  • 18 Animating More Actions
  • 19 Inventory & Loot
  • 20 Equipment
  • 21 Loot, Start Equipment & Viewers
  • 22 Magic Abilities
  • 23 Caster Setup
  • 24 More Enemies
  • 25 Start Menu & Save Games
  • 26 Menu Screens
  • 27 Interactions
  • 28 Item Collectors
  • END 2D RPG Quickstart

3D RPG Quickstart

  • START 3D RPG Quickstart
  • 01 Initial Setup
  • 02 Player Setup
  • 03 Music & Scenes
  • 04 UI System Setup
  • 05 UI Boxes
  • 06 Flying Texts
  • 07 Status Values
  • 08 Status Effects
  • 09 First Abilities
  • 10 Fighter Setup
  • 11 First Enemies & Battle AI
  • 12 Battle System Setup
  • 13 Animating Battle Start and End
  • 14 Random Battles
  • 15 Animating Actions
  • 16 Player Battle HUD
  • 17 Elemental Attacks
  • 18 Animating More Actions
  • 19 Inventory & Loot
  • 20 Equipment
  • 21 Loot, Start Equipment & Viewers
  • 22 Magic Abilities
  • 23 Caster Setup
  • 24 More Enemies
  • 25 Start Menu & Save Games
  • 26 Menu Screens
  • 27 Interactions
  • 28 Item Collectors
  • END 3D RPG Quickstart

Status System Setup

  • START Status System Setup
  • 01 Status Values
  • 02 Status Development
  • 03 Attack/Defence Modifiers
  • 04 Status Effects
  • 05 Formulas
  • 06 Ability & Item Types
  • 07 Abilities Part 1: Attacks
  • 08 Abilities Part 2: Support & Sabotage
  • 09 Abilities Part 3: Elemental Magic
  • 10 Items
  • 11 Equipment Part 1: Slots & Slot Set Templates
  • 12 Equipment Part 2: Weapons
  • 12.5 (Optional) Equipment Part 2.5: Weapons
  • 13 Equipment Part 3: Shields, Armor & Accessories
  • 13.5 (Optional) Equipment Part 3.5: Shields, Armor & Accessories
  • 14 Equipment Part 4: Available Equipment Templates
  • 15 Loot
  • 16 Battle AIs
  • 17 Combatants Part 1: General Settings
  • 18 Combatants Part 2: Players
  • 19 Combatants Part 3: Enemies
  • 20 Combatant Groups
  • END Status System Setup

3D RPG Playground

  • START 3D RPG Playground
  • 01 Player Setup
  • 02 Start Menu
  • 03 First Interaction
  • 04 Music
  • 05 Areas
  • 06 Collecting Items
  • 07 Displaying Equipment
  • 08 Combatant Prefabs, Icons & Portraits
  • 09 Combatant Animations
  • 10 Camera Positions
  • ANIM 01 Battle Start/End Schematics
  • ANIM 02 Use, Cast & Camera
  • ANIM 03 Abilities & Items
  • ANIM 04 Physical Attacks
  • ANIM 05 Special Actions
  • BATTLE 01 Battle Menu
  • BATTLE 02 Prepare for Battle
  • TURN 01 Turn Based Setup
  • TURN 02 Turn Order HUD
  • ATB 01 Active Time Setup
  • ATB 02 Cast Times
  • ATB 03 Timebar HUD
  • BATTLE 03 The First Battle
  • BATTLE 04 Hunting Move AI
  • BATTLE 05 Spawning Combatants
  • 11 Save Games
  • MENU 01 UI Boxes
  • MENU 02 Template HUDs
  • MENU 03 Overview Menu
  • MENU 04 Menu Screens
  • 12 Shop
  • BATTLE 06 Random Battles
  • DUNGEON 01 Enter the Dungeon
  • DUNGEON 02 The Trapdoor
  • DUNGEON 03 Enemies on Level 1 & 2
  • DUNGEON 04 Traps on Level 3
  • DUNGEON 05 Going Deeper
  • 13 Bestiary (+MENU+ANIM)
  • QUEST 01 Hunting Quests (+MENU)
  • QUEST 02 Guard NPC
  • QUEST 03 Forest Ruin Cheese
  • QUEST 04 Witch NPC with Cheese
  • QUEST 05 Quest Mark HUDs
  • 14 Research Trees (+MENU)
  • CRAFT 01 Crafting Materials
  • CRAFT 02 Crafting Recipes
  • CRAFT 03 Crafting Menu
  • CRAFT 04 Crafting Proficiency & Critical Crafting
  • CRAFT 05 Materials Loot
  • 15 Changing Choice Dialogue
  • 16 Follow Me!
  • BATTLE 07 Sequence Loot Dialogue

3D Action RPG

  • START 3D Action RPG
  • 01 Status System Setup
  • 02 Player Setup
  • 03 Player Weapon
  • 04 Player Attacks
  • 05 Enemy: Chomper
  • 06 Chomper Attack
  • 07 Hit & Death
  • 08 HUDs
  • 09 Rolling on the Floor
  • 10 Enemy: Spitter
  • 11 Spit Attack
  • 12 Potion
  • 13 Grenade
  • 14 Item HUD
  • 15 Enemy: Grenadier
  • 16 Grenadier Melee Attacks
  • 17 Grenadier Flamethrower
  • 18 Item Drops
  • END 3D Action RPG

2D Grid Battle RPG

  • START 2D Grid Battle RPG
  • 01 Player Setup
  • 02 Prefab & Music Setup
  • 03 Randomizing Combatants
  • 04 UI Setup
  • 05 Battle Start, End & Phase Schematics
  • 06 Battle System Setup
  • 07 Battle Grid Setup
  • 08 Grid Move
  • 09 Forest Battle Grid
  • 10 Battle AI
  • 11 Ability Ranges
  • 12 Death & Use Schematics
  • 13 Attack Schematic
  • 14 Shoot Schematics
  • 15 Battle Selection Interaction
  • END 2D Grid Battle RPG

Schematics

  • Simple Start Schematic
  • Battle Start Schematic
  • Battle End Schematic
  • Moving to Target and Back
  • Animating a Base Attack
  • Animating a Magic Ability
  • Grid Movement
  • Open and Close UI Animations
  • Flying Text Mover

UI Setups

  • Unity UI: Initial Setup
  • Unity UI: TextMesh Pro Setup
  • Unity UI: UI Box
  • Unity UI: Flying Text
  • Unity UI: Dragging Notification
  • Unity UI: Canvas with Screen Space Camera
  • Unity UI: Interaction HUD
  • Unity UI: Simple Player HUD
  • Unity UI: Quest HUD
  • Unity UI: Shortcuts HUD
  • Unity UI: Currency HUD
  • Unity UI: Tooltip HUD
  • Unity UI: Control HUD
  • Unity UI: Attack Modifiers
  • Unity UI: Defence Modifiers

Gameplay Bits

  • Combining Input Origins
  • Combining Status Value Flying Texts
  • Fun With Flying Text
  • HUD Effects With Conditional Schematics
  • Inventory Containers
  • Multi Interaction Controllers
  • World Space HUD
  • World Space Dialogue
  • Home
  • Guide
  • Tutorials
  • Status System Setup
  • 16 Battle AIs

16 Battle AIs

Table of Contents
  • 0: Do Nothing
    • Battle AI Settings
    • None
  • 1: Base Attack
    • Battle AI Settings
    • Attack
  • 2: Random Ability 25%
    • Battle AI Settings
    • Chance
      • Range 0
    • Ability
  • 3: Random Ability 50%
    • Battle AI Settings
    • Chance
  • 4: Random Ability 75%
    • Battle AI Settings
    • Chance
  • 5: Heal <50% HP
    • Battle AI Settings
    • Check Status
    • Ability
  • 6: Provoked
    • Battle AI Settings
    • Check Status
  • Save Changes

In this tutorial we’ll set up the some basic battle AIs of our status system.

AI controlled combatants use battle AIs to select their actions in battle. Learn more about battle AIs in this documentation.

You don’t have to set up a complex battle AI for each individual combatant – you can, but it’s usually better to create smaller battle AIs, each for a specific task or action.

Combatants use battle AIs in the order they’re added for them. If an action isn’t available or can’t be used (e.g. due to use costs), the battle AI will continue until it finds an action that can be used. When a battle AI ends without finding an action, the combatant’s next battle AI is used.

In most of the battle AIs we’ll set up here, we don’t search for specific targets before using an action. If no found targets are available when an action is selected, the action will automatically select one based on it’s setup (auto target conditions) and the combatant’s AI targeting settings (e.g. using nearest target). We use this setup to allow using the Provoke effect of the tank influencing all other targeting.

Navigate to Battles > Battle AI, we’ll change the Default battle AI and add additional battle AIs.

0: Do Nothing #

This battle AI will simply use the None command.

It’s recommended to have this battle AI as the lowest, last used battle AI. In case no other action was found by other battle AIs, this makes sure that a combatant ends their turn.

Battle AI Settings #

  • Name
    Set to Do Nothing.

None #

Add Node > Action > None

This node will use the None command, doing nothing and ending the combatant’s turn.

No additional setup needed.

1: Base Attack #

Use the combatant’s base attack.

Battle AI Settings #

  • Name
    Set to Base Attack.

Attack #

Add Node > Action > Attack

Uses the combatant’s base attack.

No additional setup needed.

2: Random Ability 25% #

Has a 25% chance to use a random ability (available to the combatant).

In case the chance fails, this battle AI ends, continuing with the next battle AI fo the combatant.

Battle AI Settings #

  • Name
    Set to Random Ability 25%.

Chance #

Add Node > Base > Chance

Does chance checks and performs a next node based on it.

Range 0 #

This is the default chance that’s already added for us.

  • Minimum Range
    Select Value > Value.
    Set the value to 0.
  • Maximum Range
    Select Value > Value.
    Set the value to 25.

Ability #

Add Node > Action > Ability

Uses an ability of the combatant – we’ll use a random ability.

  • Use Random Ability
    Enable this setting
    This’ll use a random ability available to the combatant.
  • Use Highest Level
    Enable this setting.
    This’ll use the highest available (and usable) level that’s available to the combatant.

3: Random Ability 50% #

Has a 50% chance to use a random ability (available to the combatant).

Copy the Random Ability 25% battle AI and change the following settings.

Battle AI Settings #

  • Name
    Set to Random Ability 50%.

Chance #

  • Maximum Range
    Select Value > Value.
    Set the value to 50.

4: Random Ability 75% #

Has a 75% chance to use a random ability (available to the combatant).

Copy the Random Ability 50% battle AI and change the following settings.

Battle AI Settings #

  • Name
    Set to Random Ability 75%.

Chance #

  • Maximum Range
    Select Value > Value.
    Set the value to 75.

5: Heal <50% HP #

Heals an ally with less than 50% health.

Battle AI Settings #

  • Name
    Set to Heal <50% HP.
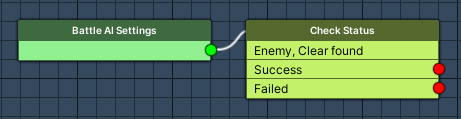
Check Status #

Add Node > Combatant > Check Status

This node is to go-to node for pretty much any combatant status related check. E.g. in our case, we’ll check for HP being less than 50%.

The node can use combatants matching the conditions as found targets, so later action nodes can use them as targets.

  • Found Targets
    Select Clear.
    Previously found targets will be removed.
  • Target
    Select Ally.
    Uses allies of the battle AI’s user.

Click on Add Status Condition.

  • Condition Type
    Select Status.
  • Status Needed
    Select Status Value.
  • Status Value
    Select Health Points.
  • Used Value
    Select Current Value.
    We’ll check the current health.
  • Check In
    Select Percent.
  • Check Type
    Select Is Less.
  • Check Value
    Select Value > Value.
    Set the value to 50.

Ability #

Add Node > Action > Ability

We’ll use Heal.

This node is connected to the Success slot of the Check Status node.

  • Ability
    Select Heal.
  • Use Highest Level
    Enable this setting.

6: Provoked #

This battle AI doesn’t use any action, it just uses a combatant with the Provoke effect as a found target. Using this battle AI before the others (but after the heal AI) will use the provoking combatant as target for any action, unless the action is targeting an ally.

The battle AIs of a combatant share their found targets, so this battle AI selecting a provoking combatant as found target will have it available in any battle AI coming after it.

Battle AI Settings #

  • Name
    Set to Provoked.

Check Status #

Add Node > Combatant > Check Status

We’ll clear previously found targets and select an enemy (of the battle AI’s user) with Provoke effect applied as found target.

  • Found Targets
    Select Clear.
  • Target
    Select Enemy.
    Uses enemies of the battle AI’s user.

Click on Add Status Condition.

  • Condition Type
    Select Status.
  • Status Needed
    Select Status Effect.
  • Status Effect
    Select Provoke
  • Is Applied
    Enable this setting.

Save Changes #

And that’s it for the battle AI setup.

Don’t forget to save your changes by clicking on Save Settings at the bottom of the editor.

Next, we’ll set up combatant types and the general settings for combatants.

Share This Article :
  • Facebook
  • Twitter
  • LinkedIn
  • Pinterest
Updated on September 28, 2022
Table of Contents
  • 0: Do Nothing
    • Battle AI Settings
    • None
  • 1: Base Attack
    • Battle AI Settings
    • Attack
  • 2: Random Ability 25%
    • Battle AI Settings
    • Chance
      • Range 0
    • Ability
  • 3: Random Ability 50%
    • Battle AI Settings
    • Chance
  • 4: Random Ability 75%
    • Battle AI Settings
    • Chance
  • 5: Heal <50% HP
    • Battle AI Settings
    • Check Status
    • Ability
  • 6: Provoked
    • Battle AI Settings
    • Check Status
  • Save Changes
Sitemap
  • Features
  • Showcase
  • Guide
    • Documentation
    • Tutorials
    • API
  • ORK 2 Hub
    • Tutorials
    • Plugins
    • API
  • Support
  • Forum
  • Get ORK
  • Contact
  • Blog
  • Makinom
  • gamingislove.com
Categories
  • News (60)
  • ORK 2 (137)
    • Tutorial (137)
      • Game tutorial (50)
      • Gameplay (32)
      • How-to (55)
  • Release (130)
Search

© 2015 Gaming is Love e.U.

Disclosure: This site may contain affiliate links, which means I may receive a commission if you click a link and purchase something that I have recommended. While clicking these links won’t cost you any money, they will help me fund my development projects while recommending great assets!