
In this tutorial we’ll make a first start into the game by setting up our player.
You’re probably eager to finally be able to actually run around with a player – at least if you’ve followed the status system setup tutorials instead of just downloading the finished setup.
So, let’s get started with a quick and easy setup for getting your player into the game!
Well … maybe not that quick – there’s a lot of topics to take care of:
- animations
- combatant setup
- scene setup
- start schematic
- controls
Player Settings #
But first, we’ll take a look at the general player and player group settings.
Navigate to Game > Game Settings.
ORK Game Settings > Player/Group Settings #
These settings handle the player’s faction and group size.
- Default Faction
Select Player. - Battle Group Size
Set to 3.
The battle group size defines how many members of the player group can take part in battle at the same time.
Non-player groups have no battle group size limitation, as this is mainly used to allow the player to manage the group. - Use Battle Reserve
Disable this setting.
Another player-only feature – you can optionally have a battle reserve, i.e. only allowing to switch with reserve members during battles. - Spawn Group
Disable this setting.
We’ll only have the player combatant (i.e. leader of the player group) spawned in the field.
If enabled, the whole battle group will be spawned and can follow the player using move AI.
Animations #
Next, we’ll set up movement animations, i.e. idle, walk and run animations. Don’t worry about animation types for now – we’ll take a look at them at a later time, and a new project comes with some default set up animation types we’re going to use for now. You can learn more about animations in this documentation.
The models used in the tutorial assets worked best using the legacy animation system, so that’s what we’re going with. Also, the legacy animation system is great at giving you control over playing animations when you want, instead of relying on state transitions like Mecanim does.
Legacy animations are played on layers, higher layers overrule lower layers, we’ll use that to ensure the correct animation has priority:
- Layer -1: idle
- Layer 0: walk, run
- Layer 1: damage, evade, etc.
- etc.
0: Movement #
Navigate to Base/Control > Animations, select the Default animation setup and change the following settings.
Base Settings #
- Name
Set to Movement. - Random First Start Time
Enable this setting.
This’ll use a random time for the initial animation that is played to prevent all combatants using the same animations from looking exactly the same.
Legacy Settings #
Since we’re using the legacy animation system, that’s where we’ll do our animation setup.
Click on Add Legacy Animation.
- Animation Type
Select Idle.
Animation types can have multiple animations assigned to them – one will be played randomly. There’s already an animation added, so let’s change it.
- Animation Name
Set to Idle. - Set Layer
Enable this setting. - Animation Layer
Set to -1.
We’ll use the default Play Settings for all our animations, they’re:
- Play Type
Select Cross Fade. - Play Mode
Select Stop Same Layer. - Fade Length
Set to 0.1.
Copy Legacy Animation 0 and change the following settings.
- Animation Type
Select Walk. - Animation Name
Set to Walk. - Animation Layer
Set to 0.
Copy Legacy Animation 1 and change the following settings.
- Animation Type
Select Run. - Animation Name
Set to Run.
Combatants General Settings #
Navigate to Combatants > Combatants > General Settings, we’ll use the animations we just set up as default animations for all combatants.
Animations & Movement #
We’ll set up the default setup for the animation system, animations, auto animation and move speed.
Default Animation System #
- System Type
Select Legacy.
Default Animations #
Click on Add Animations.
- Animations
Select Movement.
Auto Animation #
- Use Auto Animation
Enable this setting.
ORK will automatically play idle and movement animations based on a combatant’s move speed. - Minimum Run Speed
Set to 4.
This is the minimum speed needed to play the run animation. - Minimum Sprint Speed
Set to 10.
We don’t really use sprint animations, though.
The auto animations use the Default Animation Types that are set up in Base/Control > Animation Types > General Settings. A new project has them automatically set up to use the (also automatically set up) Idle, Walk, Run, etc. animation types. In case your auto animations don’t work, make sure they’re set up correctly and use the animation types you use for your movement animations.
Default Move Speed #
- Use Position Change
Enable this setting.
This’ll use the combatant’s actual position change to calculate the movement speed, i.e. it is independent from however the game object is actually moved. - Walk Speed
Select Value > Value.
Set the value to 3. - Run Speed
Select Value > Value.
Set the value to 8. - Sprint Speed
Select Value > Value.
Set the value to 12.
Player Combatant #
Navigate to Combatants > Combatants and select the Warrior combatant. This’ll be our player, we’ll have the rest join him later.
Change the following settings.
Base Settings > Prefab Settings #
- Prefab
Select the Warrior prefab. - Set Object Name
Enable this setting.
This’ll set the name of the spawned game object to the combatant’s name, instead of using the prefab’s name and adding (Clone) to it.
Yeah … that’s it for the player’s setup for now.
Don’t forget to save your changes by clicking on Save Settings at the bottom of the editor.
Let’s get to our scene.
World Scene #
Open the World scene (Assets/Scenes/) – we’ll set up a start menu in the next tutorial, for now, we’ll just add a setup for quick game testing and jump right into the scene.

As you can see, it’s a rather big level – we’ve got a town, an outpost, a forest and a swamp area and the entrance to our dungeon (which has 5 levels).
Add Game Starter #
First, we’ll add a game starter to the scene and set it up for quick game testing. We’ll go with the ORK Game Starter variant.
Game starters are used to initialize your project, without it, you can’t access any functionality without causing errors. You can learn more about game starters in this documentation.
You can either use the scene hierarchy context menu or the scene wizard (e.g. via CTRL + ALT + W, or using the Unity menu: Window > Gaming Is Love > Makinom Scene Wizard).
I’ll use the context menu: ORK Framework > ORK Game Starter
The added game starter should already have your Project asset set up. Change the following setting in the ORK Game Starter component’s inspector.
- Start Game
Enable this setting.
It doesn’t really matter where you place the game starter.
Add Spawn Point #
Next, we’ll add a spawn point – we want to start in the town, so move your scene view to somewhere on the central plaza of the town.
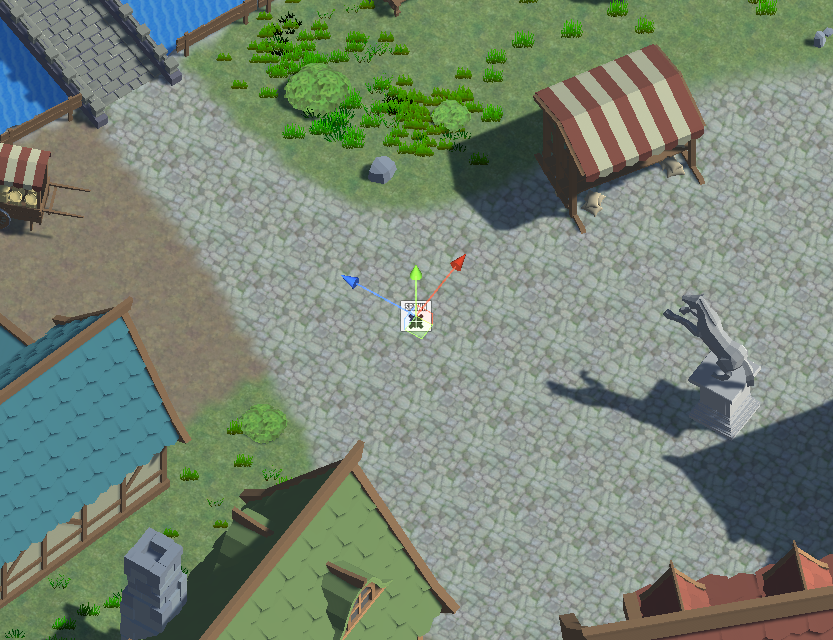
Like the game starter, you can add a spawn point via the context menu or the scene wizard. The scene wizard has searchable popups for adding game objects or components, which can get very convenient when having to set up multiple things.
I’ll use the context menu: Makinom > Spawn Point
The spawn point will be placed directly on the ground at the screen’s center – and it automatically has the next free Spawn ID assigned. Spawn IDs are used to identify a spawn point, so when we (soon) spawn our player using a schematic, that’s the spawn ID we’ll use.
Since there wasn’t a spawn point in the scene before, we’ll have the spawn ID 0 assigned.
That’s it for the scene, save your changes.
Start Schematic #
Back to the editor, navigate to Schematics – it’s time to set up a schematic we’ll use when starting our game. This’ll be used when going through a start menu as well as via game starters for quick game testing.
There’s already a tutorial on setting up a simple start schematic available, but we’ll extend it a bit and add items to the player’s inventory

Join Group #
Add Node > Group > Group > Join Group
First, we’ll add the Warrior to the player group.
- Group Origin
Select Active Player Group.
This’ll join the combatant to the currently active player group. - Combatant
Select Warrior.
Spawn ORK Player #
Add Node > Game > Player > Spawn ORK Player
Now, we’ll spawn the player in the scene.
- Spawn At
Select Spawn Point. - Spawn Point ID
Set to 0.
Add To Inventory #
Add Node > Inventory > Inventory > Add To Inventory
This node is used to add items to a combatant’s inventory.
- Object (Combatant)
Select Player.
There’s already an item added automatically.
- Type
Select Item. - Item
Select Potion. - Quantity
Select Value > Value.
Set the value to 10.
Copy the item and change the following settings.
- Item
Select Magic Potion. - Quantity
Select Value > Value.
Set the value to 3.
Copy the item and change the following settings.
- Item
Select Revive Potion. - Quantity
Select Value > Value.
Set the value to 1.
Copy the item and change the following settings.
- Item
Select Antidote. - Quantity
Select Value > Value.
Set the value to 5.
Copy the item or add a new item.
- Type
Select Currency. - Item
Select Gold. - Quantity
Select Value > Value.
Set the value to 500.
And that’s it for the schematic. Click on Save Schematic to save it, e.g. as StartGame.
I usually save all my schematics in Assets/Schematics/ and sub folders of it.
Start Menu #
We don’t set up the start menu yet, but we’ll use the start schematic here.
Navigate to UI > Start Menu and change the following settings.
New Game Settings #
- Start Schematic
Select the StartGame schematic.
Game Controls #
And as our last setup, we’ll take care of the player controls. Learn more about player/camera controls in this documentation.
Navigate to Base/Control > Game Controls and scroll down to the ORK Control Settings.
ORK Control Settings > Player Controls #
The default setup, using the Button player control is already the right thing for us, we just need to select the input keys we’re using. The project already has some default input keys available – we’ll be moving using WASD controls.
The Button player controller moves the player using a Character Controller component – the tutorial assets are already set up that way. When working on your own projects or using different prefabs/models, keep in mind that you’ll need a Character Controller if you want to use the Button player control.
- Vertical Axis
Select Vertical Move. - Horizontal Axis
Select Horizontal Move.
ORK Control Settings > Camera Controls #
While we’re at it, let’s switch the camera control to use the Top Down Border camera instead of the default Follow camera.
- Camera Control Type
Select Top Down Border. - Child Object
Select Path.
We’ll define the path to a child object. - Find Child
Set to Head.
This is a child object on our player combatants (or rather, every combatant’s prefab).
Instead of the camera being pointed at the player’s position, it’ll look at the head, giving a better camera placement.
Rotation Settings #
We’ll allow rotating the camera using the mouse.
- Use Rotation In
Select Both.
We can rotate the camera in the field and in battle (when camera control is allowed). - Remember Rotation
Enable this setting.
This’ll keep the camera’s rotation when changing scenes.
We’ll use the Mouse/Touch Controls.
- Input Type
Select Both.
We’ll alove mouse and touch control. - Mouse Button
Set to 1.
Uses the right mouse button. - Finger Count
Set to 2.
Uses 2 fingers. - Click Count
Set to 1.
Uses 1 click/touch inputs, e.g. set to 2 for double click/touch to initiate the rotation. - Mode
Select Move.
The rotation is used when moving the cursor/fingers.
Save Changes #
And that’s it – we’re ready to take our player for a test walk!
Don’t forget to save your changes by clicking on Save Settings at the bottom of the editor.
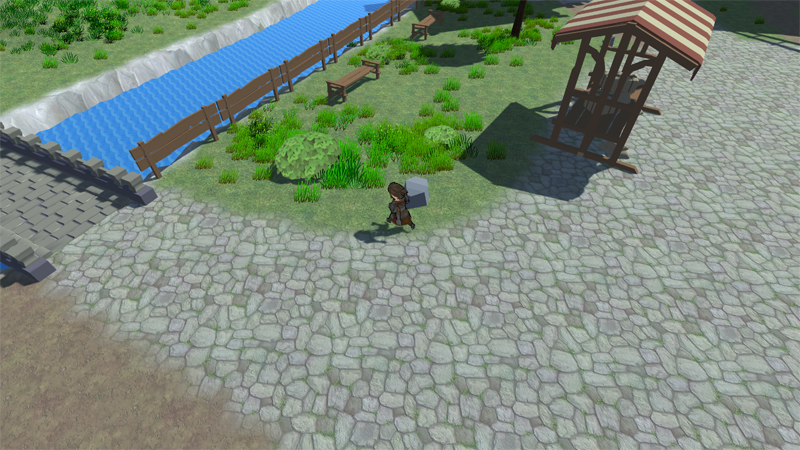
Testing #
Hit play to start your game in the World scene. Your player will spawn in the town and you an move around using WASD controls.
The camera can be rotated by holding the right mouse button and moving the mouse.
Next, we’ll set up the start menu.
(Optional) Add Zooming #
Want to do a bit more? Why not add zooming to the camera control!
For this, we’ll have to set up a new input key – we’ll use the mouse scroll wheel, which can be accessed via Unity’s input manager.
Input Key #
Navigate to Base/Control > Input Keys and add a new input key.
- Name
Set to Scroll Wheel.
Input ID Setting 0 #
- Input Origin
Select Unity Input Manager. - Axis Factor
Set to 5.
This’ll be used to multiply the axis value we’ll get from the scroll wheel, which is quite low. - Input Name
Set to Mouse ScrollWheel.
This is a default input axis set up in the Unity input manager in new projects. - Is Joypad Axis
Enable this setting. - Input Handling
Select Up.
Camera Control #
Navigate back to Base/Control > Game Controls.
ORK Control Settings > Camera Controls > Zoom Settings #
- Use Zooming In
Select Both. - Remember Zoom
Enable this setting. - UI Blocks Zooming
Enable this setting.
This’ll make sure that scrolling in a UI box doesn’t zoom. - Height Input Change
Set to 1. - Distance Input Change
Set to 1. - Use Axis
Enable this setting. - Axis Key
Select Scroll Wheel.
And that’s it, don’t forget to save your changes by clicking on Save Settings at the bottom of the editor.


