
In this tutorial we’ll set up a crafting menu screen.
This tutorial continues the sub-series for setting up crafting.
The crafting menu will list our available recipes, shows their ingredients and allows us to craft the items. Learn more about menu screens in this documentation.
Recipe Layout #
First, we’ll handle how a recipe’s information (ingredients, outcome, etc.) is displayed. This is done using a recipe layout.
Navigate to Inventory > Crafting Settings & Types > General Settings, we’ll set up the default recipe layout here.
Default Recipe Layout #
The default layout is usually used whenever we display a crafting recipe’s details – unless a custom recipe is used in a menu.
Content #
The content defines the combined text of the layout. It uses text codes to add the different parts of the information (e.g. listing the ingredients).
- Text
Set to:
<b><color=#FFFF00FF><name></color></b>
<description>
<b>Ingredient</b>
<ingredients>
<b>Outcome</b>
<outcome>
Ingredient Text #
Defines how each ingredient is displayed. By default each ingredient is displayed in it’s own line, we’ll keep it that way.
- Default Content (Ingredient Text)
Set to: <icon> <name> (<quantity>/<quantityavailable>) - Use Not Available Text
Enable this setting.
In case not enough of the required ingredient is in the user’s inventory, we’ll display a different text (just the same information but in a red color). - Default Content (Not Available Text)
Set to: <color=#FF0000FF><icon> <name> (<quantity>/<quantityavailable>)</color>
Outcome #
Defines how each outcome is displayed. By default each outcome is displayed in it’s own line, we’ll keep it that way.
- Default Content (Outcome)
Set to: <icon> <name> (<quantity>/<quantityavailable>)
Menu Requirement #
We’ll set up a menu requirement template, as we only want the crafting menu to be available when we have crafting recipes.
Navigate to Templates > Menu Requirement and add a new requirement.
Base Settings #
- Name
Set to Crafting.
General Requirement #
- Knows Recipes
Enable this setting.
Crafting Menu Screen #
Next, we’ll set up the crafting menu.
Navigate to UI > Menu Screens and add a new menu screen.
Menu Screen Settings #
- Name
Set to Crafting. - Remember Selection
Enable this setting. - Pause Notifications
Enable this setting. - Block Notifications
Enable this setting. - Block Flying Texts
Enable this setting. - Pause Game
Enable this setting. - Freeze Pause
Enable this setting.
Crafting Part #
The Crafting part is used to display crafting recipes.
Scroll down to the bottom of the settings to see the Add Menu Part button.
Click on the Add Menu Part button and select Crafting.
The default setup will already show all types and sort them by name – we’ll change it to sort by ID.
Available Crafting Types #
- Sort By
Select ID.
Type Box Settings #
Lists the crafting types that are available.
- Type Display
Select Tabs.
We’ll display the crafting types as tabs in the recipe box.
Recipe Box Settings #
Lists the crafting recipes from the selected crafting type.
- Recipe Box
Select Blue Menu Tab Center Scroll. - Sort By
Select ID. - Add Back Button
Select Last.
Create Box Settings #
Optionally displays detailed information about a recipe using a recipe layout – can also be used us a crafting confirmation.
We’ll use it as a HUD, only showing information for the selected recipe. The actual crafting is started by accepting a recipe in the recipe box.
- Create Box Mode
Select HUD. - Create Box
Select Blue Top Right Fit.
Description Part #
Scroll down to the bottom of the settings to see the Add Menu Part button.
Click on the Add Menu Part button and select Description.
- UI Box
Select Blue Top Left Fit.
That’s it for the crafting menu screen.
Updating Overview Menu Screen #
Select the Overview menu screen, we’ll now add a button for the crafting menu.
Button List 0 #
Scroll down to Menu Item 1, the button for the Inventory menu screen.
Copy Menu Item 1.
Menu Item 2 #
This is the copied button, let’s change it.
- Menu Screen
Select Crafting. - Text (Button Content)
Set to Crafting.
We’ll also use our menu requirement in the Requirements settings.
- Hide
Enable this setting.
The button will be hidden if the requirement check fails. - Use Menu Requirement
Enable this setting. - Menu Requirement
Select Crafting.
Save Changes #
And that’s it for our crafting menu!
Don’t forget to save your changes by clicking on Save Settings at the bottom of the editor.
Updating the Start Game Schematic #
We’ll update the Start Game schematic that’s used to set up the player group and add the crafting recipes and some ingredients to be able to test the system.
Navigate to Schematics, select your Start Game schematic and add the following new nodes at the end.
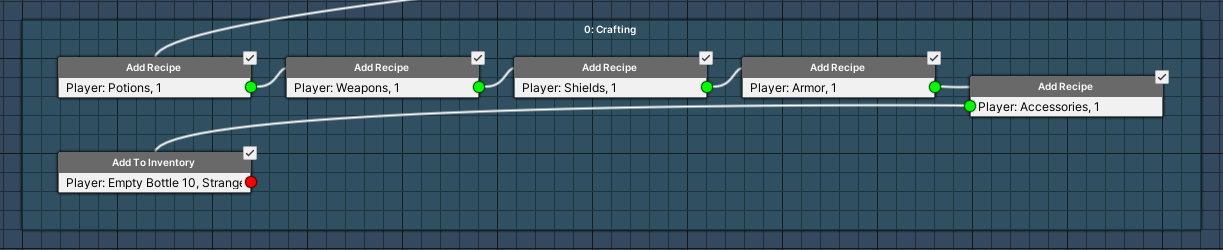
Add Recipe #
Add Node > Inventory > Crafting > Add Recipe
This node is used to add a crafting recipe or all recipes of a crafting type – we’ll add by type.
- Object (Combatant)
Select Player. - Add Crafting Type
Enable this setting. - Crafting Type
Select Potions.
You can ignore the Quantity setting, since our recipes are not set up to be consumed on use, i.e. quantities aren’t used by them.
Add Recipe #
Add Node > Inventory > Crafting > Add Recipe
Copy the previous Add Recipe node and change the used type.
- Crafting Type
Select Weapons.
Add Recipe #
Add Node > Inventory > Crafting > Add Recipe
Copy the previous Add Recipe node and change the used type.
- Crafting Type
Select Shields.
Add Recipe #
Add Node > Inventory > Crafting > Add Recipe
Copy the previous Add Recipe node and change the used type.
- Crafting Type
Select Armor.
Add Recipe #
Add Node > Inventory > Crafting > Add Recipe
Copy the previous Add Recipe node and change the used type.
- Crafting Type
Select Accessories.
Add To Inventory #
Add Node > Inventory > Inventory > Add To Inventory
We’ll now add some materials to the player’s inventory.
- Object (Combatant)
Select Player.
There’s already an item added automatically.
- Type
Select Item. - Item
Select Empty Bottle. - Quantity
Select Value > Value.
Set the value to 10.
Copy the item and change the following settings.
- Item
Select Strange Liquid.
Copy the item and change the following settings.
- Item
Select Slime. - Quantity
Select Value > Value.
Set the value to 5.
Copy the item and change the following settings.
- Item
Select Bone.
Copy the item and change the following settings.
- Item
Select Venom.
Copy the item and change the following settings.
- Item
Select Bat Wing.
Copy the item and change the following settings.
- Item
Select Wood. - Quantity
Select Value > Value.
Set the value to 10.
Copy the item and change the following settings.
- Item
Select Iron. - Quantity
Select Value > Value.
Set the value to 15.
And that’s it for the schematic. Click on Save Schematic to save the changes.
Tip!
Use node groups to organize your schematics.
Select all nodes that we just added, right-click on a node and select: Node Groups > Add Group or Node Groups > Add To Group > Add New Group
This’ll create a new node group and add all selected nodes to it. You can change the node group’s name by selecting it and changing the name in the settings.
Testing #
Hit play, call the menu and open the crafting menu.
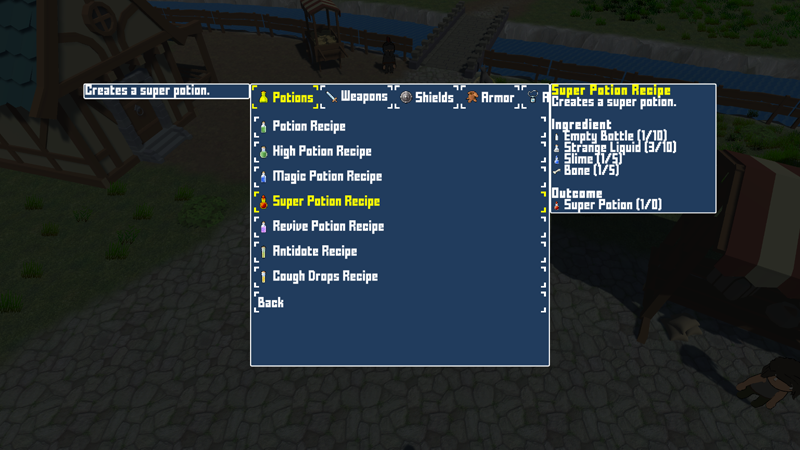
You can change tabs with the next/previous tab keys (we set them up in UI > UI Boxes > General Settings) and craft items by accepting a button.
The info box on the right side shows the needed ingredients and outcome of the recipe.
With this we have a working crafting system – but let’s do a bit more!
Next, we’ll add a crafting proficiency system.


