ORK Framework Logo - RPG Editor for Unity
  • Features
  • Showcase
  • Guide
    • Documentation
    • Tutorials
    • API
  • ORK 2
    • Tutorials
    • Plugins
    • API
  • Support
  • Forum
  • Get ORK

2D RPG Quickstart

  • START 2D RPG Quickstart
  • 01 Initial Setup
  • 02 Player Setup
  • 03 Music & Scenes
  • 04 UI System Setup
  • 05 UI Boxes
  • 06 Flying Texts
  • 07 Status Values
  • 08 Status Effects
  • 09 First Abilities
  • 10 Fighter Setup
  • 11 First Enemies & Battle AI
  • 12 Battle System Setup
  • 13 Animating Battle Start and End
  • 14 Random Battles
  • 15 Animating Actions
  • 16 Player Battle HUD
  • 17 Elemental Attacks
  • 18 Animating More Actions
  • 19 Inventory & Loot
  • 20 Equipment
  • 21 Loot, Start Equipment & Viewers
  • 22 Magic Abilities
  • 23 Caster Setup
  • 24 More Enemies
  • 25 Start Menu & Save Games
  • 26 Menu Screens
  • 27 Interactions
  • 28 Item Collectors
  • END 2D RPG Quickstart

3D RPG Quickstart

  • START 3D RPG Quickstart
  • 01 Initial Setup
  • 02 Player Setup
  • 03 Music & Scenes
  • 04 UI System Setup
  • 05 UI Boxes
  • 06 Flying Texts
  • 07 Status Values
  • 08 Status Effects
  • 09 First Abilities
  • 10 Fighter Setup
  • 11 First Enemies & Battle AI
  • 12 Battle System Setup
  • 13 Animating Battle Start and End
  • 14 Random Battles
  • 15 Animating Actions
  • 16 Player Battle HUD
  • 17 Elemental Attacks
  • 18 Animating More Actions
  • 19 Inventory & Loot
  • 20 Equipment
  • 21 Loot, Start Equipment & Viewers
  • 22 Magic Abilities
  • 23 Caster Setup
  • 24 More Enemies
  • 25 Start Menu & Save Games
  • 26 Menu Screens
  • 27 Interactions
  • 28 Item Collectors
  • END 3D RPG Quickstart

Status System Setup

  • START Status System Setup
  • 01 Status Values
  • 02 Status Development
  • 03 Attack/Defence Modifiers
  • 04 Status Effects
  • 05 Formulas
  • 06 Ability & Item Types
  • 07 Abilities Part 1: Attacks
  • 08 Abilities Part 2: Support & Sabotage
  • 09 Abilities Part 3: Elemental Magic
  • 10 Items
  • 11 Equipment Part 1: Slots & Slot Set Templates
  • 12 Equipment Part 2: Weapons
  • 12.5 (Optional) Equipment Part 2.5: Weapons
  • 13 Equipment Part 3: Shields, Armor & Accessories
  • 13.5 (Optional) Equipment Part 3.5: Shields, Armor & Accessories
  • 14 Equipment Part 4: Available Equipment Templates
  • 15 Loot
  • 16 Battle AIs
  • 17 Combatants Part 1: General Settings
  • 18 Combatants Part 2: Players
  • 19 Combatants Part 3: Enemies
  • 20 Combatant Groups
  • END Status System Setup

3D RPG Playground

  • START 3D RPG Playground
  • 01 Player Setup
  • 02 Start Menu
  • 03 First Interaction
  • 04 Music
  • 05 Areas
  • 06 Collecting Items
  • 07 Displaying Equipment
  • 08 Combatant Prefabs, Icons & Portraits
  • 09 Combatant Animations
  • 10 Camera Positions
  • ANIM 01 Battle Start/End Schematics
  • ANIM 02 Use, Cast & Camera
  • ANIM 03 Abilities & Items
  • ANIM 04 Physical Attacks
  • ANIM 05 Special Actions
  • BATTLE 01 Battle Menu
  • BATTLE 02 Prepare for Battle
  • TURN 01 Turn Based Setup
  • TURN 02 Turn Order HUD
  • ATB 01 Active Time Setup
  • ATB 02 Cast Times
  • ATB 03 Timebar HUD
  • BATTLE 03 The First Battle
  • BATTLE 04 Hunting Move AI
  • BATTLE 05 Spawning Combatants
  • 11 Save Games
  • MENU 01 UI Boxes
  • MENU 02 Template HUDs
  • MENU 03 Overview Menu
  • MENU 04 Menu Screens
  • 12 Shop
  • BATTLE 06 Random Battles
  • DUNGEON 01 Enter the Dungeon
  • DUNGEON 02 The Trapdoor
  • DUNGEON 03 Enemies on Level 1 & 2
  • DUNGEON 04 Traps on Level 3
  • DUNGEON 05 Going Deeper
  • 13 Bestiary (+MENU+ANIM)
  • QUEST 01 Hunting Quests (+MENU)
  • QUEST 02 Guard NPC
  • QUEST 03 Forest Ruin Cheese
  • QUEST 04 Witch NPC with Cheese
  • QUEST 05 Quest Mark HUDs
  • 14 Research Trees (+MENU)
  • CRAFT 01 Crafting Materials
  • CRAFT 02 Crafting Recipes
  • CRAFT 03 Crafting Menu
  • CRAFT 04 Crafting Proficiency & Critical Crafting
  • CRAFT 05 Materials Loot
  • 15 Changing Choice Dialogue
  • 16 Follow Me!
  • BATTLE 07 Sequence Loot Dialogue

3D Action RPG

  • START 3D Action RPG
  • 01 Status System Setup
  • 02 Player Setup
  • 03 Player Weapon
  • 04 Player Attacks
  • 05 Enemy: Chomper
  • 06 Chomper Attack
  • 07 Hit & Death
  • 08 HUDs
  • 09 Rolling on the Floor
  • 10 Enemy: Spitter
  • 11 Spit Attack
  • 12 Potion
  • 13 Grenade
  • 14 Item HUD
  • 15 Enemy: Grenadier
  • 16 Grenadier Melee Attacks
  • 17 Grenadier Flamethrower
  • 18 Item Drops
  • END 3D Action RPG

2D Grid Battle RPG

  • START 2D Grid Battle RPG
  • 01 Player Setup
  • 02 Prefab & Music Setup
  • 03 Randomizing Combatants
  • 04 UI Setup
  • 05 Battle Start, End & Phase Schematics
  • 06 Battle System Setup
  • 07 Battle Grid Setup
  • 08 Grid Move
  • 09 Forest Battle Grid
  • 10 Battle AI
  • 11 Ability Ranges
  • 12 Death & Use Schematics
  • 13 Attack Schematic
  • 14 Shoot Schematics
  • 15 Battle Selection Interaction
  • END 2D Grid Battle RPG

Schematics

  • Simple Start Schematic
  • Battle Start Schematic
  • Battle End Schematic
  • Moving to Target and Back
  • Animating a Base Attack
  • Animating a Magic Ability
  • Grid Movement
  • Open and Close UI Animations
  • Flying Text Mover

UI Setups

  • Unity UI: Initial Setup
  • Unity UI: TextMesh Pro Setup
  • Unity UI: UI Box
  • Unity UI: Flying Text
  • Unity UI: Dragging Notification
  • Unity UI: Canvas with Screen Space Camera
  • Unity UI: Interaction HUD
  • Unity UI: Simple Player HUD
  • Unity UI: Quest HUD
  • Unity UI: Shortcuts HUD
  • Unity UI: Currency HUD
  • Unity UI: Tooltip HUD
  • Unity UI: Control HUD
  • Unity UI: Attack Modifiers
  • Unity UI: Defence Modifiers

Gameplay Bits

  • Combining Input Origins
  • Combining Status Value Flying Texts
  • Fun With Flying Text
  • HUD Effects With Conditional Schematics
  • Inventory Containers
  • Multi Interaction Controllers
  • World Space HUD
  • World Space Dialogue
  • Home
  • Guide
  • Tutorials
  • 3D Action RPG
  • 16 Grenadier Melee Attacks

16 Grenadier Melee Attacks

Table of Contents
  • Punch Attack Schematic
    • Combatant Animation
    • Wait
  • Spin Attack Schematic
    • Rotate To
    • Combatant Animation
  • Grenadier Death Schematic
    • Combatant Animation
    • Change Color
  • Punch Ability
    • Use Settings
    • Target Selection Settings > Use Range Settings
    • Battle Animation > Battle Animation 0
  • Spin Ability
    • Battle Animation > Battle Animation 0
    • Battle Animation > Damage Dealer Settings
  • Battle AI
    • Battle AI Settings
    • Chance
    • Ability
  • Updating the Grenadier
    • Attacks & Abilities
      • Ability Development
      • Override Settings > Base Attack
    • Battle Settings
      • Battle AI
      • Override Settings > Battle Animations
  • Save Changes
  • Testing

In this tutorial we’ll set up the grenadier’s melee attacks (and death).

The grenadier’s melee attacks are a punch and a spin attack – which are both very similar and also very similar to the chomper’s attack. So, we’ll have it easy this time – that’s why we additionally set up the grenadier’s death animation via it’s own schematic.

We’ll set up:

  • punch attack schematic
  • spin attack schematic
  • death schematic
  • punch attack ability
  • spin attack ability
  • grenadier battle AI
  • updating grenadier combatant

Let’s get to it.

Punch Attack Schematic #

We can base the punch attack on the chomper’s attack schematic – so duplicate the ChomperAttack schematic and rename it to GrenadierPunchAttack.

Open the schematic and change it to our needs.

Combatant Animation #

We’ll play adjust the normalized times for wait and store duration.

  • Normalized Time (Wait)
    Set to 0.45.
  • Normalized Time (Store Duration)
    Set to 0.2.

Wait #

Duplicate the Wait node and add it at the end (after the 2nd Activate Damage Dealer node).

And that’s it for the schematic. Click on Save Schematic to save it the changes (since we already duplicated it, it’s already a new and saved schematic).

Spin Attack Schematic #

The spin attack is also versy similar to the punch attack, so we’ll continue working on this schematic.

We’ll simply change what we need to for this variation and use Save Schematic As to save it as a new schematic.

Rotate To #

Remove this node.

Combatant Animation #

We’ll change the used animation type and the normalized times.

  • Animation Type
    Select Attack 2.
  • Normalized Time (Wait)
    Set to 0.33.
  • Normalized Time (Store Duration)
    Set to 0.37.

And that’s it for the schematic. Click on Save Schematic As … to save it, e.g. as GrenadierSpinAttack.

Grenadier Death Schematic #

We can once again base this on the chomper’s death schematic, so open it for editing.

We’ll simply change what we need to for this variation and use Save Schematic As to save it as a new schematic.

Combatant Animation #

We’ll adjust the stored duration’s time to end shortly before the animation ends.

  • Normalized Time (Store Duration)
    Set to 0.6.

Change Color #

We’ll change to fade an actual color instead of a property (there’s no dissolve effect on the grenadier).

  • Set Property
    Disable this setting.
  • Fade Red/Green/Blue
    Enable these settings.
  • From Current
    Enable this setting.

And that’s it for the schematic. Click on Save Schematic As … to save it, e.g. as GrenadierDeath.

Punch Ability #

We’ve got our schematics, it’s time to set up some abilities – and we can again base them on the chomper’s attack ability.

Navigate to Status > Abilities and copy the Chomper Attack ability.

  • Name
    Set to Grenadier Punch Attack.

Use Settings #

The ability is not cancelable. Nothing stops the big robot!

  • Cancelable
    Disable this setting.

Target Selection Settings > Use Range Settings #

We’ll use a range of 4, we’ve already updated the Range 4 battle range template to use raycast line of sight checking.

  • Template
    Select Range 4.

Battle Animation > Battle Animation 0 #

  • Schematic Asset
    Select GrenadierPunchAttack.

The damage dealer’s activation tag is already set to attack.

Spin Ability #

The spin attack is the same as the punch attack, only using a different schematic to animate it and a different activation tag for the damage dealer.

Copy the Grenadier Punch Attack.

  • Name
    Set to Grenadier Spin Attack.

Battle Animation > Battle Animation 0 #

  • Schematic Asset
    Select GrenadierSpinAttack.

Battle Animation > Damage Dealer Settings #

  • Tag
    Set to attack2.

Battle AI #

We’ll now set up the battle AI for the grenadier’s melee attacks. Again, we can build upon the chomper’s battle AI.

Navigate to Battles > Battle AI and copy the Attack battle AI.
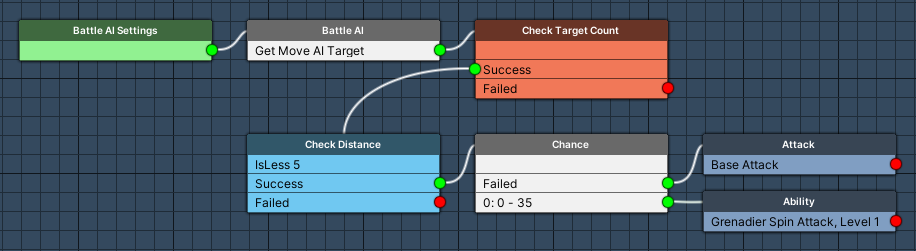
Battle AI Settings #

  • Name
    Set to Grenadier Melee.

Chance #

Add Node > Base > Chance

We’ll use this node to do a chance check on which attack to use. Using the spin attack will have a 35% chance, otherwise we’ll use the punch attack (we’ll set it up as the base attack of the grenadier).

Add this node to the Success slot of the Check Distance node, i.e. between the Check Distance and Attack nodes.

There’s already Range 0 chance setup added for us.

  • Maximum Value
    Select Value > Value.
    Set the value to 35.

Ability #

Add Node > Action > Ability

We’ll use the spin attack.

This node is added to the 0-35 slot of the Chance node (the Attack node should be added to the Failed slot).

  • Ability
    Select Grenadier Spin Attack.
  • Force Found Targets
    Enable this setting.

Updating the Grenadier #

Finally, we’ll update the grenadier’s combatant.

Navigate to Combatants > Combatants and select the Grenadier.

Attacks & Abilities #

We’ll add the spin attack as an ability and use the punch attack as base attack.

Ability Development #

Click on Add Ability.

  • Learn at Level
    Set to 1.
  • Ability
    Select Grenadier Spin Attack.

Override Settings > Base Attack #

  • Own Base Attack
    Enable this setting.

Click on Add Base Attack.

  • Ability
    Select Grenadier Punch Attack.

Battle Settings #

We’ll set up the melee battle AI and override the default death animation.

Battle AI #

Click on Add Battle AI.

  • Battle AI
    Select Grenadier Melee.

Override Settings > Battle Animations #

Click on Add Battle Animation.

  • ActionType
    Select Death.

Click on Add Battle Animation to add a schematic for the death animation.

  • Schematic Asset
    Select the GrenadierDeath schematic.

Save Changes #

And that’s it for the grenadier’s melee attacks.

Don’t forget to save your changes by clicking on Save Settings at the bottom of the editor.

Testing #

Hit play and pay a grenadier a visit.

It punches and spins when becoming aggressive, success!


Next, we’ll set the world ablaze with the grenadier’s flamethrower attack!

Share This Article :
  • Facebook
  • Twitter
  • LinkedIn
  • Pinterest
Updated on January 27, 2022
Table of Contents
  • Punch Attack Schematic
    • Combatant Animation
    • Wait
  • Spin Attack Schematic
    • Rotate To
    • Combatant Animation
  • Grenadier Death Schematic
    • Combatant Animation
    • Change Color
  • Punch Ability
    • Use Settings
    • Target Selection Settings > Use Range Settings
    • Battle Animation > Battle Animation 0
  • Spin Ability
    • Battle Animation > Battle Animation 0
    • Battle Animation > Damage Dealer Settings
  • Battle AI
    • Battle AI Settings
    • Chance
    • Ability
  • Updating the Grenadier
    • Attacks & Abilities
      • Ability Development
      • Override Settings > Base Attack
    • Battle Settings
      • Battle AI
      • Override Settings > Battle Animations
  • Save Changes
  • Testing
Sitemap
  • Features
  • Showcase
  • Guide
    • Documentation
    • Tutorials
    • API
  • ORK 2 Hub
    • Tutorials
    • Plugins
    • API
  • Support
  • Forum
  • Get ORK
  • Contact
  • Blog
  • Makinom
  • gamingislove.com
Categories
  • News (60)
  • ORK 2 (137)
    • Tutorial (137)
      • Game tutorial (50)
      • Gameplay (32)
      • How-to (55)
  • Release (130)
Search

© 2015 Gaming is Love e.U.

Disclosure: This site may contain affiliate links, which means I may receive a commission if you click a link and purchase something that I have recommended. While clicking these links won’t cost you any money, they will help me fund my development projects while recommending great assets!