
In this tutorial finish the dungeon setup with level 4 and 5, including the boss battle.
This tutorial continues the sub-series for setting up the dungeon.
Time to finish up the dungeon – we’ll set up level 4 and the final boss at level 5.
Dungeon Level 4 #
Open Dungeon Level 4 (Assets/Scenes/Dungeon/).
We’ll add the usual level zone, item collectors (small key and additional items) and battles.
Level Zone #
Add a level zone either using the scene hierarchy context menu (ORK Framework > Zome > Level Zone (Scene)) or the Makinom scene wizard (Create Game Object > Level Zone (Scene)).
Level Settings #
- Use Minimum Level
Enable this setting. - Minimum Level
Set to 15. - Set Levels
Enable this setting. - Set Level
Select Player. - Minimum Offset
Set to -1. - Maximum Offset
Set to 1.
Item Collector (Small Key) #
Add an item collector either via the scene hierarchy context menu (ORK Framework > Item Collector) or the Makinom scene wizard (Create Game Object > Item Collector).
Place the item collector on a table in the large room on the upper left side (not the one with the trapdoor).
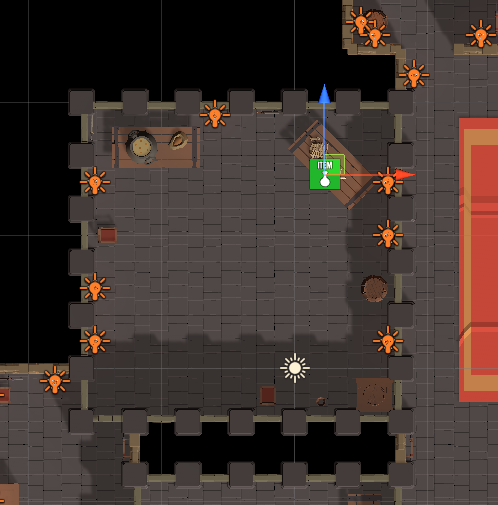
Item Settings > Item 0 #
- Item
Select Small Key.
Battles #
Place battles using the Combatant Spawner Range prefab.
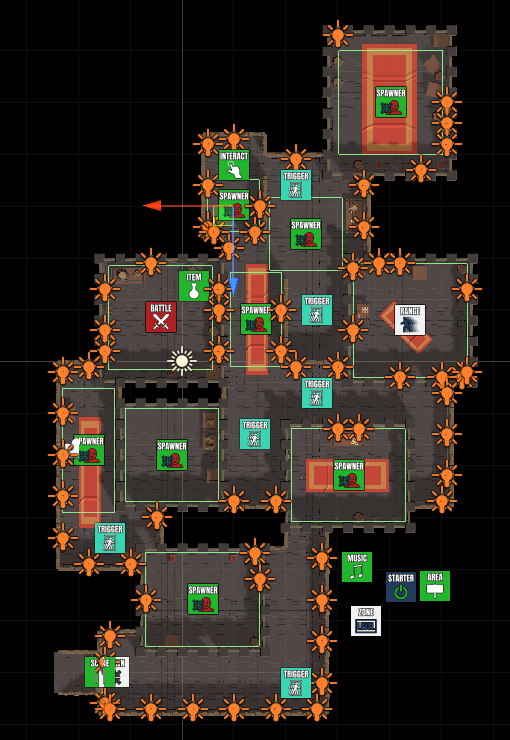
Adjust the Box Collider of the Move AI Range to fit the rooms the battles are placed in, rotate them as needed and select the groups you want to use.
I’m using:
- 1x Tank, 2x Physical DPS
- 1x Tank, 1x Mage, 1x Supporter
- 1x Tank, 1x Supporter
- 2x Physical DPS, 1x Supporter
- 1x Physical DPS, 1x Mage
- 1x Tank, 1x Physical DPS, 1x Mage
- 2x Physical DPS
- 1x Tank, 1x Physical DPS, 1x Supporter
- Dragon (single combatant, in the small key’s room)
- Dragon (single combatant, in front of the trapdoor)
To use a single combatant, change the following setting of the Combatant Spawner.
Combatant Spawner > Combatant Settings > Combatant 0 #
Change the used group on the Combatant Spawner child object.
- Use Group
Disable this setting. - Combatant
Select Dragon.
Additional Item Collectors #
Add some additional item collectors to the scene to have the player something to pick up and enjoy.
You can add item collectors either via the scene hierarchy context menu (ORK Framework > Item Collector) or the Makinom scene wizard (Create Game Object > Item Collector).
E.g. I’m adding:
- High Potion x3
- Magic Potion x2
- Revive Potion x1
- Revive Potion x1
- Dagger 2 x1
- Hammer 1 x1
- Shield 2 x1
- Armor 2 x1
- Light Armor 2 x1
- Staff 2 x1
- Gold x500
Enter Level 5 #
We’ll now update the trapdoor in the level 4 scene to load Dungeon Level 5 and add a spawn point in front of the trapdoor.
Scene Changer #
Select the Entrance_Trapdoor_Block game object in case it’s no longer selected.
Adjust the following setting.
Scene Change Settings > Scene Settings > Target Scene 0 #
- Target Scene
Set to Dungeon Level 5.
Spawn Point #
Create a Spawn Point in front of the trapdoor, either using the scene hierarchy context menu (Makinom > Spawn Point) or the Makinom scene wizard (Create Game Object > Spawn Point).

The spawn point automatically receives the spawn ID 1, since this is the next unused spawn ID. We’ll adjust the rotation for our player’s spawn.
Transform #
- Rotation
Set to X=0, Y=180, Z=0.
Spawn Point #
- Use Rotation
Enable Y, disable X and Z.
That’s it for level 4 – don’t forget to save your changes.
Exit Level 5 #
Open Dungeon Level 5 (Assets/Scenes/Dungeon/), we’ll add a spawn point and scene changer to return to level 4.
Adding a Game Starter #
Don’t forget that you need to add a Game Starter to a scene if you want to do a quick playtest right in the scene.
Create an ORK Game Starter either using the scene hierarchy context menu (ORK Framework > ORK Game Starter) or the Makinom scene wizard (Add ORK Game Starter > Add ORK Game Starter).
It doesn’t really matter where you place the game starter, but make sure to enable Start Game for quick game testing.
- Start Game
Enable this setting.
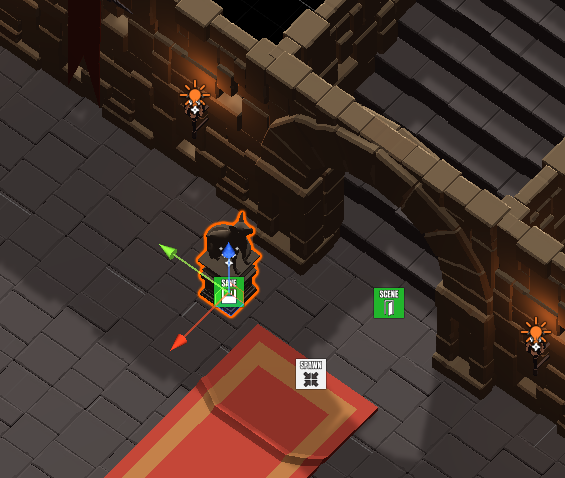
Adding a Spawn Point #
Create a Spawn Point either using the scene hierarchy context menu (Makinom > Spawn Point) or the Makinom scene wizard (Create Game Object > Spawn Point).
Place the spawn point in front of the stairs leading upwards – but not too close, as we’ll also add a scene changer to the stairs.
The spawn point is already facing the right way, so we don’t need to adjust it’s rotation.
Adding a Scene Changer #
Select the Entrance_Staircase_Block game object – you can easily select it by clicking on the arch of the staircase.

The scene changer has to be added to the root game object (Entrance_Staircase_Block), not one of it’s child objects. Use the component menu to add a Scene Changer component.
Scene Change Settings > Scene Settings > Target Scene 0 #
- Target Scene
Set to Dungeon Level 4. - Position Type
Select Spawn ID. - Spawn ID
Select Value > Value. - Value (Spawn ID)
Set to 1.
Dungeon Level 5 #
We already have Dungeon Level 5 open.
We’ll add a level zone, a save point, 3 battles (boss and 2 dragons) and some items to pick up.
Level Zone #
Add a level zone either using the scene hierarchy context menu (ORK Framework > Zome > Level Zone (Scene)) or the Makinom scene wizard (Create Game Object > Level Zone (Scene)).
Level Settings #
We’ll use a minimum level of 20, but stick the level to the player’s level otherwise.
- Use Minimum Level
Enable this setting. - Minimum Level
Set to 20. - Set Levels
Enable this setting. - Set Level
Select Player. - Minimum Offset
Set to 0. - Maximum Offset
Set to 0.
Save Point #
We’ve got our SavePoint prefab already set up for us (found in Assets/Tutorial Assets/Prefabs/).
Add it to the scene and place it beside the stairway.
Battles #
Place battles using the Combatant Spawner Range prefab.
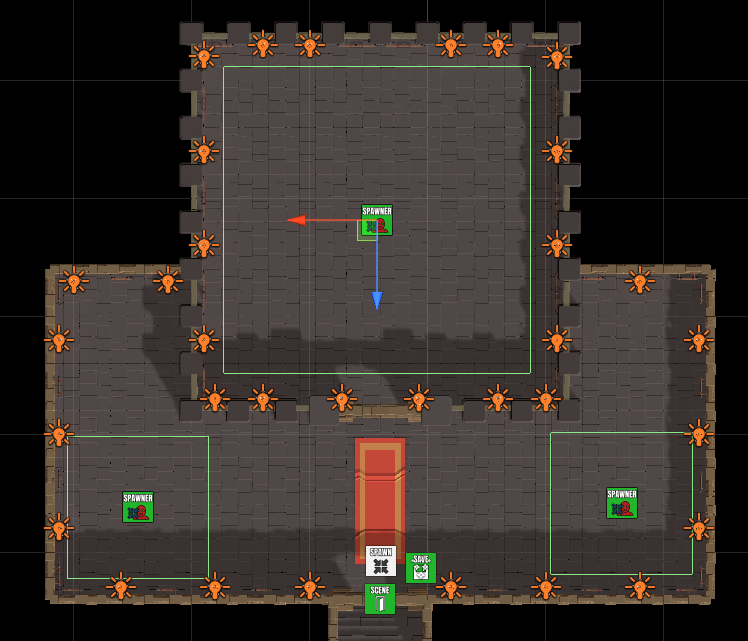
Adjust the Box Collider of the Move AI Range to fit the rooms the battles are placed in, rotate them as needed and select the groups you want to use.
I’m using:
- Velociraptor (single combatant, large room)
- Dragon (single combatant, left side)
- Dragon (single combatant, right side)
To use a single combatant, change the following setting of the Combatant Spawner.
Combatant Spawner > Combatant Settings > Combatant 0 #
Change the used group on the Combatant Spawner child object.
- Use Group
Disable this setting. - Combatant
Select Dragon or Velociraptor.
If you want the boss (Velociraptor) to only occur once, simply enable the Combatant Spawner component’s Use Scene ID setting. This works like Item Collector components and remembers the finished battle in this scene.
Boss Battle Start Schematic #
We’ll create a different version of the BattleStart schematic for our boss battle – mainly to play the boss battle music.
Duplicate the BattleStart schematic we created earlier, rename it to e.g. BossBattleStart and open it.
Change Music #
Select the Change Music node and change the following setting.
- Music Clip
Select Boss Battle Theme.
That’s all you need to do – save the changes.
If you want, you can also add other changes, e.g. use a different message or play some animations, etc.
Updating the Boss Battle #
Select the Battle child object of the Velociraptor‘s spawner, we’ll change the following setting in the Battle component.
Battle Settings > Battle Start/End Schematics #
- Own Start Schematic
Enable this setting. - Start Schematic
Select the BossBattleStart schematic.
Since the spawned combatant will use this Battle, it’ll also use this battle’s setup.
Battle Spots #
While we’re at it, let’s make some slight adjustment to this battle’s battle spots. We only have 1 enemy, so we’ll place it in the middle instead of the side (as it’s in our setup).
Expand the Battle Spots foldout.
Click on Create Battle Spots – this’ll create empty game objects for the battle spot setup we defined in Battles > Battle Spots.
Now, we just need to swap the spots for enemy 0 and enemy 1. Expand the Enemy Spots setting and drag the enemy 0 spot down.
Additional Item Collectors #
Add some additional item collectors to the scene to have the player something to pick up and enjoy.
You can add item collectors either via the scene hierarchy context menu (ORK Framework > Item Collector) or the Makinom scene wizard (Create Game Object > Item Collector).
E.g. I’m adding:
- Gold x1000
- Scope x1
- Magic Crystal x1
- Magic Crystal x1
- Revive Potion x3
- High Potion x5
And that’s it for level 5 – don’t forget to save your changes.
Testing #
With our dungeon being complete, you can now try out a complete run from level 1 to 5!

My quick test with a level 1 group vs a level 20 Velociraptor naturally ended in a quick defeat.
Next, we’ll set up the bestiary, including the ranger’s study ability.


