
In this tutorial we’ll continue setting up schematics to animate battle actions.
This time we’ll only handle the close range melee attacks, which all use the same schematic. We’ll use sound types to play an attack and hit sound, so we need to set that up as well. Since that’s not that much to do, we also let damaged combatants flash red when they receive damage (that’s set up in the flying texts for HP) and update the use cost texts, which currently show the full status value name (Magic Points) instead of it’s short name (MP).
We’ll set up:
- sound types
- combatant sounds
- attack schematic
- update attack abilities
- HP damage flash
- use cost texts
Let’s get to it.
Sound Types #
Sound types are used to play sounds without knowing (or caring) which actual sound will be played. Combatants, equipment and other things (including Sound Assignment components) can define which sound is played for which type – this allows us to e.g. play an attack or hit sound in our attack schematic, and the actual sound can depend on which combatant attacks (and which weapon they have equipped) and who’s hit by the attack (and maybe which kind of armor they wear). We’ll only use a default sound setup for this tutorial, though.
You can learn more about sound types in this Makinom documentation.
Navigate to Base/Control > Sound Types, we’ll change the Default type and add an additional type.
0: Attack #
- Name
Set to Attack.
1: Hit #
- Name
Set to Hit.
Combatant Sounds #
We’ll set up default attack and hit sounds for all combatants.
Navigate to Combatants > Combatants > General Settings.
Animation & Movement > Sound Settings #
Click on Add Sound.
- Sound Type
Select Attack. - Audio Clip
Select the Sword2 audio clip.
Click on Add Sound.
- Sound Type
Select Hit. - Audio Clip
Select the Hit audio clip.
Save Changes #
That’s it for the editor setup for now, we’ll continue with schematics.
Don’t forget to save your changes by clicking on Save Settings at the bottom of the editor.
Attack Schematic #
Like with use and death, the Attack animation also plays until we stop it, so we need to play and stop it in the schematic. We’ll also change the user’s showWeapon bool variable to let it’s equipment viewer show the weapon during attacks.
Additionally, we need to handle the direction of our animations – the attack animation has different versions for north, south, east and west directions. We already handle this automatically via the combatant’s rotation. So, what do we do to make use of that? We let the user face the target!
Navigate to Schematics and start working on a new schematic.
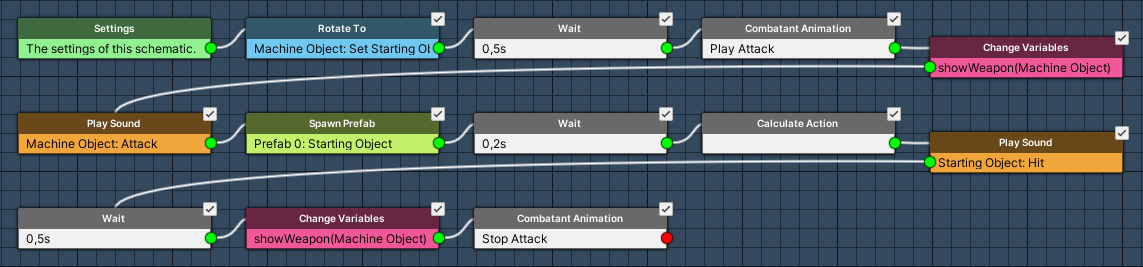
Settings #
We’ll add a prefab that’ll spawn to animate the attack.
Prefabs #
Click on Add Prefab Resource.
- Auto Destroy After Time
Enable this setting. - Time
Set to 0.55. - Prefab
Select Slash.
Rotate To #
Add Node > Movement > Rotation > Rotate To
This node rotates a game object to face another game object or position.
We’ll use it to rotate the user (Machine Object) to face the target (Starting Object), which takes care of our directional animations.
- Is 2D
Enable this setting.
This makes sure the 2D look at rotation is correct. - Object (Rotating Object)
Select Machine Object. - Rotate Component
Select Transform. - Rotate Function
Select Set. - Is 2D Look At
Enable this setting.
This isn’t really needed, as the Is 2D setting already takes care of this and this node uses a different rotation function. But it doesn’t hurt to do this for 2D. - Rotation Target
Select Game Object. - Object (Rotation Target)
Select Starting Object.
Wait #
Add Node > Base > Wait
- Time
Select Value > Value.
Set the value to 0.5.
Combatant Animation #
Add Node > Animation > Combatant > Combatant Animation
We’ll play the Attack animation. As said, the attack animation will play until we stop it, so we don’t need to wait for it.
- Object
Select Machine Object. - Animation Type
Select Attack.
Change Variables #
Add Node > Value > Variable > Change Variables
We’ll now enable the showWeapon bool variable on the user, this’ll show it’s weapon via the Equipment Viewer (as we set up).
Click on Add Variable.
- Variable Key
Set to showWeapon. - Variable Origin
Select Object.
We use object variables on the user. - Object
Select Machine Object. - Type
Select Bool. - Bool Type
Select Value. - Bool Value
Enable this setting.
Play Sound #
Add Node > Audio > Audio > Play Sound
Play the Attack sound type on the user.
- Object (Play On)
Select Machine Object. - Use Sound Type
Enable this setting. - Sound Type
Select Attack. - Play One Shot
Enable this setting.
Spawn Prefab #
Add Node > Game Object > Prefab > Spawn Prefab
We’ll spawn the prefab on the target (Starting Object).
- Prefab
Select Prefab 0. - Target Type
Select Object. - Object (Target Object)
Select Starting Object.
Wait #
Add Node > Base > Wait
- Time
Select Value > Value.
Set the value to 0.2.
Calculate Action #
Add Node > Battle > Action Outcome > Calculate Action
We now calculate the outcome of the action.
No further settings needed.
Play Sound #
Add Node > Audio > Audio > Play Sound
Play the Hit sound type on the target.
- Object (Play On)
Select Starting Object. - Use Sound Type
Enable this setting. - Sound Type
Select Hit. - Play One Shot
Enable this setting.
Wait #
Copy the first Wait node (0.5 second wait).
Change Variables #
Copy the previous Change Variables node, we now disable the showWeapon bool variable.
- Bool Value
Disable this setting.
Combatant Animation #
Copy the previous Combatant Animation node.
We’ll now stop playing the Attack animation.
- Stop
Enable this setting.
And that’s it for the schematic. Click on Save Schematic to save it, e.g. as Attack.
Abilities #
Next, we’ll use the schematic to animate our attack abilities.
Navigate to Status > Abilities.
0: Attack #
Battle Animation #
Click on Add Battle Animation.
- Schematic Asset
Select the Attack schematic.
2: Poison Attack #
Battle Animation #
Click on Add Battle Animation.
- Schematic Asset
Select the Attack schematic.
We’ll replace the prefab in the Resource Overrides settings.
Click on Add Prefab Override.
- Auto Destroy After Time
Enable this setting. - Time
Set to 0.55. - Prefab
Select SmokePurple.
3: Slow Attack #
Battle Animation #
Click on Add Battle Animation.
- Schematic Asset
Select the Attack schematic.
We’ll replace the prefab in the Resource Overrides settings.
Click on Add Prefab Override.
- Auto Destroy After Time
Enable this setting. - Time
Set to 1.1. - Prefab
Select ShieldBlue.
4: Blind Attack #
Battle Animation #
Click on Add Battle Animation.
- Schematic Asset
Select the Attack schematic.
We’ll replace the prefab in the Resource Overrides settings.
Click on Add Prefab Override.
- Auto Destroy After Time
Enable this setting. - Time
Set to 0.55. - Prefab
Select Smoke.
Damage Flash #
Next, we’ll setup up a red flash on a damaged combatant’s game object. This is done in the HP status value’s flying text settings.
Navigate to Status > Status Values and select the Health Points status value.
UI Settings > Flying Text Settings > Flying Text 0 #
We need to add the red flashing to the Damage and Critical Damage settings, since we already have set up using different versions in the status system setup tutorials.
Damage > Flash Settings #
- Use Flash
Enable this setting. - Flash Children
Enable this setting.
This’ll also change the color of renderers on child objects. - Time
Set to 0.5. - Fade Alpha/Red/Green/Blue
Enable these settings. - Start Color
Select a white color with full alpha (i.e. A=255 or 1, depending on the color picker). - End Color
Select a red color with full alpha (i.e. A=255 or 1, depending on the color picker).
Critical Damage > Flash Settings #
We use the same setup, but do a longer flash.
- Use Flash
Enable this setting. - Flash Children
Enable this setting. - Time
Set to 1. - Fade Alpha/Red/Green/Blue
Enable these settings. - Start Color
Select a white color with full alpha (i.e. A=255 or 1, depending on the color picker). - End Color
Select a red color with full alpha (i.e. A=255 or 1, depending on the color picker).
Update Use Cost Text #
And lastly, we update the use costs to show short names (MP) instead of the regular names (Magic Points) of the status values.
Navigate to UI > Text Display Settings.
Status Texts > Use Cost Display #
These settings manage how use costs will be displayed in menus. We’ll only change the status value texts.
Negative Change Text #
- Default Content
Set to: <shortname> <change>
Positive Change Text #
- Default Content
Set to: <shortname> +<change>
Set Change Text #
- Default Content
Set to: <shortname> =<change>
Save Changes #
And that’s it for the attack animations!
Don’t forget to save your changes by clicking on Save Settings at the bottom of the editor.
Testing #
Hit play in the Forest Battle 1 scene and hit some enemies.

And it’s working – weapons are shown, sounds play and prefabs spawn, great!
Next, we’ll set up the bow attack schematics.


