
In this tutorial we’ll set up multiple HUDs.
We’ll set up the following HUDs:
- enemy HUD at the enemy’s position
- player’s health HUD in the lower left corner of the screen
- player’s stamina HUD in the center of the screen (only shown when stamina isn’t full)
Using the Unity UI module most of our HUD setup is handled in prefabs.
Let’s get to it!
Enemy HUD Prefab #
We’ll start with the enemy HUD, it’ll display the enemy’s name and HP (as a value bar). I recommend setting up UI prefabs in a new scene (or use the UI Environment scene you’ve set up for editing UI prefabs).
HUD Base #
Use the scene hierarchy’s context menu to create the base HUD: Makinom > HUD > HUD (Vertical Layout)
This creates a canvas, an empty HUD with a vertical layout. We use a Vertical Layout Group to arrange the HUD’s content in a vertical list.
Rect Transform #
The width of the HUD should already be set to 100, that’s what we’ll use.
- Width
Set to 100.
Vertical Layout Group #
We’ll set the padding and spacing all to 0.
- Padding
Set all to 0. - Spacing
Set to 0.
Content Size Fitter #
Add a Content Size Fitter component using the component menu.
- Vertical Fit
Select Preferred Size.
Name #
Use the scene hierarchy context menu on the HUD game object to add an ORK status text content: ORK Framework > HUD > Content > Status Text Content
ORK HUD Status Text Content #
This component handles the content that will be displayed.
It’s already set up as we need it, displaying the name (via <name> text code) of the combatant.
TextMeshPro – Text (UI) #
This component handles displaying the text, we’ll adjust it to our needs.
- Font Size
Set to 14. - Alignment
Select Center. - Wrapping
Select Disabled.
HP #
Use the scene hierarchy context menu on the HUD game object to add a status value with a value bar: ORK Framework > HUD > Status Value > Status Value with +- changes – Name+Value+Bar (single)
This’ll add more than we need, remove the following child objects from the Status Value game object:
- Name
- Value
That leaves us with the Value Bar child object.
Select the Status Value game object.
HUD Status Value #
This defines the status value that will be displayed.
- Status Value
Select HP.
Layout Element #
Add a Layout Element component using the component menu.
We’ll need this to define the height the value bar will have in the vertical layout.
- Preferred Height
Enable this setting.
Set the value to 5.
Empty Sprite #
Select the Status Value > Value Bar > Empty Sprite child object, we’ll adjust the Image component.
- Source Image
Select White_16x16.
Positive Change Sprite #
Select the Status Value > Value Bar > Positive Change Sprite child object, we’ll adjust the Image component.
- Source Image
Select White_16x16. - Color
Select a light green color with full alpha.
E.g. I’m using this hexadecimal color code: 96FF96
Negative Change Sprite #
Select the Status Value > Value Bar > Negative Change Sprite child object, we’ll adjust the Image component.
- Source Image
Select White_16x16. - Color
Select a yellow color with full alpha.
E.g. I’m using this hexadecimal color code: FFC700
Value Sprite #
Select the Status Value > Value Bar > Value Sprite child object, we’ll adjust the Image component.
- Source Image
Select White_16x16. - Color
Select a red color with full alpha.
E.g. I’m using this hexadecimal color code: FF0000
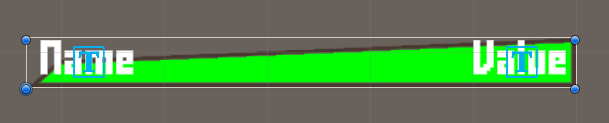
The finished HUD will look like this:

Create Prefab #
You might be wondering about the placement of the HUD. We’ll use the enemy’s on-screen position for that, it’ll be placed using the HUD’s pivot, i.e. in our HUD the (default) center pivot position.
Create a prefab out of the HUD, e.g. save it as Enemy HUD.
You can remove the HUD game object from the scene (but keep the canvas).
Player Health HUD Prefab #
Next, we’ll create the prefab for the player’s health HUD.
HUD Base #
Use the scene hierarchy’s context menu to create the base HUD: Makinom > HUD > HUD
This time we’ll create a HUD without any layout.
Rect Transform #
Change the settings in the following order.
Select the bottom left anchor preset.
- Pivot
Set to X=0, Y=0. - Pox X
Set to 50. - Pos Y
Set to 50. - Width
Set to 400. - Height
Set to 36.
HP #
Use the scene hierarchy context menu on the HUD game object to add a status value with a value bar: ORK Framework > HUD > Status Value > Status Value with +- changes – Name+Value+Bar (single)
Select the Status Value game object.
Rect Transform #
We’ll change it to fill out the whole HUD.
Select the stretch stretch anchor preset.
- Left
Set to 0. - Top
Set to 0. - Right
Set to 0. - Bottom
Set to 0.
HUD Status Value #
This defines the status value that will be displayed.
- Status Value
Select HP.
Border Image #
Add an empty game object to the Status Value game object and place it between the Value Bar and the Name child objects.
We’ll use it to display an image acting as the border of the value bar. The text (name, value) should be visible in front of it, the bar behind it.
Rename the game object to Border Image.
Rect Transform #
Select the stretch stretch anchor preset.
- Left
Set to 0. - Top
Set to 0. - Right
Set to 0. - Bottom
Set to 0.
Image #
Add an Image component using the component menu.
- Source Image
Select SimpleMaskBar_Border.
Name, Value #
The Name and Value child objects of the Status Value game object are already set up as we need them.
Mask #
Add another empty game object to the Status Value game object and place it above the Border Image child object.
Rename the game object to Mask.
This game object will serve as a mask, hiding parts of the value bar (we’ll parent it to this game object after we’re done with it’s setup).
Rect Transform #
Select the stretch stretch anchor preset.
- Left
Set to 0. - Top
Set to 0. - Right
Set to 0. - Bottom
Set to 0.
Mask #
Add a Mask component using the component menu.
Image #
Add an Image component using the component menu.
- Source Image
Select SimpleMaskBar_Mask.
Move the Value Bar child object and parent it to the new game object. You’ll see that parts of the value bar are now hidden.
Value Bar #
All that’s left to do is set up the value bar’s sprites.
Empty Sprite #
Select the Value Bar > Empty Sprite child object, we’ll adjust the Image component.
- Source Image
Select White_16x16.
Positive Change Sprite #
Select the Value Bar > Positive Change Sprite child object, we’ll adjust the Image component.
- Source Image
Select White_16x16. - Color
Select a light green color with full alpha.
E.g. I’m using this hexadecimal color code: 96FF96
Negative Change Sprite #
Select the Value Bar > Negative Change Sprite child object, we’ll adjust the Image component.
- Source Image
Select White_16x16. - Color
Select a red color with full alpha.
E.g. I’m using this hexadecimal color code: FF0000
Value Sprite #
Select the Value Bar > Value Sprite child object, we’ll adjust the Image component.
- Source Image
Select White_16x16. - Color
Select a green color with full alpha.
E.g. I’m using this hexadecimal color code: 00FF00
The finished HUD will look like this:
Create Prefab #
Create a prefab out of the HUD, e.g. save it as Player Health HUD.
You can remove the HUD game object from the scene (but keep the canvas).
Player Stamina HUD Prefab #
Our last HUD prefab to set up is for the player’s stamina HUD.
HUD Base #
Use the scene hierarchy’s context menu to create the base HUD: Makinom > HUD > HUD
We’ll create a HUD without any layout again.
Rect Transform #
The HUD should already be placed using a middle center anchor preset. We’ll display it slightly above the center and reduce it’s size.
Select the middleft anchor preset.
- Pox X
Set to 0. - Pos Y
Set to 100. - Width
Set to 50. - Height
Set to 50.
Image #
Add an Image component using the component menu.
The base of the HUD will serve as a mask.
- Source Image
Select SmallMaskBar_Round.
Soft Mask #
Add a Soft Mask component using the component menu.
This uses the SoftMaskForUGUI available under the MIT license.
We can keep the settings as they are.
Stamina #
Use the scene hierarchy context menu on the HUD game object to add a status value with a value bar: ORK Framework > HUD > Status Value > Status Value – Name+Value+Bar (single)
This’ll add more than we need, remove the following child objects from the Status Value game object:
- Name
- Value
That leaves us with the Value Bar child object.
Select the Status Value game object.
Rect Transform #
We’ll change it to fill out the whole HUD.
Select the stretch stretch anchor preset.
- Left
Set to 0. - Top
Set to 0. - Right
Set to 0. - Bottom
Set to 0.
HUD Status Value #
- Status Value
Select Stamina.
Empty Sprite #
Select the Value Bar > Empty Sprite child object, we’ll adjust the Image component.
- Source Image
Select White_16x16.
Add a Soft Maskable component to the Empty Sprite child object. This component is needed for the soft mask to work on the image.
Value Sprite #
Select the Value Bar > Value Sprite child object, we’ll adjust the Image component.
- Source Image
Select White_16x16. - Color
Select a yellow color with full alpha.
E.g. I’m using this hexadecimal color code: FFFF00 - Fill Method
Select Radial 360. - Fill Origin
Select Top. - Clockwise
Dislabe this setting.
Add a Soft Maskable component to the Value Sprite child object.
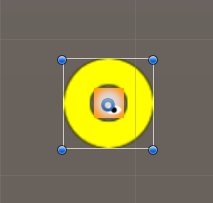
The finished HUD will look like this:
Create Prefab #
Create a prefab out of the HUD, e.g. save it as Player Stamina HUD.
We’re done with our prefabs – you can now remove the canvas (in case you worked in the game’s scene).
HUD UI Layer #
Open the editor and navigate to UI > UI Layers, we’ll add a new layer for our HUDs.
- Name
Set to HUDs.
Drag the HUDs layer in the list above the Screen Fader layer, i.e. the order is:
- Flying Texts
- Layer 1
- HUDs
- Screen Fader
HUD Animations #
Navigate to UI > HUDs > General Settings, we’ll set up default UI animations for all our HUDs.
Default Schematics #
We’ll use schematics to fade in/out our HUDs. If you haven’t set them up yet, see this tutorial (or download them there).
- Before Open Schematic
Select UIFadeIn. - Wait
Enable this setting. - Before Close Schematic
Select UIFadeOut. - Wait
Enable this setting.
HUD Setup #
Navigate to UI > HUDs, we’ll change the Default HUD and add additional HUDs.
0: Player Health #
First, we’ll set up the player’s health HUD.
HUD Settings #
- Name
Set to Player Health. - HUD Type
Select Combatant. - Auto Display
Enable this setting.
This will automatically show the HUD. If you use a HUD only as a template, make sure to disable this setting.
Combatant Settings #
- Only Leaders
Enable this setting.
This’ll display the HUD only for the player combatant itself (we only have one in this game anyway). - Player
Enable this setting.
Display Conditions #
You can use these settings to only show the HUD based on conditions. We’ll not use this for this tutorial.
Unity UI #
- UI Layer
Select HUDs. - HUD Prefab
Select the Player Health HUD prefab.
1: Player Stamina #
Copy the Player Health HUD.
HUD Settings #
- Name
Set to Player Stamina.
Display Conditions > Combatant Requirements #
The stamina will use a display condition – only showing when the stamina isn’t full.
Click on Add Status Condition.
- Condition Type
Select Status. - Status Needed
Select Status Value. - Status Value
Select Stamina. - Used Value
Select Display Value.
Since our stamina uses count to value, we’ll base this on the displayed value, not the real value. - Check In
Select Percent. - Check Type
Select Is Less. - Check Value
Select Value > Value.
Set the value to 100.
Unity UI #
- HUD Prefab
Select the Player Stamina HUD prefab.
2: Enemy #
The enemy HUD is a bit different, add a new HUD.
It’ll be displayed at the combatant’s game object (they already have a child object added for the HUD’s position).
HUD Settings #
- Name
Set to Enemy. - HUD Type
Select Combatant Object. - Auto Display
Enable this setting.
Combatant Settings #
- Enemy
Enable this setting. - Child Object
Select Path.
We’ll define the path to a child object. - Find Child
Set to HUD.
This’ll use a child object on the combatants named HUD to place the HUD. - Limit Display Range
Enable this setting.
We only display the HUD when the combatant is close enough to the player. - Range
Select Value > Value.
Set the value to 15.
Unity UI #
- UI Layer
Select HUDs. - HUD Prefab
Select the Enemy HUD prefab.
Save Changes #
And that’s it for the HUD setup.
Don’t forget to save your changes by clicking on Save Settings at the bottom of the editor.
Testing #
Hit play (in the Scene scene) and do something.
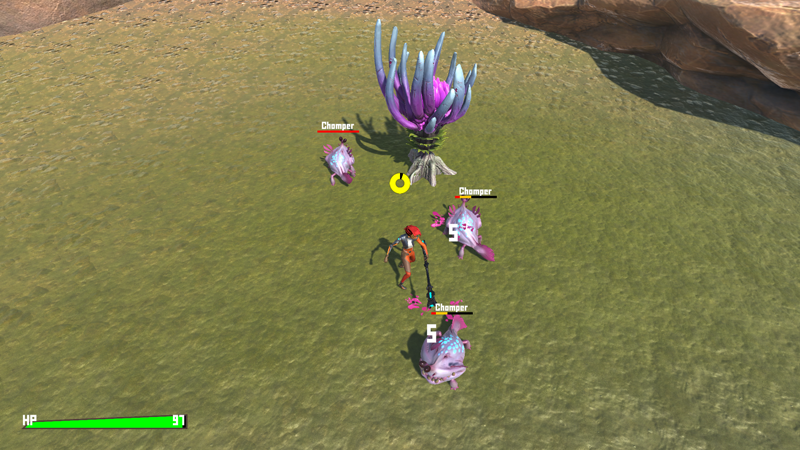
Attacking or sprinting will show the stamina HUD (and it vanishes when it’s full again).
Enemies have a HUD above them when they’re close enough – attacking them shows the damage we do in a different color and our own health also works.
Great! You can also finally notice that the stamina system we’ve set up works – using stamina shortly stops regeneration, kicking back in after a second (until we keep using it).
Next, we’ll start rolling on the floor!


