
In this tutorial we’ll set up the comper’s attack.
The chomper will use a close range melee attack – we’ll set up:
- schematic animating the enemy’s attack
- battle range template for the attack range
- attack ability
- battle AI
- battle system
- chomper’s prefab (damage dealer/zone)
Let’s get to it.
Chomper Attack Schematic #
The chomper’s attack also uses damage dealers (we’ll set them up later) and combatant animations with partly wait times, similar to the player’s attack.
Like with the player’s attack, this attack can also be canceled, so we need to ensure that certain nodes are executed in any case. This is done by enabling their Execute On Stop setting (at the top of the node’s settings). I’ll note in each node that needs this.
Navigate to Schematics and start working on a new schematic.

Rotate To #
Add Node > Movement > Rotation > Rotate To
This node rotates a game object to face a target, we’ll use it to rotate the user (Machine Object) to the target (Starting Object).
- Object (Rotating Object)
Select Machine Object. - Rotate Component
Select Transform.
We’ll force rotating via the transform. - Lock Rotation
Enable X and Z.
We’ll only rotate on the Y axis. - Rotation Target
Select Game Object. - Object
Select Starting Object. - Fade Rotation
Enable this setting. - Time
Select Value > Value.
Set the value to 0.5. - Wait
Enable this setting. - Interpolation
Select Linear.
Combatant Animation #
Add Node > Animation > Combatant > Combatant Animation
We’ll play the combatant’s attack animation.
- Object
Select Machine Object. - Animation Type
Select Attack. - Wait
Enable this setting. - Normalized Time (Wait)
Set to 0.4. - Store Duration
Enable this setting. - Normalized Time (Store Duration)
Set to 0.4. - Variable Key
Set to wait. - Variable Origin
Select Local.
Play Sound #
Add Node > Audio > Audio > Play Sound
We’ll play the Attack sound type on the user (Machine Object).
- Object (Play On)
Select Machine Object. - Use Sound Type
Enable this setting. - Sound Type
Select Attack. - Play One Shot
Enable this setting. - Set Pitch
Enable this setting. - Random Pitch
Enable this setting. - Pitch
Set to 0.8. - Pitch 2
Set to 1.2.
Activate Damage Dealer #
Add Node > Battle > Action Outcome > Activate Damage Dealer
We’ll handle the damage dealer setup on the combatant’s prefab later, the setup will be similar to the player (i.e. activation via the ability’s tags).
- Object (Activate On)
Select Machine Object. - Activate
Enable this setting. - Use Action Tags
Enable this setting. - Set Action
Enable this setting.
Wait #
Add Node > Base > Wait
We’ll now wait for the stored duration.
- Time
Select Variable > Float Variable. - Variable Key
Set to wait. - Variable Origin
Select Local.
Activate Damage Dealer #
Copy the previous Activate Damage Dealer node, we’ll now deactivate it again.
This node needs to be executed on stop.
- Execute On Stop
Enable this setting. - Activate
Disable this setting.
And that’s it for the schematic. Click on Save Schematic to save it, e.g. as ChomperAttack.
Battle Range Template #
The chomper should have an attack range of 1.5 world units, but use the move AI to get into range when being further away.
There are already different range templates set up in a new project, but we’ll need a range between 1 and 2 (which are set up).
Navigate to Templates > Battle Range Templates and add a new template.
- Name
Set Range 1.5.
Range Settings #
We’ll set up the maximum range, raycast line of sight check and using the move AI to move into range.
Maximum Range #
- Maximum Range
Enable this setting. - Range
Select Value > Value.
Set the value to 1.5.
Raycast Line of Sight #
We’ll use child objets on user and target for the raycast.
- Use Raycast
Enable this setting. - Layer Mask
Select only the Default layer.
First select Nothing and then select Default. - Use Child (User)
Select Path. - Find Child (User)
Set to Head. - Use Child (Target)
Select Path. - Find Child (Target)
Set to Head.
Move AI Settings #
- Move Into Range
Enable this setting.
This’ll use the combatant’s move AI to move into range.
While we’re here, let’s adjust 2 other ranges that are already set up to also use line of sight.
Range 4 #
Select the Range 4 template.
Raycast Line of Sight #
- Use Raycast
Enable this setting. - Layer Mask
Select only the Default layer.
First select Nothing and then select Default. - Use Child (User)
Select Path. - Find Child (User)
Set to Head. - Use Child (Target)
Select Path. - Find Child (Target)
Set to Head.
Range 5 #
Select the Range 5 template.
Raycast Line of Sight #
- Use Raycast
Enable this setting. - Layer Mask
Select only the Default layer.
First select Nothing and then select Default. - Use Child (User)
Select Path. - Find Child (User)
Set to Head. - Use Child (Target)
Select Path. - Find Child (Target)
Set to Head.
Attack Ability #
Next, we’ll set up the enemy’s attack ability.
Navigate to Status > Abilities and add a new ability.
- Name
Set to Chomper Attack.
Ability Settings #
- Ability Type
Select Default. - Useable In
Select Both.
Use Settings #
The ability can be canceled by other attacks.
- Cancelable
Enable this setting.
Target Selection Settings #
We’ll set up a Custom target selection instead of using a template, targeting a single enemy within a use range of 1.5.
- Target Selection Type
Select Custom.
Target Settings #
- Target Type
Select Enemy. - Target Range
Select Single.
Use Range Settings #
- Own Use Range
Enable this setting.
Click on Add Range.
- Range Type
Select Template. - Template
Select Range 1.5.
Target Settings > Target Changes #
Click on Add Target Change.
- Cancel Action
Enable this setting.
The ability can cancel the target’s action (if it’s cancelable).
Click on Add Status Change.
- Change Type
Select Status Value. - Status Value
Select HP. - Operator
Select Sub. - Change Value
Select Combatant > Status Value. - Status Value (Change Value)
Select ATK.
Battle Animation #
Click on Add Battle Animation.
- Schematic Asset
Select ChomperAttack.
Damage Dealer Settings #
Click on Add Tag.
- Tag
Set to attack.
This is the same activation tag we’ve used on the staff’s damage dealer.
Click on Add Battle Animation. We’ll use the schematic we’ve set up to animate the damage dealer hit.
- Schematic Asset
Select DamageDealerHit.
Battle AI #
Next, we’ll set up 3 battle AIs, one for doing nothing (should always be used as a fallback), one for getting a target based on the move AI’s detection, and one for the chomper’s attack.
Navigate to Battles > Battle AI, we’ll change the Default battle AI and add another battle AI.
Do Nothing #
This battle AI only uses the None action, i.e. the combatant will do nothing.
It’s a fallback in case no other action is used (e.g. no target detected). If the battle AI doesn’t find an action, a combatant will use it’s base attack, which we don’t want.

Battle AI Settings #
- Name
Set to Do Nothing.
None #
Add Node > Action > None
This’ll use the None action.
No further setup needed.
Get Move AI Target #
Add a new battle AI, this’ll get the nearest target detected by the combatant’s move AI.
We’ll only use this battle AI in other battle AIs to not have to set this up again and again.

Battle AI Settings #
- Name
Set to Get Move AI Target.
Check Move AI Target #
Add Node > Move AI > Check Move AI Target
This node uses combatants already detected by the move AI as found targets.
- Found Targets
Select Clear.
This’ll remove previously found targets. - Target
Select Enemy.
Check Move AI Detection #
Add Node > Move AI > Check Move AI Detection
This node will check if combatants could be detected by the move AI and use them as found targets.
This node is connected to the Failed slot of the Check Move AI Target node, i.e. we’ll check if any combatant could be detected but the move AI currently hasn’t detected (e.g. due to timeouts).
- Found Targets
Select Clear. - Target
Select Enemy.
Get Nearest #
Add Node > Position > Get Nearest
This node uses the nearest target as found target. We’ll use it to get the nearest from the previously found targets and not check for additional targets.
The node is connected to the Success slots of the other 2 nodes.
- Found Targets
Select Check. - Target
Select None.
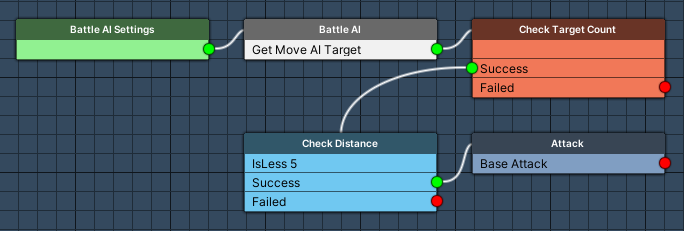
Attack #
Add a new battle AI, we’ll use the combatant’s base attack if a target is found and it’s less than 5 world units away.
Battle AI Settings #
- Name
Set to Attack.
Battle AI #
Add Node > Base > Battle AI
This node uses another battle AI – we’ll use the Get Move AI Target battle AI, selecting a target via the move AI.
- Battle AI
Select Get Move AI Target.
Check Target Count #
Add Node > Target > Check Target Count
Checks if any target is in the found targets list.
- Check Type
Select Is Greater. - Check Value
Select Value > Value.
Set the value to 0.
Check Distance #
Add Node > Position > Check Distance
We’ll now check if any of the found targets is nearer than 5 world units.
This node is connected to the Success slot of the Check Target Count node.
- Found Targets
Select Check. - Target
Select None. - Check Type
Select Is Less. - Check Value
Select Value > Value.
Set the value to 5.
Attack #
Add Node > Action > Attack
Uses the combatant’s base attack.
- Force Found Targets
Enable this setting.
This’ll force to target the found target.
Updating Combatant General Settings #
Next, we’ll set up the Do Nothing battle AI as a default battle AI for all combatants.
Navigate to Combatants > Combatants > General Settings.
Battle Settings > Default Battle AI #
Click on Add Battle AI.
- Battle AI
Select Do Nothing.
Updating the Chomper #
Now, we’ll add the comper’s attack and battle AI.
Navigate to Combatants > Combatants and select the Chomper.
Attacks & Abilities > Override Settings > Base Attack #
- Own Base Attack
Enable this setting.
Click on Add Base Attack.
- Ability
Select Chomper Attack.
Battle Settings > Battle AI #
Click on Add Battle AI.
- Battle AI
Select Attack.
Battle Settings #
Next, we’ll set up a few things for our battle system.
Navigate to Battles > Battle System > General Settings.
Base Settings #
We’ll only use a real time battle system in this game. One is already set up, so let’s select it.
We’ll do the setup for it after the general settings.
- Default Battle System
Select Real Time. - Real Time Area System
Select Real Time.
This should already be set up this way.
Range Settings #
We’ll increase the ranges for various things.
Battle Range #
This defines the range to the player a combatant can have to be part of the battle.
So, anything outside this range doesn’t fight – this can be used to improve performance in scene wide battles like in this project.
- Range
Select Value > Value.
Set the value to 70.
AI Range #
This defines the range to the player a combatant can have to use the battle AI.
We’ll match it to the battle range.
- Range
Select Value > Value.
Set the value to 70.
Move AI Range #
This defines the range to the player a combatant can have to use the move AI. This is only for outside battles – battle systems have their own move AI setup.
We’ll match it to the battle range.
- Range
Select Value > Value.
Set the value to 70.
Real Time Battle System #
Navigate to Battles > Battle System and select the Real Time system.
Base Settings #
Nothing to change here for us, the default setup should be correct.
Make sure the player and camera control isn’t blocked at all.
Control Block Settings #
- Block Player Control
Select None. - Block Camera Control
Select None.
Real Time Settings #
The Real Time Settings are the only settings specific for the real time battle system, the other settings are the same for all battle systems.
There’s only one thing we have to do here – ignoring None actions.
This’ll discard any None action of combatants, i.e. all those enemies using the Do Nothing battle AI if they don’t have an action will not even do nothing.
Unless you’re using the None action to do some animations, it’s best to ignore them in real time battles to improve performance.
Other Options #
- Ignore None Actions
Enable this setting.
Battle System Settings #
We’ll set up a few AI settings here – the AI decision time and the real time battle’s move AI range.
AI Decision Time Settings #
This defines the time it takes an AI controlled combatant to select an action.
We’ll use it with a random time between 2 and 5 seconds to keep enemies from spamming actions.
- Min AI Decision Time
Select Value > Value.
Set the value to 2. - Max AI Decision Time
Select Value > Value.
Set the value to 5.
Move AI Settings #
We need to allow using the move AI in this battle system and set up it’s range.
- Allow Move AI
Enable this setting. - Use Move AI Range
Enable this setting. - Range
Select Value > Value.
Set the value to 70.
Save Changes #
That’s it for the setup in the editor.
Don’t forget to save your changes by clicking on Save Settings at the bottom of the editor.
Update the Prefab #
Open the Chomper Variant prefab for editing – you can find it in Assets/Tutorial Assets/Prefabs/Combatants/.

We’ll add a Damage Zone and a Radius component to the root, and a Damage Dealer component to it’s Attack child object.
Add Damage Zone #
Add a Damage Zone component to the prefab’s root using the component menu.
The default setup is already correct for us.
Add Radius #
Add a Radius component to the prefab’s root using the component menu.
It should automatically set the radius according to the added colliders.
- Radius
Select Value > Value. - Value
Set to 0.6.
Add Damage Dealer #
Add a Damage Dealer component to the Attack child object (the Sphere Collider in front of it’s mouth) using the component menu.
- Start Type
Select Trigger Stay.
Damage zones on game objects within the trigger will cause damage to them.
We’ll use Trigger Stay because the damage dealer might become active while the player is already inside it. - Damage Zone From Children
Enable this setting. - Damage Zone From Parent
Enable this setting. - One Time Damage
Enable this setting.
Activation Settings #
If you remember, we used the activate tag attack in the chomper’s attack ability, so we need to use that here as well.
- Field
Enable this setting. - All Battle Systems
Enable this setting.
Click on Add Activation Tag.
- Activation Tag
Set to attack.
And that’s it for the prefab – save the changes.
Close the prefab editing.
Testing #
Alright – everything’s set up.
Hit play, let’s hunt some chompers!
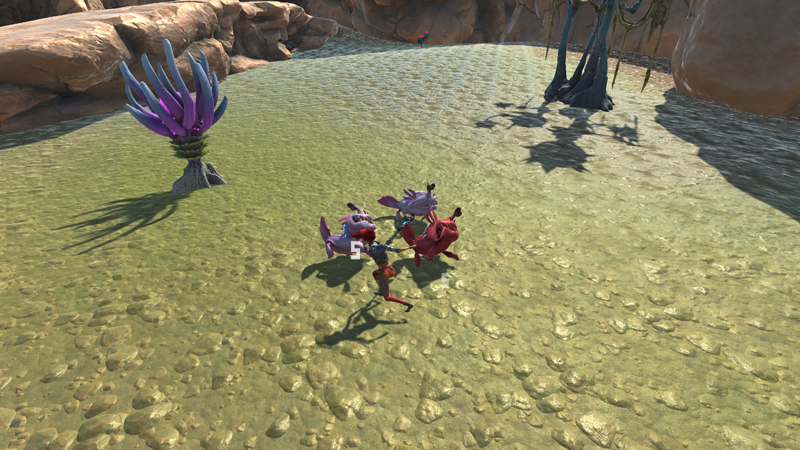
Great – they hunt us, they bite us, but we can hit back!
However, they just disappear when they die … and hits need a bit more pop.
Next, we’ll set up hit effects and the enemy’s death.


