
Create a simple schematic that can be used as a battle’s start schematic.
In this tutorial we’ll create two very simple battle start schematics. One for starting a battle in the same scene, one for loading a battle scene where the battle takes place.
Both will do the following:
- remember the current music and play the battle music
- fade out the screen
- spawn and place combatants
- fade in the screen again
The teleport battle start schematic will additionally store the current scene and player position and load the battle scene.
Battle Start Schematic #
A battle start schematic is used at the start of a battle to e.g. animate the battle introduction, spawn and place combatants at their battle spots.
You can download the finished schematic here:
Please note that you’ll have to update the used music in the Change Music node of the schematic.
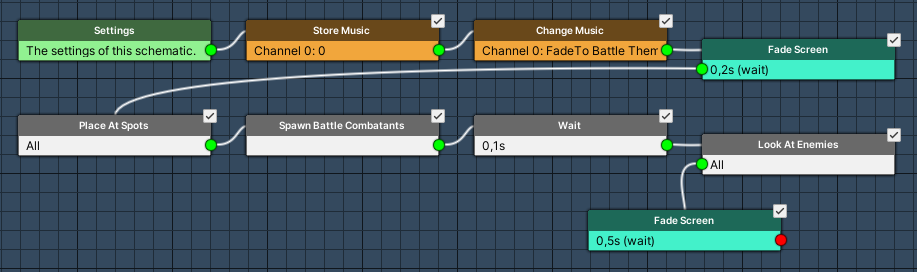
Settings #
We want the player and camera controls to be blocked during this schematic.
- Block Player Control
Enable this setting. - Block Camera Control
Enable this setting.
Store Music #
Add Node > Audio > Music > Store Music
We store the currently playing music to be able to resume playing it after the battle (i.e. in a battle end schematic).
The default setup of the node should usually already be what you need. Please note that this depends on which music channel your music is playing.
- Music Channel
Set to 0. - Store ID
Set to 0.
Change Music #
Add Node > Audio > Music > Change Music
Now we change the music to our battle music.
This requires you to already have a music clip set up in Game > Music.
- Music Channel
Set to 0. - Play Type
Select Fade To. - Music Clip
Select your battle music. - Fade Time
Set to 1. - Interpolation
Select Linear.
Fade Screen #
Add Node > Animation > Fade > Fade Screen
We’ll fade out the screen to hide our combatant spawning and placement.
- Wait
Enable this setting. - Time
Set to 0.2. - Interpolation
Select Linear. - Fade Alpha/Red/Green/Blue
Enable all. - Start Color
Set to a white color with no alpha (fully transparent).
E.g. R=255, G=255, B=255, A=0. - End Color
Set to a white color with full alpha (not transparent).
E.g. R=255, G=255, B=255, A=255.
Place At Spots #
Add Node > Battle > Spawn > Place At Spots
This’ll place the already spawned combatants (e.g. the player) at their battle spots.
- Place All
Enable this setting.
Spawn Battle Combatants #
Add Node > Battle > Spawn > Spawn Battle Combatants
This’ll spawn all combatants participating in battle.
- Spawn All
Enable this setting.
Wait #
Add Node > Base > Wait
Add a short wait time to make sure Unity spawned the combatants (usually happens at the end of the current frame).
- Time
Select Value > Value.
Set the value to 0.1.
Look At Enemies #
Add Node > Battle > Combatant > Look At Enemies
Our combatant’s are spawned, but they’ll probably not look where we want them to. This node will make each faction look at the center of their enemies, i.e. the player looks at the enemies, the enemies look at the player.
Please note that you shouldn’t use this node in 2D games.
- Use Combatant
Disable this setting.
When enabled, this’d let us select a combatant/game object to use instead of using all combatants participating in battle.
Fade Screen #
Add Node > Animation > Fade > Fade Screen
We need to fade in the screen again – let’s make this easy and copy the previous Fade Screen node and connect it to the Next slot of the Look At Enemies node.
Change the following settings in the copied node.
- Time
Set to 0.5.
We’ll take a little more time to fade in to not have the fade be too flashy.
Click on the Swap Colors button to change our fade direction.
And that’s it for the schematic. Click on Save Schematic to save it, e.g. as SimpleBattleStart.
Teleport Battle Start Schematic #
Your battle should take place in a different scene? Sure, we just need to do small changes to get this going.
- store the current scene and player position (used in battle end schematics to return to it)
- instead of fading out the screen, load the battle scene and handle the fade out there
You can download the finished schematic here:
Please note that you’ll have to update the used music in the Change Music node of the schematic.

Settings #
We want the player and camera controls to be blocked during this schematic.
- Block Player Control
Enable this setting. - Block Camera Control
Enable this setting.
Store Music #
Add Node > Audio > Music > Store Music
We store the currently playing music to be able to resume playing it after the battle (i.e. in a battle end schematic).
The default setup of the node should usually already be what you need. Please note that this depends on which music channel your music is playing.
- Music Channel
Set to 0. - Store ID
Set to 0.
Change Music #
Add Node > Audio > Music > Change Music
Now we change the music to our battle music.
This requires you to already have a music clip set up in Game > Music.
- Music Channel
Set to 0. - Play Type
Select Fade To. - Music Clip
Select your battle music. - Fade Time
Set to 1. - Interpolation
Select Linear.
Store Scene #
Add Node > Game > Scene > Store Scene
This node stores the current scene and player position, this can be used by Load Scene nodes to return to the stored position.
The default setup should already work – you’ll mainly define how the scene is loaded.
- Load Type
Select Load Level.
You can also load scenes additive or asynchronously.
Load Scene #
Add Node > Game > Scene > Load Scene
Now we’ll load the scene the battle should take place in.
- Spawn Machine Object
Enable this setting.
This will place the machine’s game object instead of the player – in this case, this’ll place the battle game object.
Target Scene 0 #
The Target Scene settings define the scene that will be loaded and where to spawn the machine (e.g. via spawn point).
- Target Scene
Define the name of your scene. - Position Type
Select Spawn ID.
This’ll use a Spawn Point in the loaded scene to place the battle. - Load Type
Select Load Level. - Spawn ID
Select Value > Value.
Set the value to 0 (or whatever spawn ID you want to use).
Screen Fade Settings #
We handle fading out the screen here.
- Own Screen Fade
Enable this setting.
If disabled, the scene change will use the default screen fade setup (defined in Game > Game Settings).
We’ll use the Screen Fade Out settings.
- Fade Out
Enable this setting. - Time
Set to 0.2. - Interpolation
Select Linear. - Fade Alpha/Red/Green/Blue
Enable all. - Start Color
Set to a white color with no alpha (fully transparent).
E.g. R=255, G=255, B=255, A=0. - End Color
Set to a white color with full alpha (not transparent).
E.g. R=255, G=255, B=255, A=255.
We don’t use the Screen Fade In settings, we’ll fade in later after handling some other things.
- Fade In
Disable this setting.
Place At Spots #
Add Node > Battle > Spawn > Place At Spots
This’ll place the already spawned combatants (e.g. the player) at their battle spots.
This is probably not needed in a teleport battle start since no spawned combatants should be there – but it doesn’t hurt to have it.
- Place All
Enable this setting.
Spawn Battle Combatants #
Add Node > Battle > Spawn > Spawn Battle Combatants
This’ll spawn all combatants participating in battle.
- Spawn All
Enable this setting.
Wait #
Add Node > Base > Wait
Add a short wait time to make sure Unity spawned the combatants (usually happens at the end of the current frame).
- Time
Select Value > Value.
Set the value to 0.1.
Look At Enemies #
Add Node > Battle > Combatant > Look At Enemies
Our combatant’s are spawned, but they’ll probably not look where we want them to. This node will make each faction look at the center of their enemies, i.e. the player looks at the enemies, the enemies look at the player.
Please note that you shouldn’t use this node in 2D games.
- Use Combatant
Disable this setting.
When enabled, this’d let us select a combatant/game object to use instead of using all combatants participating in battle.
Fade Screen #
Add Node > Animation > Fade > Fade Screen
We need to fade in the screen again – let’s make this easy and copy the previous Fade Screen node and connect it to the Next slot of the Look At Enemies node.
Change the following settings in the copied node.
- Time
Set to 0.5.
We’ll take a little more time to fade in to not have the fade be too flashy.
Click on the Swap Colors button to change our fade direction.
And that’s it for the schematic. Click on Save Schematic to save it, e.g. as SimpleTeleportBattleStart.
Using the Battle Start Schematic #
You can use a battle start schematic in two ways.
Battle System #
Define the battle start schematic as the default start schematic of a battle system. This’ll be used by all battles, unless the Battle component will override it.
Navigate to Battles > Battle System and select the battle system you want to use the start schematic in.
Base Settings > Battle Start/End Schematics #
- Start Schematic
Select the SimpleBattleStart (or whatever schematic you created).
Don’t forget to save your changes via the Save Settings button.
Battle Component #
A Battle component can optionally override the default battle start schematic for a battle. This can e.g. be useful when you want to do a special introduction to a battle, e.g. adding some dialogue or flashy boss animation.
Select the battle’s game object in the scene and change the following settings in the Battle component’s inspector.
Battle Settings > Battle Start/End Schematics #
- Own Start Schematic
Enable this setting. - Start Schematic
Select the SimpleBattleStart (or whatever schematic you created).
Add More #
The battle start schematics we’ve set up here are very basic – you can add more functionality by adding different nodes.
Change Camera Position #
Add Node > Game Object > Camera > Change Camera Position
This node uses camera positions (set up in Game > Camera Positions) to set or fade the camera to a new position.
If your battle blocks camera controls you’ll most likely want to change the camera to look at the battle center. You can add a Battle Arena actor to your schematic’s Settings node to have it available.
Show Dialogue #
Add Node > UI > Diaogue > Show Dialogue
This node can show dialogues, e.g. an Auto Close dialogue to display a battle message (e.g. Fight!!!).
Combatant Animation #
Add Node > Animation > Combatant > Combatant Animation
Use an Animation Type to play a battle intro animation on your combatants.
You can add the different actors to the schematic’s settings node to have different groups available for this. E.g. the Player (Battle) and Enemies (Battle) actor types to have the player and enemy combatants participating in battle as separate actors.


