ORK Framework Logo - RPG Editor for Unity
  • Features
  • Showcase
  • Guide
    • Documentation
    • Tutorials
    • API
  • ORK 2
    • Tutorials
    • Plugins
    • API
  • Support
  • Forum
  • Get ORK

2D RPG Quickstart

  • START 2D RPG Quickstart
  • 01 Initial Setup
  • 02 Player Setup
  • 03 Music & Scenes
  • 04 UI System Setup
  • 05 UI Boxes
  • 06 Flying Texts
  • 07 Status Values
  • 08 Status Effects
  • 09 First Abilities
  • 10 Fighter Setup
  • 11 First Enemies & Battle AI
  • 12 Battle System Setup
  • 13 Animating Battle Start and End
  • 14 Random Battles
  • 15 Animating Actions
  • 16 Player Battle HUD
  • 17 Elemental Attacks
  • 18 Animating More Actions
  • 19 Inventory & Loot
  • 20 Equipment
  • 21 Loot, Start Equipment & Viewers
  • 22 Magic Abilities
  • 23 Caster Setup
  • 24 More Enemies
  • 25 Start Menu & Save Games
  • 26 Menu Screens
  • 27 Interactions
  • 28 Item Collectors
  • END 2D RPG Quickstart

3D RPG Quickstart

  • START 3D RPG Quickstart
  • 01 Initial Setup
  • 02 Player Setup
  • 03 Music & Scenes
  • 04 UI System Setup
  • 05 UI Boxes
  • 06 Flying Texts
  • 07 Status Values
  • 08 Status Effects
  • 09 First Abilities
  • 10 Fighter Setup
  • 11 First Enemies & Battle AI
  • 12 Battle System Setup
  • 13 Animating Battle Start and End
  • 14 Random Battles
  • 15 Animating Actions
  • 16 Player Battle HUD
  • 17 Elemental Attacks
  • 18 Animating More Actions
  • 19 Inventory & Loot
  • 20 Equipment
  • 21 Loot, Start Equipment & Viewers
  • 22 Magic Abilities
  • 23 Caster Setup
  • 24 More Enemies
  • 25 Start Menu & Save Games
  • 26 Menu Screens
  • 27 Interactions
  • 28 Item Collectors
  • END 3D RPG Quickstart

Status System Setup

  • START Status System Setup
  • 01 Status Values
  • 02 Status Development
  • 03 Attack/Defence Modifiers
  • 04 Status Effects
  • 05 Formulas
  • 06 Ability & Item Types
  • 07 Abilities Part 1: Attacks
  • 08 Abilities Part 2: Support & Sabotage
  • 09 Abilities Part 3: Elemental Magic
  • 10 Items
  • 11 Equipment Part 1: Slots & Slot Set Templates
  • 12 Equipment Part 2: Weapons
  • 12.5 (Optional) Equipment Part 2.5: Weapons
  • 13 Equipment Part 3: Shields, Armor & Accessories
  • 13.5 (Optional) Equipment Part 3.5: Shields, Armor & Accessories
  • 14 Equipment Part 4: Available Equipment Templates
  • 15 Loot
  • 16 Battle AIs
  • 17 Combatants Part 1: General Settings
  • 18 Combatants Part 2: Players
  • 19 Combatants Part 3: Enemies
  • 20 Combatant Groups
  • END Status System Setup

3D RPG Playground

  • START 3D RPG Playground
  • 01 Player Setup
  • 02 Start Menu
  • 03 First Interaction
  • 04 Music
  • 05 Areas
  • 06 Collecting Items
  • 07 Displaying Equipment
  • 08 Combatant Prefabs, Icons & Portraits
  • 09 Combatant Animations
  • 10 Camera Positions
  • ANIM 01 Battle Start/End Schematics
  • ANIM 02 Use, Cast & Camera
  • ANIM 03 Abilities & Items
  • ANIM 04 Physical Attacks
  • ANIM 05 Special Actions
  • BATTLE 01 Battle Menu
  • BATTLE 02 Prepare for Battle
  • TURN 01 Turn Based Setup
  • TURN 02 Turn Order HUD
  • ATB 01 Active Time Setup
  • ATB 02 Cast Times
  • ATB 03 Timebar HUD
  • BATTLE 03 The First Battle
  • BATTLE 04 Hunting Move AI
  • BATTLE 05 Spawning Combatants
  • 11 Save Games
  • MENU 01 UI Boxes
  • MENU 02 Template HUDs
  • MENU 03 Overview Menu
  • MENU 04 Menu Screens
  • 12 Shop
  • BATTLE 06 Random Battles
  • DUNGEON 01 Enter the Dungeon
  • DUNGEON 02 The Trapdoor
  • DUNGEON 03 Enemies on Level 1 & 2
  • DUNGEON 04 Traps on Level 3
  • DUNGEON 05 Going Deeper
  • 13 Bestiary (+MENU+ANIM)
  • QUEST 01 Hunting Quests (+MENU)
  • QUEST 02 Guard NPC
  • QUEST 03 Forest Ruin Cheese
  • QUEST 04 Witch NPC with Cheese
  • QUEST 05 Quest Mark HUDs
  • 14 Research Trees (+MENU)
  • CRAFT 01 Crafting Materials
  • CRAFT 02 Crafting Recipes
  • CRAFT 03 Crafting Menu
  • CRAFT 04 Crafting Proficiency & Critical Crafting
  • CRAFT 05 Materials Loot
  • 15 Changing Choice Dialogue
  • 16 Follow Me!
  • BATTLE 07 Sequence Loot Dialogue

3D Action RPG

  • START 3D Action RPG
  • 01 Status System Setup
  • 02 Player Setup
  • 03 Player Weapon
  • 04 Player Attacks
  • 05 Enemy: Chomper
  • 06 Chomper Attack
  • 07 Hit & Death
  • 08 HUDs
  • 09 Rolling on the Floor
  • 10 Enemy: Spitter
  • 11 Spit Attack
  • 12 Potion
  • 13 Grenade
  • 14 Item HUD
  • 15 Enemy: Grenadier
  • 16 Grenadier Melee Attacks
  • 17 Grenadier Flamethrower
  • 18 Item Drops
  • END 3D Action RPG

2D Grid Battle RPG

  • START 2D Grid Battle RPG
  • 01 Player Setup
  • 02 Prefab & Music Setup
  • 03 Randomizing Combatants
  • 04 UI Setup
  • 05 Battle Start, End & Phase Schematics
  • 06 Battle System Setup
  • 07 Battle Grid Setup
  • 08 Grid Move
  • 09 Forest Battle Grid
  • 10 Battle AI
  • 11 Ability Ranges
  • 12 Death & Use Schematics
  • 13 Attack Schematic
  • 14 Shoot Schematics
  • 15 Battle Selection Interaction
  • END 2D Grid Battle RPG

Schematics

  • Simple Start Schematic
  • Battle Start Schematic
  • Battle End Schematic
  • Moving to Target and Back
  • Animating a Base Attack
  • Animating a Magic Ability
  • Grid Movement
  • Open and Close UI Animations
  • Flying Text Mover

UI Setups

  • Unity UI: Initial Setup
  • Unity UI: TextMesh Pro Setup
  • Unity UI: UI Box
  • Unity UI: Flying Text
  • Unity UI: Dragging Notification
  • Unity UI: Canvas with Screen Space Camera
  • Unity UI: Interaction HUD
  • Unity UI: Simple Player HUD
  • Unity UI: Quest HUD
  • Unity UI: Shortcuts HUD
  • Unity UI: Currency HUD
  • Unity UI: Tooltip HUD
  • Unity UI: Control HUD
  • Unity UI: Attack Modifiers
  • Unity UI: Defence Modifiers

Gameplay Bits

  • Combining Input Origins
  • Combining Status Value Flying Texts
  • Fun With Flying Text
  • HUD Effects With Conditional Schematics
  • Inventory Containers
  • Multi Interaction Controllers
  • World Space HUD
  • World Space Dialogue
  • Home
  • Guide
  • Tutorials
  • 3D Action RPG
  • 18 Item Drops

18 Item Drops

Table of Contents
  • Pickup Rotation Schematic
    • Rotate
  • Pickup Prefabs
    • Sphere Collider
    • Tick Machine
      • Start Settings
      • Machine Execution Settings
    • Create Prefab
    • Grenade Variant
      • Sprite Renderer
      • Create Prefab
  • Updating Items
    • 0: Potion
      • Item Settings > Prefab Settings
    • 1: Grenade
      • Item Settings > Prefab Settings
  • Inventory Settings
    • Drop Item Settings
      • Start Settings > Trigger
      • Despawn Settings
    • Item Collection
      • After Collection (Ok)
      • Collection Dialogue
  • Loot
    • Loot Table 0 > Loot Settings
  • Updating Combatants
    • Inventory & Equipment > Default Loot Settings
  • Updating Real Time Battle System
    • Battle System Settings > Battle Gains Collection
  • Save Changes
  • Testing
  • One Last Thing
    • Flying Text Settings

In this tutorial we’ll set up item drops from killed enemies.

We’ve only got a limited supply of potions and grenades, so let’s have our enemies drop them for us.

We’ll let them drop a grenade (10%) or potion (5%) on the spot they died, picking it up by moving over it (i.e. Trigger Enter). The item will be displayed by a rotating sprite.

We’ll set up:

  • schematic to rotate the sprite
  • prefabs for items
  • update the items
  • item drop settings
  • loot
  • update combatants (adding loot)
  • update to the battle system

Let’s get to it!

Pickup Rotation Schematic #

This’ll be very simple – the schematic is executed by a Tick Machine, executing it each frame.

Navigate to Schematics and start working on a new schematic.

Rotate #

Add Node > Movement > Rotation > Rotate

This node is doing a one time rotation change and is meant to be used in tick machines, i.e. regularly updated.

We’ll use it to rotate the game object by 90° per second.

  • Object (Rotating Object)
    Select Machine Object.
  • Rotate Component
    Select Transform.
    You can also leave it on Auto, since there is no other relevant component on the game object we’ll set up.
  • Value (Rotation Change)
    Set to X=0, Y=1, Z=0.
    This’ll let it rotate on the Y-axis.
  • Rotation Speed
    Select Value > Value.
    Set the value to 90.
  • Use Delta Time
    Enable this setting.
    This will let it rotate based on the framerate (delta time), i.e. the 90 rotation speed is per second.

And that’s it for the schematic. Click on Save Schematic to save it, e.g. as PickupRotation.

You can close the editor for now.

Pickup Prefabs #

Next, we’ll set up prefabs for our item pickups – from scratch!

Drag the icons_54 sprite into the scene, you can find it in Assets/Tutorial Assets/Icons/ as a sub-asset of the icons sprite.

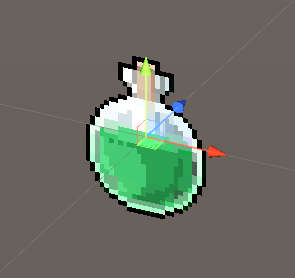
We’ll add a Sphere Collider and a Tick Machine to it.

Sphere Collider #

Add a Sphere Collider component using the component menu.

  • Is Trigger
    Enable this setting.

Tick Machine #

Add a Tick Machine component using the component menu.

Start Settings #

  • Update
    Enable this setting.
    This machine will start each frame.

Machine Execution Settings #

  • Schematic Asset
    Select the PickupRotation schematic.

Create Prefab #

And that’s it – create a prefab out of the game object and e.g. name it PotionPickup.

Grenade Variant #

Now, with the game object (now linked to the prefab) still in the scene, we’ll change the used sprite.

Make sure you have the scene’s game object selected, not the prefab you created.

Sprite Renderer #

  • Sprite
    Select icons_267.

Create Prefab #

And that’s it – create a new prefab variant (or original prefab) out of the game object and e.g. name it GrenadePickup.

You can now remove the game object from the scene.

Updating Items #

Open the editor and navigate to Inventory > Items, we’ll now set up the prefabs we’ve created to be used by the items.

0: Potion #

Item Settings > Prefab Settings #

  • Own Prefab
    Enable this setting.
  • Item Prefab
    Select PotionPickup.
  • Spawn Offset
    Set to X=0, Y=0.5, Z=0.

1: Grenade #

Item Settings > Prefab Settings #

  • Own Prefab
    Enable this setting.
  • Item Prefab
    Select GrenadePickup.
  • Spawn Offset
    Set to X=0, Y=0.5, Z=0.

Inventory Settings #

Next, we’ll set up how items are dropped into the world (e.g. by our enemies) and how they’re collected.

Navigate to Inventory > Inventory Settings.

Drop Item Settings #

These settings handle how items are dropped into the game world (e.g. from enemies dropping items on death).

  • Drop On Ground
    Disable this setting.
    We’ll just spawn them using the position of the combatant without trying to find the ground.
    No need for that in our setup.

We’ll also not use a random offset when spawning, directly spawning at the combatant’s position.

  • Offset X
    Set to X=0, Y=0.
  • Offset Y
    Set to X=0, Y=0.
  • Offset Z
    Set to X=0, Y=0.

Start Settings > Trigger #

We’ll use Trigger Enter to collect the dropped items – i.e. when the player runs into the item.

  • Trigger Enter
    Enable this setting.

Despawn Settings #

We’ll also remove dropped items after 30 seconds of not being collected.

  • Despawn Battle Drops
    Enable this setting.
  • Despawn Time
    Select Value > Value.
    Set the value to 30.

Item Collection #

We’re also going to disable showing a collection dialogue, but enable playing a sound when collecting.

After Collection (Ok) #

  • Play Sound
    Enable this setting.
  • Audio Clip
    Select swoosh03.

Collection Dialogue #

  • Show Dialogue
    Disable this setting.

Loot #

Next, we’ll set up the loot table that’ll handle if and which item is dropped.

Navigate to Combatants > Loot and select the Default loot.

Click on Add Loot Table.

Loot Table 0 > Loot Settings #

  • Get Random
    Enable this setting.
  • Use Chance Selection
    Enable this setting.
    This’ll use the chance settings of each item to select which is dropped.
    E.g. first item has 10% chance, second item 5% chance results in a total 15% chance of an item being dropped.

Click on Add Item.

  • Type
    Select Item.
  • Item
    Select Potion.
  • Quantity
    Select Value > Value.
    Set the value to 1.
  • Chance
    Select Value > Value.
    Set the value to 5.

Copy Item 0.

  • Item
    Select Grenade.
  • Chance
    Select Value > Value.
    Set the value to 10.

Updating Combatants #

We’ll use the loot as the default loot for all combatants, i.e. all will have the same item drops.

Navigate to Combatants > Combatants > General Settings.

Inventory & Equipment > Default Loot Settings #

  • Loot Origin
    Select Loot.

Click on Add Loot.

  • Loot
    Select Default.

Updating Real Time Battle System #

And finally, we need to update how battle gains are collected in our battle system.

Navigate to Battles > Battle System and select the Real Time battle system.

Battle System Settings > Battle Gains Collection #

  • Own Gains Collection
    Enable this setting.
  • Collect Immediately
    Enable this setting.
  • Show Gains
    Disable this setting.
  • Collect Loot
    Enable this setting.
  • Drop Items
    Enable this setting.

Save Changes #

And that’s it!

Don’t forget to save your changes by clicking on Save Settings at the bottom of the editor.

Testing #

Hit play and kill some enemies.

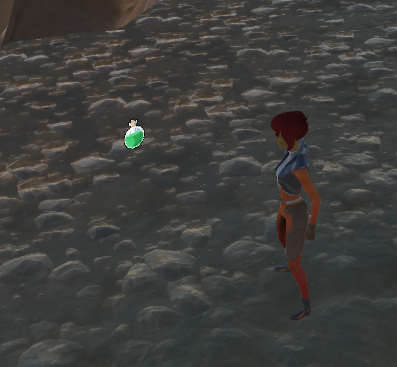
Lucky, we got some loot!

One Last Thing #

With the battle taking place all over the scene, you’ll notice that flying texts for damages far away from the player are popping up. Let’s fix that!

Navigate to UI > UI Settings, we’ll limit the display range for flying texts.

Flying Text Settings #

  • Limit Display Range
    Enable this setting.
  • Range
    Select Value > Value.
    Set the value to 20.

Don’t forget to save your changes by clicking on Save Settings at the bottom of the editor.


That’s it – we’re done with the 3D Action RPG tutorials. Allow me to say some final words in the next and final part of this tutorial series.

Share This Article :
  • Facebook
  • Twitter
  • LinkedIn
  • Pinterest
Updated on January 27, 2022
Table of Contents
  • Pickup Rotation Schematic
    • Rotate
  • Pickup Prefabs
    • Sphere Collider
    • Tick Machine
      • Start Settings
      • Machine Execution Settings
    • Create Prefab
    • Grenade Variant
      • Sprite Renderer
      • Create Prefab
  • Updating Items
    • 0: Potion
      • Item Settings > Prefab Settings
    • 1: Grenade
      • Item Settings > Prefab Settings
  • Inventory Settings
    • Drop Item Settings
      • Start Settings > Trigger
      • Despawn Settings
    • Item Collection
      • After Collection (Ok)
      • Collection Dialogue
  • Loot
    • Loot Table 0 > Loot Settings
  • Updating Combatants
    • Inventory & Equipment > Default Loot Settings
  • Updating Real Time Battle System
    • Battle System Settings > Battle Gains Collection
  • Save Changes
  • Testing
  • One Last Thing
    • Flying Text Settings
Sitemap
  • Features
  • Showcase
  • Guide
    • Documentation
    • Tutorials
    • API
  • ORK 2 Hub
    • Tutorials
    • Plugins
    • API
  • Support
  • Forum
  • Get ORK
  • Contact
  • Blog
  • Makinom
  • gamingislove.com
Categories
  • News (60)
  • ORK 2 (137)
    • Tutorial (137)
      • Game tutorial (50)
      • Gameplay (32)
      • How-to (55)
  • Release (130)
Search

© 2015 Gaming is Love e.U.

Disclosure: This site may contain affiliate links, which means I may receive a commission if you click a link and purchase something that I have recommended. While clicking these links won’t cost you any money, they will help me fund my development projects while recommending great assets!