ORK Framework Logo - RPG Editor for Unity
  • Features
  • Showcase
  • Guide
    • Documentation
    • Tutorials
    • API
  • ORK 2
    • Tutorials
    • Plugins
    • API
  • Support
  • Forum
  • Get ORK

Status System Setup

  • START Status System Setup
  • 01 Status Values
  • 02 Status Development
  • 03 Attack/Defence Modifiers
  • 04 Status Effects
  • 05 Formulas
  • 06 Ability & Item Types
  • 07 Abilities Part 1: Attacks
  • 08 Abilities Part 2: Support & Sabotage
  • 09 Abilities Part 3: Elemental Magic
  • 10 Items
  • 11 Equipment Part 1: Slots & Slot Set Templates
  • 12 Equipment Part 2: Weapons
  • 12.5 (Optional) Equipment Part 2.5: Weapons
  • 13 Equipment Part 3: Shields, Armor & Accessories
  • 13.5 (Optional) Equipment Part 3.5: Shields, Armor & Accessories
  • 14 Equipment Part 4: Available Equipment Templates
  • 15 Loot
  • 16 Battle AIs
  • 17 Combatants Part 1: General Settings
  • 18 Combatants Part 2: Players
  • 19 Combatants Part 3: Enemies
  • 20 Combatant Groups
  • END Status System Setup

3D RPG Playground

  • START 3D RPG Playground
  • 01 Player Setup
  • 02 Start Menu
  • 03 First Interaction
  • 04 Music
  • 05 Areas
  • 06 Collecting Items
  • 07 Displaying Equipment
  • 08 Combatant Prefabs, Icons & Portraits
  • 09 Combatant Animations
  • 10 Camera Positions
  • ANIM 01 Battle Start/End Schematics
  • ANIM 02 Use, Cast & Camera
  • ANIM 03 Abilities & Items
  • ANIM 04 Physical Attacks
  • ANIM 05 Special Actions
  • BATTLE 01 Battle Menu
  • BATTLE 02 Prepare for Battle
  • TURN 01 Turn Based Setup
  • TURN 02 Turn Order HUD
  • ATB 01 Active Time Setup
  • ATB 02 Cast Times
  • ATB 03 Timebar HUD
  • BATTLE 03 The First Battle
  • BATTLE 04 Hunting Move AI
  • BATTLE 05 Spawning Combatants
  • 11 Save Games
  • MENU 01 UI Boxes
  • MENU 02 Template HUDs
  • MENU 03 Overview Menu
  • MENU 04 Menu Screens
  • 12 Shop
  • BATTLE 06 Random Battles
  • DUNGEON 01 Enter the Dungeon
  • DUNGEON 02 The Trapdoor
  • DUNGEON 03 Enemies on Level 1 & 2
  • DUNGEON 04 Traps on Level 3
  • DUNGEON 05 Going Deeper
  • 13 Bestiary (+MENU+ANIM)
  • QUEST 01 Hunting Quests (+MENU)
  • QUEST 02 Guard NPC
  • QUEST 03 Forest Ruin Cheese
  • QUEST 04 Witch NPC with Cheese
  • QUEST 05 Quest Mark HUDs
  • 14 Research Trees (+MENU)
  • CRAFT 01 Crafting Materials
  • CRAFT 02 Crafting Recipes
  • CRAFT 03 Crafting Menu
  • CRAFT 04 Crafting Proficiency & Critical Crafting
  • CRAFT 05 Materials Loot
  • 15 Changing Choice Dialogue
  • 16 Follow Me!
  • BATTLE 07 Sequence Loot Dialogue

3D Action RPG

  • START 3D Action RPG
  • 01 Status System Setup
  • 02 Player Setup
  • 03 Player Weapon
  • 04 Player Attacks
  • 05 Enemy: Chomper
  • 06 Chomper Attack
  • 07 Hit & Death
  • 08 HUDs
  • 09 Rolling on the Floor
  • 10 Enemy: Spitter
  • 11 Spit Attack
  • 12 Potion
  • 13 Grenade
  • 14 Item HUD
  • 15 Enemy: Grenadier
  • 16 Grenadier Melee Attacks
  • 17 Grenadier Flamethrower
  • 18 Item Drops
  • END 3D Action RPG

2D Grid Battle RPG

  • START 2D Grid Battle RPG
  • 01 Player Setup
  • 02 Prefab & Music Setup
  • 03 Randomizing Combatants
  • 04 UI Setup
  • 05 Battle Start, End & Phase Schematics
  • 06 Battle System Setup
  • 07 Battle Grid Setup
  • 08 Grid Move
  • 09 Forest Battle Grid
  • 10 Battle AI
  • 11 Ability Ranges
  • 12 Death & Use Schematics
  • 13 Attack Schematic
  • 14 Shoot Schematics
  • 15 Battle Selection Interaction
  • END 2D Grid Battle RPG

Schematics

  • Simple Start Schematic
  • Battle Start Schematic
  • Battle End Schematic
  • Moving to Target and Back
  • Animating a Base Attack
  • Animating a Magic Ability
  • Grid Movement
  • Open and Close UI Animations
  • Flying Text Mover

UI Setups

  • Unity UI: Initial Setup
  • Unity UI: TextMesh Pro Setup
  • Unity UI: UI Box
  • Unity UI: Flying Text
  • Unity UI: Dragging Notification
  • Unity UI: Interaction HUD
  • Unity UI: Simple Player HUD
  • Unity UI: Quest HUD
  • Unity UI: Shortcuts HUD
  • Unity UI: Currency HUD
  • Unity UI: Tooltip HUD
  • Unity UI: Control HUD
  • Unity UI: Attack Modifiers
  • Unity UI: Defence Modifiers

Gameplay Bits

  • Combining Input Origins
  • Combining Status Value Flying Texts
  • Fun With Flying Text
  • HUD Effects With Conditional Schematics
  • Inventory Containers
  • Multi Interaction Controllers
  • World Space HUD
  • World Space Dialogue
  • Home
  • Guide
  • Tutorials
  • 2D Grid Battle RPG
  • 10 Battle AI

10 Battle AI

Table of Contents
  • Updating Provoked Battle AI
    • Check Grid Distance
    • Grid Move
      • Target Cell Settings
    • Check Status
    • Get Nearest
  • Provoked Ranged Battle AI
    • Battle AI Settings
    • Grid Move
      • Target Cell Settings
  • Updating Heal <50% HP Battle AI
    • Grid Move
      • Target Cell Settings
  • Updating Combatants
    • 2: Ranger
      • Battle Settings > Battle AI
    • 3: Wizard
      • Battle Settings > Battle AI
    • 4: Cleric
      • Battle Settings > Battle AI
  • Save Changes
  • Testing

In this tutorial we’ll set up grid movement in the battle AI.

The status system setup tutorials already set up most of the battle AI, we’ll extend it by adding grid movement.

Well set up:

  • update the Provoked battle AI
  • make a new variant of the Provoked battle AI for ranged combatants
  • update the Heal <50% HP battle AI
  • update the combatant’s battle AI setup

Let’s get to it.

Updating Provoked Battle AI #

We’ll start with updating the Provoked battle AI. If you remember from the status system setup tutorials, this battle AI will check if the player (i.e. the enemy of the user) has the Provoke status effect added, making it a primary target.

We’ll extend on that and also move to the target using a Grid Move action – and if no provoking enemy was found, we’ll move to the nearest enemy.

Navigate to Battles > Battle AI and selected Provoked.
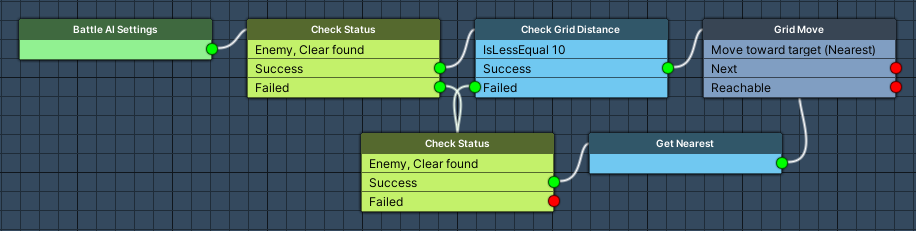
Check Grid Distance #

Add Node > Position > Check Grid Distance

We’ll limit being provoked to a certain distance on the grid, i.e. we’ll check the grid distance to the found target (i.e. the combatant with Provoke status effect).

This node is connected to the Success slot of the Check Status node.

  • Found Targets
    Select Check.
    We check the already found targets.
  • Target
    Select None.
    We don’t check additional targets.
  • Check Type
    Select Is Less Equal.
  • Check Value
    Select Value > Value.
    Set the value to 10.

Grid Move #

Add Node > Action > Grid Move

This node selects a path to a target (cell) and uses the grid move action. We’ll move to the found target.

This node is connected to the Success slot of the Check Grid Distance node.

  • Move Type
    Select Move Toward Target.
  • Target Cell
    Select Nearest.

Target Cell Settings #

These settings define which cells around the target are valid to move to – we’ll use a battle range template for this.

  • Range Type
    Select Battle Range Template.
  • Battle Range Template
    Select Range 1.

Check Status #

Add Node > Combatant > Check Status

In case we don’t have a provoking enemy (or not in range), we’ll find an alive enemy before selecting the nearest of them.

This node is connected to the Failed slots of the first Check Status node and the Check Grid Distance node.

  • Found Targets
    Select Clear.
  • Target
    Select Enemy.

Click on Add Status Condition.

  • Condition Type
    Select Status.
  • Status Needed
    Select Death.
  • Is Dead
    Disable this setting.

Get Nearest #

Add Node > Position > Get Nearest

We’ll now selected the nearest found target (i.e. the nearest alive enemy).

This node is connected to the Success slot of the previous Check Status node and it’s Next slot connects to the Grid Move node.

  • Found Targets
    Select Check.
  • Target
    Select None.
  • Use Grid Distance
    Enable this setting.

Provoked Ranged Battle AI #

Copy the Provoked battle AI, we’ll change it a bit for ranged combatants (e.g. the ranger, wizard and cleric) to not move directly to the target and stay a bit away from it.

Battle AI Settings #

  • Name
    Set to Provoked Ranged.

Grid Move #

We’ll use a different battle range tempalte and also prevent using cells directly neighboring the target.

Target Cell Settings #

  • Battle Range Template
    Select Range 5.
  • Use Enemy Distance
    Enable this setting.
  • Minimum Distance
    Set to 2.

Updating Heal <50% HP Battle AI #

Select the Heal <50% HP battle AI, we’ll move toward the found ally to get in range to help them.

Grid Move #

Add Node > Action > Grid Move

This node is connected to the Success slot of the Check Status node and it’s Success slot connects to the Ability node (i.e. add the node between Check Status and Ability nodes).

  • Move Type
    Select Move Toward Target.
  • Target Cell
    Select Nearest.

Target Cell Settings #

The healing ability will have a use range of 5 (we’ll set that up in the next tutorial), so we need to move within the same range to the target (ally).

  • Range Type
    Select Battle Range Template.
  • Battle Range Template
    Select Range 5.

Updating Combatants #

With our battle AI ready, we can now update our combatants. The default battle AI is already set up and used by all of them (using Provoked, etc.) – we only need to update the ranged combatants, i.e. the Ranger, Wizard and Cleric. The cleric also uses the updated heal battle AI.

Navigate to Combatants > Combatants and select the Ranger.

2: Ranger #

The ranger pretty much uses the default battle AI setup, but replaces provoked with the ranged variant.

Battle Settings > Battle AI #

  • Replace Default
    Enable this setting.

Click on Add Battle AI.

  • Battle AI
    Select Provoked Ranged.

Click on Add Battle AI.

  • Battle AI
    Select Random Ability 25%.

Click on Add Battle AI.

  • Battle AI
    Select Base Attack.

Click on Add Battle AI.

  • Battle AI
    Select Do Nothing.

3: Wizard #

The wizard will use an ability 50% of the time, anything more would probably obliterate the player.

Battle Settings > Battle AI #

  • Replace Default
    Enable this setting.

Click on Add Battle AI.

  • Battle AI
    Select Provoked Ranged.

Click on Add Battle AI.

  • Battle AI
    Select Random Ability 50%.

Click on Add Battle AI.

  • Battle AI
    Select Base Attack.

Click on Add Battle AI.

  • Battle AI
    Select Do Nothing.

4: Cleric #

The cleric will prioritize healing allies before getting provoked and attacking.

Battle Settings > Battle AI #

  • Replace Default
    Enable this setting.

Click on Add Battle AI.

  • Battle AI
    Select Heal <50% HP.

Click on Add Battle AI.

  • Battle AI
    Select Provoked Ranged.

Click on Add Battle AI.

  • Battle AI
    Select Random Ability 50%.

Click on Add Battle AI.

  • Battle AI
    Select Base Attack.

Click on Add Battle AI.

  • Battle AI
    Select Do Nothing.

Save Changes #

And that’s it for the battle AI setup.

Don’t forget to save your changes by clicking on Save Settings at the bottom of the editor.

Testing #

Hit play in the Forest Battle 1 scene – move a bit and end your phase.

The enemy will now also move on the grid.


Next, we’ll update the abilities to use use ranges and affect ranges.

Share This Article :
  • Facebook
  • Twitter
  • LinkedIn
  • Pinterest
Updated on February 9, 2022
Table of Contents
  • Updating Provoked Battle AI
    • Check Grid Distance
    • Grid Move
      • Target Cell Settings
    • Check Status
    • Get Nearest
  • Provoked Ranged Battle AI
    • Battle AI Settings
    • Grid Move
      • Target Cell Settings
  • Updating Heal <50% HP Battle AI
    • Grid Move
      • Target Cell Settings
  • Updating Combatants
    • 2: Ranger
      • Battle Settings > Battle AI
    • 3: Wizard
      • Battle Settings > Battle AI
    • 4: Cleric
      • Battle Settings > Battle AI
  • Save Changes
  • Testing
Sitemap
  • Features
  • Showcase
  • Guide
    • Documentation
    • Tutorials
    • API
  • ORK 2 Hub
    • Tutorials
    • Plugins
    • API
  • Support
  • Forum
  • Get ORK
  • Contact
  • Blog
  • Makinom
  • gamingislove.com
Categories
  • News (59)
  • ORK 2 (137)
    • Tutorial (137)
      • Game tutorial (50)
      • Gameplay (32)
      • How-to (55)
  • Release (129)
Search

© 2015 Gaming is Love e.U.

Disclosure: This site may contain affiliate links, which means I may receive a commission if you click a link and purchase something that I have recommended. While clicking these links won’t cost you any money, they will help me fund my development projects while recommending great assets!