
In this tutorial we’ll set up schematics to animate the start and end of our battles.
This tutorial is the start of the sub-series for animating battles.
We’ll set up 4 schematics, one for the battle start (spawning/placing the combatants) and 3 for the different possible battle outcomes – victory, escape and defeat.
Battle Message UI Box #
First, we’ll set up a new UI box to display battle start/end messages. We’ll also add a new UI layer above the screen fader, to have it displayed while fading the screen.
UI Box Prefab #
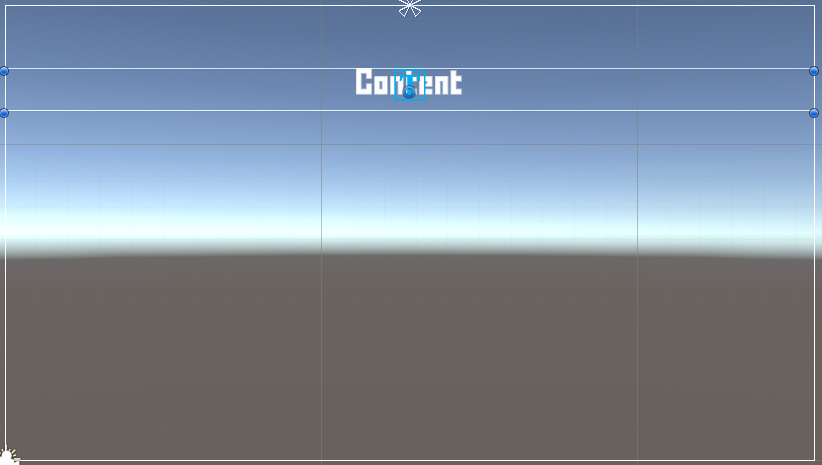
We’ll create a new prefab from scratch, no scrolling. This time, the box should only display a centered text, no box image, etc.
Use the scene hierarchy context menu to create a basic setup: Makinom > UI Box > UI Box (no title this time)
Rect Transform #
I’m anchoring the box to the top center and have it go accross the whole width of the screen at a height of 100.
Image #
Remove the Image component from the UI Box game object, as we don’t want a background image in the box.
TextMeshPro – Text (UI) #
The text component is located on the UI Box > Text child object.
Increase the Font Size (e.g. I’m using 50) and use the Center alignment.
The finished result should look something like this:
Create a prefab out of the UI Box game object, e.g. name it UI Box Battle Message.
Don’t forget to remove the Canvas in case you created the UI box in one of your game scenes.
New UI Layer #
Open the Makinom editor and navigate to UI > UI Layers, we’ll create a new UI layer.
- Name
Set to Above Screen Fader.
The layer is added at the end of the list, i.e. it’ll be placed above all others, including the Screen Fader layer which has the Screen Fader setting enabled.
UI Box Setup #
Navigate to UI > UI Boxes, we’ll add a new UI box for our battle message.
Base Settings #
- Name
Set to Battle Message. - UI Layer
Select Above Screen Fader.
Unity UI #
- UI Box Prefab
Select UI Box Battle Message.
Override Default Settings > Schematics #
I’m also using the move from left and move to right schematics from the UI animations schematics to animate this UI box.
- Own Schematics
Enable this setting. - Before Open Schematic
Select the UIMoveFromLeftFadeIn schematic. - Wait
Enable this setting. - Before Close Schematic
Select the UIMoveToRightFadeOut schematic. - Wait
Enable this setting.
Game State #
We’ll also set up a new game state that we’ll use to have control over when to show the battle HUDs.
Navigate to Game > Game States and add a new game state.
- Name
Set to Show Battle HUD. - Initial State
Disable this setting.
That’s it for the UI setup – don’t forget to save your changes by clicking on Save Settings at the bottom of the editor.
Battle Start Schematic #
Now, we’ll set up the schematic animating our battle start. We’ll use the Battle Intro Zoom camera position to create a zoom-in effect, display a Fight! message and fade the screen. While the screen is faded out, we’ll spawn and place our combatants.
Navigate to Schematics.
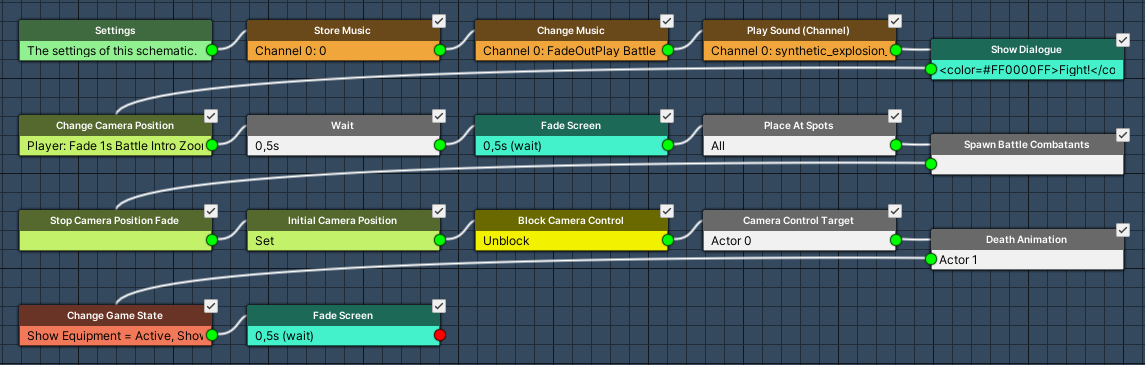
Settings #
- Block Player Control
Enable this setting - Block Camera Control
Enable this setting. - Store Initial Position (Camera Settings)
Enable this setting.
We’ll use it to reset the camera after the zoom in, mainly for resetting the field of view.
Actors #
We’ll add 2 actors, one for the battle arena (to use it as camera target) and one to have all combatants that are in battle available (for having dead combatants play their Death animation).
Click on Add Actor
- Actor Type
Select Battle Arena.
Click on Add Actor
- Actor Type
Select Combatants. - Add Player Group
Enable this setting. - In Battle
Select Yes.
Store Music #
Add Node > Audio > Music > Store Music
We store the currently playing music to be able to resume playing it after the battle (i.e. in a battle end schematic).
The default setup of the node should usually already be what you need. Please note that this depends on which music channel your music is playing.
- Music Channel
Set to 0. - Store ID
Set to 0.
Change Music #
Add Node > Audio > Music > Change Music
Now we change the music to our battle music.
- Music Channel
Set to 0. - Play Type
Select Fade Out Play. - Music Clip
Select Battle Theme. - Fade Time
Set to 1. - Interpolation
Select Linear.
Play Sound (Channel) #
Add Node > Audio > Audio > Play Sound (Channel)
This node plays a sound on a sound channel instead of a game object in the scene.
- Audio Clip
Select Select Audio Clip.
This’ll let us directly define an audio clip in the node instead of setting one up in the Settings node. - Audio Clip Asset
Select synthetic_explosion_1. - Sound Channel
Set to 0. - Wait
Disable this setting. - Play One Shot
Enable this setting.
Show Dialogue #
Add Node > UI > Dialogue > Show Dialogue
We’ll display the battle message as an Auto Close dialogue.
- Dialogue Type
Select Auto Close. - UI Box
Select Battle Message. - Block Accept Button
Enable this setting. - Close After
Set to 2. - Wait
Disable this setting. - Text (Message Content)
Set to: <color=#FF0000FF>Fight!</color>
Change Camera Position #
Add Node > Game Object > Camera > Change Camera Position
Now we’ll zoom in.
- Camera Position
Select Battle Intro Zoom. - Object (Target Object)
Select Player. - Fade Position
Enable this setting. - Time
Select Value > Value.
Set the value to 1. - Wait
Disable this setting. - Interpolation
Select Quadratic > Quadratic In.
Wait #
Add Node > Base > Wait
We’ll wait for a part of the zoom in before fading the screen.
- Time
Select Value > Value.
Set the value to 0.5.
Fade Screen #
Add Node > Animation > Fade > Fade Screen
We’ll fade out the screen to hide our combatant spawning and placement.
- Wait
Enable this setting. - Time
Set to 0.5. - Interpolation
Select Linear. - Fade Alpha/Red/Green/Blue
Enable these settings. - Start Color
Set to a white color with no alpha (fully transparen, A=0). - End Color
Set to a white color with full alpha (not transparent, A=1 or 255, based on your color picker).
Place At Spots #
Add Node > Battle > Spawn > Place At Spots
This’ll place the already spawned combatants (e.g. the player) at their battle spots.
- Place All
Enable this setting.
Spawn Battle Combatants #
Add Node > Battle > Spawn > Spawn Battle Combatants
This’ll spawn all combatants participating in battle at their battle spots.
- Spawn All
Enable this setting.
Stop Camera Position Fade #
Add Node > Game Object > Camera > Stop Camera Position Fade
Stop the camera fading in case it’s still ongoing.
No further settings.
Initial Camera Position #
Add Node > Game Object > Camera > Initial Camera Position
Reset the camera to the initial position (mainly for the field of view).
- Fade Position
Disable this setting.
Block Camera Control #
Add Node > Input > Block Camera Control
We’ll unblock the camera control to be able to set the battle arena as the target of the camera.
- Block/Unblock
Disable this setting.
Camera Control Target #
Add Node > Game Object > Camera > Camera Control Target
This’ll change the target for the camera control – this is only available for the built-in camera controls or custom controls extending from the BaseCameraControl class.
- Target Type
Select Game Object. - Object (Target Object)
Select Actor 0: Battle Arena.
Death Animation #
Add Node > Animation > Combatant > Death Animation
This node plays the animation type set up for death animations (in Base/Control > Animation Types > General Settings) on all dead combatants.
This is used to e.g. have a dead player member show as dead (animated).
- Object (Combatant Object)
Select Actor 1: Combatants.
Change Game State #
Add Node > Game > Game > Change Game State
We’ll activate our game states to show the equipment and battle HUDs (which we’ll set up later).
Click on Add Game State.
- Game State
Select Show Equipment. - Set State
Select Active.
Copy the Game State Change 0.
- Game State
Select Show Battle HUD.
Fade Screen #
Add Node > Animation > Fade > Fade Screen
Copy the previous Fade Screen node, time to fade in the screen again.
Click on the Swap Colors button to exchange the start and end color.
And that’s it for the schematic. Click on Save Schematic to save it, e.g. as BattleStart.
Victory Schematic #
This battle end schematic is used when the player won the battle. We’ll play the victory music, collect our loot and continue on.
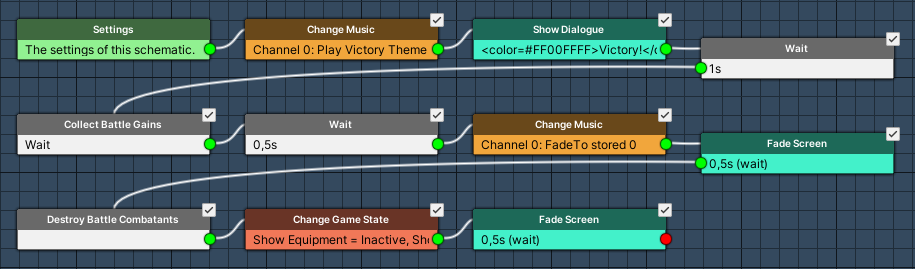
Settings #
- Block Player Control
Enable this setting - Block Camera Control
Enable this setting.
Change Music #
Add Node > Audio > Music > Change Music
Play the victory music.
- Play Type
Select Play. - Music Clip
Select Victory Theme.
Show Dialogue #
Add Node > UI > Dialogue > Show Dialogue
Show the victory message.
- Dialogue Type
Select Auto Close. - UI Box
Select Battle Message. - Block Accept Button
Enable this setting. - Close After
Set to 5. - Wait
Disable this setting. - Text (Message Content)
Set to: <color=#FF00FFFF>Victory!</color>
Wait #
Add Node > Base > Wait
Wait a second.
- Time
Select Value > Value.
Set the value to 1.
Collect Battle Gains #
Add Node > Battle > Gains > Collect Battle Gains
This node is used to collect experience and loot from a battle – we’ll also display the loot dialogue.
- Show Gains
Enable this setting. - Collect Loot
Enable this setting. - Collect Experience
Enable this setting. - Wait
Enable this setting.
Wait #
Add Node > Base > Wait
Wait a short time before fading out the screen.
- Time
Select Value > Value.
Set the value to 0.5.
Change Music #
Add Node > Audio > Music > Change Music
Now we’ll fade back to the stored music (we stored it in the battle start schematic).
- Play Type
Select Fade To. - Play Stored Music
Enable this setting. - Fade Time
Set to 1. - Interpolation
Select Linear.
Fade Screen #
Add Node > Animation > Fade > Fade Screen
We’ll fade out the screen to hide removing all combatants except the player, also switching off the game states to hide equipment and HUDs.
- Wait
Enable this setting. - Time
Set to 0.5. - Interpolation
Select Linear. - Fade Alpha/Red/Green/Blue
Enable these settings. - Start Color
Set to a black color with no alpha (fully transparen, A=0). - End Color
Set to a black color with full alpha (not transparent, A=1 or 255, based on your color picker).
Destroy Battle Combatants #
Add Node > Battle > Spawn > Destroy Battle Combatants
This node is used to destroy combatants participating in battle.
We’ll use it to remove all combatants except for the player.
- Destroy Player
Disable this setting. - Destroy All
Enable this setting.
Change Game State #
Add Node > Game > Game > Change Game State
We’ll inactivate our game states to hide the equipment and battle HUDs (which we’ll set up later).
Click on Add Game State.
- Game State
Select Show Equipment. - Set State
Select Inactive.
Copy the Game State Change 0.
- Game State
Select Show Battle HUD.
Fade Screen #
Add Node > Animation > Fade > Fade Screen
Copy the previous Fade Screen node, time to fade in the screen again.
Click on the Swap Colors button to exchange the start and end color.
And that’s it for the schematic. Click on Save Schematic to save it, e.g. as BattleEndVictory.
Escape Schematic #
This battle end schematic is used when the player escaped the battle. We’ll not collect the loot and continue on.
Since this schematic is very similar to the victory one, we’ll just adjust some things and use Save Schematic As to save it as a new schematic.
Change Music (1st) #
Remove the 1st Change Music node (playing the Victory Theme).
Show Dialogue #
Adjust the time and text.
- Close After
Set to 2. - Text (Message Content)
Set to: <color=#FFFF00FF>You Escaped!</color>
Collect Battle Gains #
Remove this node.
Wait (2nd) #
Remove the 2nd Wait node (waiting 0.5 seconds).
Clear Battle Gains #
Add Node > Battle > Gains > Clear Battle Gains
This node is used to remove battle gains without collecting them.
Add it after the 1st Wait node (i.e. instead of the Collect Battle Gains node).
The default setup is enough, i.e. clearing loot, experience and normal SV.
The rest of the setup can remain the same, i.e. changing music to stored, fading out the screen, etc.
And that’s it for the schematic. Click on Save Schematic As … to save it, e.g. as BattleEndEscape.
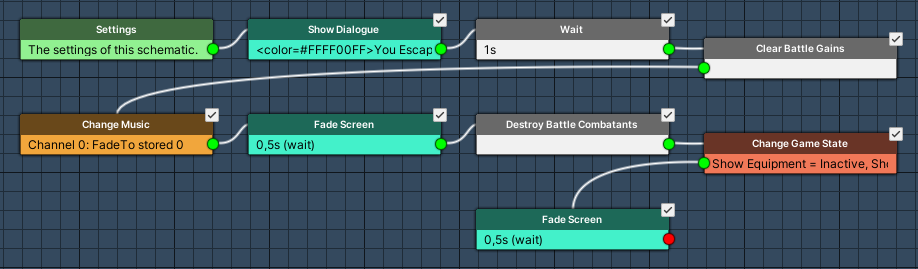
Defeat Schematic #
This battle end schematic is used when the player was defeated in battle. We’ll call game over.
We’ll once again adjust the current schematic (escape) and use Save Schematic As to save it as a new schematic.

Show Dialogue #
Adjust the time and text.
- Close After
Set to 3. - Text (Message Content)
Set to: <color=#FF0000FF>You Lost!</color>
Wait #
We’ll wait a bit longer.
- Time
Select Value > Value.
Set the value to 2.
Change Music #
- Play Type
Select Fade Out.
Remove all nodes after the Change Music node – you can quickly remove a node and all it’s following nodes using the context menu: Remove Node Chain
Game Over #
Add Node > Game > Game > Game Over
This node will call game over according to the Game Over Settings (see below).
No further settings.
And that’s it for the schematic. Click on Save Schematic As … to save it, e.g. as BattleEndDefeat.
Game Over Settings #
Navigate to Game > Game Settings, we’ll take a look at the Game Over Settings.
You can learn more about game over in this documentation.
ORK Game Settings > Game Over Settings #
- Load Scene
Leave this empty.
If you define the name of a scene, it’ll be loaded on game over as the game over scene.
Leaving it empty will load the start menu scene. - Auto Game Over
Enable this setting.
This’ll automatically call game over when the player/group is dead out of battle or in real time area battles. - Wait Time
Set to 1.
This is the time before game over is executed.
Save Changes #
And that’s it for the battle start/end schematics!
Don’t forget to save your changes by clicking on Save Settings at the bottom of the editor.
Next, we’ll set up schematics for animating camera changes and the use of abilities and items.


