
In this tutorial we’ll set up schematics to animate the start and end of our battles.
Our battles take place in a separate battle scene – i.e. we need to remember the scene and position the player was before loading into the battle scene, or we can’t return there after the battle.
Additionally, which battle scene is used depends on the scene the player is in, so we’ll use a string variable that’ll contain the battle scene (we’ll set the variable later in our scenes, not in the schematics here).
We’ll set up:
- game state
- battle start schematic
- battle end schematic for victory (collecting loot)
- battle end schematic for lost (game over)
Since we don’t use escaping in this game, we don’t need to set up a separate battle end schematic for this battle outcome. Let’s get to it!
Game State #
We’ll begin with setting up a game state – we’ll use this later as a condition for displaying the player’s battle HUD. Our battle start/end schematics will change that game state, giving us exact control over when the HUD should be visible.
Game states are simple states that are either active or inactive. They can be used as conditions for other things and also be changed automatically. A new project already comes with some game states set up, e.g. to check if player controls are blocked. Learn more about game states in this Makinom documentation.
Open the Makinom editor, navigate to Game > Game States and add a new game state.
- Name
Set to: Show Battle HUD - Initial State
Disable this setting.
Save Changes #
That’s it for now in the regular editor – before changing to Schematics we need to save our changes.
Save the changes using the Save Settings button at the bottom of the editor.
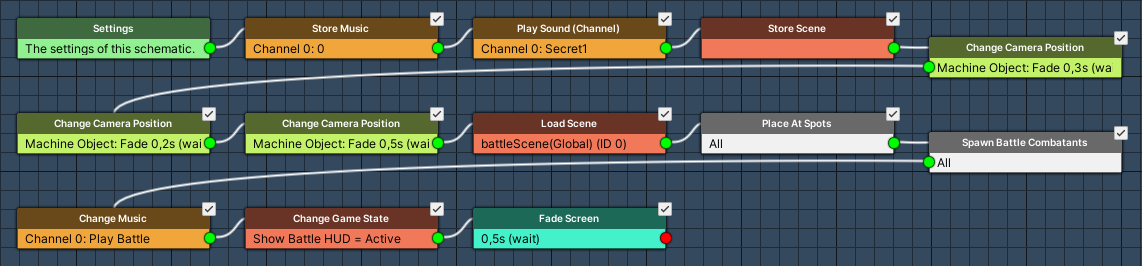
Battle Start Schematic #
Now, we’ll set up the schematic animating our battle start.
We’ll remember the currently playing music (including it’s track position), the scene and position of the player and do a little zooming animation (camera) before loading into the battle scene.
Navigate to Schematics.
Settings #
We’ll block player/camera controls during the start schematic.
- Block Player Control
Enable this setting - Block Camera Control
Enable this setting.
Store Music #
Add Node > Audio > Music > Store Music
We store the currently playing music to be able to resume playing it after the battle (i.e. in a battle end schematic).
The default setup of the node should usually already be what we need. Please note that this depends on which music channel your music is playing on.
- Music Channel
Set to 0. - Store ID
Set to 0.
Play Sound (Channel) #
Add Node > Audio > Audio > Play Sound (Channel)
This node plays a sound on a sound channel instead of a game object in the scene.
- Audio Clip
Select Select Audio Clip.
This’ll let us directly define an audio clip in the node instead of setting one up in the Settings node. - Audio Clip Asset
Select the Secret1 audio clip.
You can find it in Assets/Tutorial Assets/NinjaAdventure/Sounds/Game/. - Sound Channel
Set to 0. - Wait
Disable this setting. - Play One Shot
Enable this setting.
Store Scene #
Add Node > Game > Scene > Store Scene
Stores the current scene and player position.
No further settings needed.
Change Camera Position #
Add Node > Game Object > Camera > Change Camera Position
Changes the camera – either using a camera position (set up in Game > Camera Positions) or settings defined in the node. We’ll use it to change the orthographic size of the camera, i.e. zoom in.
This node should be used while camera controls are blocked, otherwise the active control will immediately reset any changes.
- Use Target Position
Enable this setting.
Instead of a camera position, we’ll define changes in this node. - Set Orthographic Size
Enable this setting. - Orthographic Size
Select Value > Value.
Set the value to 1.
We’ll fade the camera change to zoom in.
- Fade Position
Enable this setting. - Time
Select Value > Value.
Set the value to 0.3. - Wait
Enable this setting. - Interpolation
Select Linear.
Change Camera Position #
Copy the previous Change Camera Position node – we’ll zoom out again.
- Orthographic Size
Select Value > Value.
Set the value to 5. - Time
Select Value > Value.
Set the value to 0.2.
Change Camera Position #
Copy the previous Change Camera Position node – we’ll zoom in again, but this time really close.
- Orthographic Size
Select Value > Value.
Set the value to 0.1. - Time
Select Value > Value.
Set the value to 0.5. - Wait
Disable this setting.
Our last zoom will not pause the schematic from progressing, instead it’ll directly continue with loading into the battle scene, making the screen fade of it part of the zoom.
Load Scene #
Add Node > Game > Scene > Load Scene
Now we’ll load the scene the battle should take place in.
As said above, we’ll use the value of a string variable to hold the scene name.
- Spawn Machine Object
Enable this setting.
This will place the machine’s game object instead of the player – in this case, this’ll place the battle game object.
Target Scene 0 #
The Target Scene settings define the scene that will be loaded and where to spawn the machine (e.g. via spawn point).
- Target Scene
Select Variable > String Variable (in the popup field on the right side of the setting).
Set the text to: battleScene - Variable Origin
Select Global.
We’ll have the scene’s name stored in a global string variable, i.e. it’s available everywhere. - Position Type
Select Spawn ID.
This’ll use a Spawn Point in the loaded scene to place the battle. - Spawn ID
Select Value > Value.
Set the value to 0.
That’s the ID of the spawn point we already set up in the battle scenes.
Screen Fade Settings #
We handle fading out the screen here.
- Own Screen Fade
Enable this setting.
If disabled, the scene change will use the default screen fade setup (defined in Game > Game Settings).
We’ll use the Screen Fade Out settings – we can stick with the default setup:
- Fade Out
Enable this setting. - Time
Set to 0.5. - Interpolation
Select Linear. - Fade Alpha/Red/Green/Blue
Enable these settings. - Start Color
Set to a black color with no alpha (A=0). - End Color
Set to a black color with full alpha (A=1 or A=255, depending on the color picker).
We don’t use the Screen Fade In settings, we’ll fade in later after handling some other things.
- Fade In
Disable this setting.
Place At Spots #
Add Node > Battle > Spawn > Place At Spots
This’ll place the already spawned combatants at their battle spots.
This is probably not needed in a this battle start schematic since no spawned combatants should be there – but it doesn’t hurt to have it.
- Place All
Enable this setting.
Spawn Battle Combatants #
Add Node > Battle > Spawn > Spawn Battle Combatants
This’ll spawn all combatants participating in battle.
- Spawn All
Enable this setting.
Change Music #
Add Node > Audio > Music > Change Music
Now we change the music to our battle music.
- Music Channel
Set to 0. - Play Type
Select Play. - Music Clip
Select Battle.
Change Game State #
Add Node > Game > Game > Change Game State
We’ll activate our new game states to show the battle HUD (which we’ll set up later).
Click on Add Game State.
- Game State
Select Show Battle HUD. - Set State
Select Active.
Fade Screen #
Add Node > Animation > Fade > Fade Screen
And finally, we’ll fade in the screen.
- Wait
Enable this setting. - Time
Set to 0.5. - Interpolation
Select Linear. - Fade Alpha/Red/Green/Blue
Enable these settings.
Click on Swap Colors, that’ll exchange the start and end color, which should now go from full alpha to no alpha.
- Start Color
Set to a black color with full alpha (A=1 or A=255, depending on the color picker). - End Color
Set to a black color with no alpha (A=0).
And that’s it for the schematic. Click on Save Schematic to save it, e.g. as BattleStart.
Victory Schematic #
This battle end schematic is used when the player won the battle. We’ll play the victory music, collect our loot and return to the stored scene.
Create a new schematic.

Settings #
- Block Player Control
Enable this setting - Block Camera Control
Enable this setting.
Change Music #
Add Node > Audio > Music > Change Music
Play the victory music.
- Play Type
Select Play. - Music Clip
Select Victory.
Wait #
Add Node > Base > Wait
Wait a second.
- Time
Select Value > Value.
Set the value to 1.
Collect Battle Gains #
Add Node > Battle > Gains > Collect Battle Gains
This node is used to collect experience and loot from a battle – we’ll also display the loot dialogue.
- Show Gains
Enable this setting. - Collect Loot
Enable this setting. - Collect Experience
Enable this setting. - Wait
Enable this setting.
Wait #
Add Node > Base > Wait
We’ll wait a short time before returning to the stored scene.
- Time
Select Value > Value.
Set the value to 0.5.
Change Music #
Add Node > Audio > Music > Change Music
Now we’ll fade back to the stored music (we stored it in the battle start schematic).
- Play Type
Select Fade To. - Play Stored Music
Enable this setting. - Fade Time
Set to 1. - Interpolation
Select Linear.
Change Game State #
Add Node > Game > Game > Change Game State
We’ll inactivate the new game state to hide the HUD again.
Click on Add Game State.
- Game State
Select Show Battle HUD. - Set State
Select Inactive.
Load Scene #
Add Node > Game > Scene > Load Scene
We’ll load the scene that was previously stored.
- Spawn Machine Object
Disable this setting.
This time we spawn the player (the battle start schematic used this option to spawn the battle). - Scene Origin
Select Stored. - Own Screen Fade
Disable the setting.
We’ll just use the default screen fade settings (defined in Game > Game Settings).
And that’s it for the schematic. Click on Save Schematic to save it, e.g. as BattleEndVictory.
Defeat Schematic #
This battle end schematic is used when the player lost the battle. We’ll play the lost music and call game over.
Create a new schematic.

Settings #
- Block Player Control
Enable this setting - Block Camera Control
Enable this setting.
Change Music #
Add Node > Audio > Music > Change Music
Play the victory music.
- Play Type
Select Fade Out Play. - Music Clip
Select Lost. - Fade Time
Set to 1. - Interpolation
Set to Linear.
Change Game State #
Add Node > Game > Game > Change Game State
We’ll inactivate the new game state to hide the HUD again.
Click on Add Game State.
- Game State
Select Show Battle HUD. - Set State
Select Inactive.
Wait #
Add Node > Base > Wait
We’ll wait for 3 seconds.
- Time
Select Value > Value.
Set the value to 3.
Game Over #
Add Node > Game > Game > Game Over
This node will call game over according to the Game Over Settings (in Game > Game Settings).
No further settings.
And that’s it for the schematic. Click on Save Schematic As … to save it, e.g. as BattleEndDefeat.
Using the Schematics #
With our battle start/end schematics set up, we’ll now return to our Turn Based battle system to use the schematics.
Navigate to Battles > Battle System and select the Turn Based battle system.
Base Settings > Battle Start/End Schematics #
We’ll use the schematics we’ve set up.
- Start Schematic
Select the BattleStart schematic. - Victory Schematic
Select the BattleEndVictory schematic. - Defeat Schematic
Select the BattleEndDefeat schematic.
Save Changes #
And that’s it!
Save the changes using the Save Settings button at the bottom of the editor.
Next, we’ll finally get to adding battles to our game.


