ORK Framework Logo - RPG Editor for Unity
  • Features
  • Showcase
  • Guide
    • Documentation
    • Tutorials
    • API
  • ORK 2
    • Tutorials
    • Plugins
    • API
  • Support
  • Forum
  • Get ORK

2D RPG Quickstart

  • START 2D RPG Quickstart
  • 01 Initial Setup
  • 02 Player Setup
  • 03 Music & Scenes
  • 04 UI System Setup
  • 05 UI Boxes
  • 06 Flying Texts
  • 07 Status Values
  • 08 Status Effects
  • 09 First Abilities
  • 10 Fighter Setup
  • 11 First Enemies & Battle AI
  • 12 Battle System Setup
  • 13 Animating Battle Start and End
  • 14 Random Battles
  • 15 Animating Actions
  • 16 Player Battle HUD
  • 17 Elemental Attacks
  • 18 Animating More Actions
  • 19 Inventory & Loot
  • 20 Equipment
  • 21 Loot, Start Equipment & Viewers
  • 22 Magic Abilities
  • 23 Caster Setup
  • 24 More Enemies
  • 25 Start Menu & Save Games
  • 26 Menu Screens
  • 27 Interactions
  • 28 Item Collectors
  • END 2D RPG Quickstart

3D RPG Quickstart

  • START 3D RPG Quickstart
  • 01 Initial Setup
  • 02 Player Setup
  • 03 Music & Scenes
  • 04 UI System Setup
  • 05 UI Boxes
  • 06 Flying Texts
  • 07 Status Values
  • 08 Status Effects
  • 09 First Abilities
  • 10 Fighter Setup
  • 11 First Enemies & Battle AI
  • 12 Battle System Setup
  • 13 Animating Battle Start and End
  • 14 Random Battles
  • 15 Animating Actions
  • 16 Player Battle HUD
  • 17 Elemental Attacks
  • 18 Animating More Actions
  • 19 Inventory & Loot
  • 20 Equipment
  • 21 Loot, Start Equipment & Viewers
  • 22 Magic Abilities
  • 23 Caster Setup
  • 24 More Enemies
  • 25 Start Menu & Save Games
  • 26 Menu Screens
  • 27 Interactions
  • 28 Item Collectors
  • END 3D RPG Quickstart

Status System Setup

  • START Status System Setup
  • 01 Status Values
  • 02 Status Development
  • 03 Attack/Defence Modifiers
  • 04 Status Effects
  • 05 Formulas
  • 06 Ability & Item Types
  • 07 Abilities Part 1: Attacks
  • 08 Abilities Part 2: Support & Sabotage
  • 09 Abilities Part 3: Elemental Magic
  • 10 Items
  • 11 Equipment Part 1: Slots & Slot Set Templates
  • 12 Equipment Part 2: Weapons
  • 12.5 (Optional) Equipment Part 2.5: Weapons
  • 13 Equipment Part 3: Shields, Armor & Accessories
  • 13.5 (Optional) Equipment Part 3.5: Shields, Armor & Accessories
  • 14 Equipment Part 4: Available Equipment Templates
  • 15 Loot
  • 16 Battle AIs
  • 17 Combatants Part 1: General Settings
  • 18 Combatants Part 2: Players
  • 19 Combatants Part 3: Enemies
  • 20 Combatant Groups
  • END Status System Setup

3D RPG Playground

  • START 3D RPG Playground
  • 01 Player Setup
  • 02 Start Menu
  • 03 First Interaction
  • 04 Music
  • 05 Areas
  • 06 Collecting Items
  • 07 Displaying Equipment
  • 08 Combatant Prefabs, Icons & Portraits
  • 09 Combatant Animations
  • 10 Camera Positions
  • ANIM 01 Battle Start/End Schematics
  • ANIM 02 Use, Cast & Camera
  • ANIM 03 Abilities & Items
  • ANIM 04 Physical Attacks
  • ANIM 05 Special Actions
  • BATTLE 01 Battle Menu
  • BATTLE 02 Prepare for Battle
  • TURN 01 Turn Based Setup
  • TURN 02 Turn Order HUD
  • ATB 01 Active Time Setup
  • ATB 02 Cast Times
  • ATB 03 Timebar HUD
  • BATTLE 03 The First Battle
  • BATTLE 04 Hunting Move AI
  • BATTLE 05 Spawning Combatants
  • 11 Save Games
  • MENU 01 UI Boxes
  • MENU 02 Template HUDs
  • MENU 03 Overview Menu
  • MENU 04 Menu Screens
  • 12 Shop
  • BATTLE 06 Random Battles
  • DUNGEON 01 Enter the Dungeon
  • DUNGEON 02 The Trapdoor
  • DUNGEON 03 Enemies on Level 1 & 2
  • DUNGEON 04 Traps on Level 3
  • DUNGEON 05 Going Deeper
  • 13 Bestiary (+MENU+ANIM)
  • QUEST 01 Hunting Quests (+MENU)
  • QUEST 02 Guard NPC
  • QUEST 03 Forest Ruin Cheese
  • QUEST 04 Witch NPC with Cheese
  • QUEST 05 Quest Mark HUDs
  • 14 Research Trees (+MENU)
  • CRAFT 01 Crafting Materials
  • CRAFT 02 Crafting Recipes
  • CRAFT 03 Crafting Menu
  • CRAFT 04 Crafting Proficiency & Critical Crafting
  • CRAFT 05 Materials Loot
  • 15 Changing Choice Dialogue
  • 16 Follow Me!
  • BATTLE 07 Sequence Loot Dialogue

3D Action RPG

  • START 3D Action RPG
  • 01 Status System Setup
  • 02 Player Setup
  • 03 Player Weapon
  • 04 Player Attacks
  • 05 Enemy: Chomper
  • 06 Chomper Attack
  • 07 Hit & Death
  • 08 HUDs
  • 09 Rolling on the Floor
  • 10 Enemy: Spitter
  • 11 Spit Attack
  • 12 Potion
  • 13 Grenade
  • 14 Item HUD
  • 15 Enemy: Grenadier
  • 16 Grenadier Melee Attacks
  • 17 Grenadier Flamethrower
  • 18 Item Drops
  • END 3D Action RPG

2D Grid Battle RPG

  • START 2D Grid Battle RPG
  • 01 Player Setup
  • 02 Prefab & Music Setup
  • 03 Randomizing Combatants
  • 04 UI Setup
  • 05 Battle Start, End & Phase Schematics
  • 06 Battle System Setup
  • 07 Battle Grid Setup
  • 08 Grid Move
  • 09 Forest Battle Grid
  • 10 Battle AI
  • 11 Ability Ranges
  • 12 Death & Use Schematics
  • 13 Attack Schematic
  • 14 Shoot Schematics
  • 15 Battle Selection Interaction
  • END 2D Grid Battle RPG

Schematics

  • Simple Start Schematic
  • Battle Start Schematic
  • Battle End Schematic
  • Moving to Target and Back
  • Animating a Base Attack
  • Animating a Magic Ability
  • Grid Movement
  • Open and Close UI Animations
  • Flying Text Mover

UI Setups

  • Unity UI: Initial Setup
  • Unity UI: TextMesh Pro Setup
  • Unity UI: UI Box
  • Unity UI: Flying Text
  • Unity UI: Dragging Notification
  • Unity UI: Canvas with Screen Space Camera
  • Unity UI: Interaction HUD
  • Unity UI: Simple Player HUD
  • Unity UI: Quest HUD
  • Unity UI: Shortcuts HUD
  • Unity UI: Currency HUD
  • Unity UI: Tooltip HUD
  • Unity UI: Control HUD
  • Unity UI: Attack Modifiers
  • Unity UI: Defence Modifiers

Gameplay Bits

  • Combining Input Origins
  • Combining Status Value Flying Texts
  • Fun With Flying Text
  • HUD Effects With Conditional Schematics
  • Inventory Containers
  • Multi Interaction Controllers
  • World Space HUD
  • World Space Dialogue
  • Home
  • Guide
  • Tutorials
  • 2D RPG Quickstart
  • 28 Item Collectors

28 Item Collectors

Table of Contents
  • Item Collection Dialogue
    • Item Collection
      • Before Collection
      • Collection Dialogue
    • Item Box > Item List Settings
    • Save Changes
  • Chest Open Schematic
    • Play Mecanim Animation
  • Adding a Chest
    • Item Collector
      • Collection Settings
      • Item Settings
      • Start Settings
  • More Chests
    • Forest Scene
      • Item Collector > Item Settings > Item 0
    • Deep Forest Scene
      • Item Collector > Item Settings > Item 0
  • Testing

In this tutorial we’ll add treasure chests to the game.

Item Collectors are used to pick up individual items or access item boxes. We’ll use them to add treasure chests that open when interacted with.

We’ll set up:

  • item collection dialogue (inventory settings)
  • chest open schematic
  • item collectors

Let’s get to it!

Item Collection Dialogue #

Open the Makinom editor and navigate to Inventory > Inventory Settings.

Item Collection #

These settings handle the collection of single items via Item Collector components.

Before Collection #

We’ll play an audio clip.

  • Play Sound
    Enable this setting.
  • Audio Clip
    Select the Success3 audio clip.
    You can find it in Assets/Tutorial Assets/NinjaAdventure/Sounds/Game/.

Collection Dialogue #

We can stick with the default setup, which displays a message with the name of the thing we found. You can optionally also use a choice dialogue to let the player select if it should be collected.

All we need to do is select the UI box that’s used to display the dialogue.

  • UI Box
    Select Dialogue.

Item Box > Item List Settings #

We don’t use item boxes in this tutorial series, but we can set it up just to have it working.

Like with the single item collection dialogue, we just need to select the UI box and can stick with the rest of the default settings.

  • UI Box
    Select Blue Center.

Save Changes #

Save the changes before we set up the schematic.

Don’t forget to save your changes by clicking on Save Settings at the bottom of the editor.

Chest Open Schematic #

We’ll simply play an animation on the chest (Machine Object) – the animation’s state is named ChestOpen, and we’ll play it directly without setting any parameters.

Navigate to Schematics.

Play Mecanim Animation #

Add Node > Animation > Mecanim > Play Mecanim Animation

This node is used to play a Mecanim animation and doesn’t require any combatant animation setup to work.

  • Object
    Select Machine Object.
  • Play Mode
    Select Play.
  • State Name
    Set to: ChestOpen

And that’s it for the schematic – save it, e.g. as ChestOpen.

Adding a Chest #

Let’s first add a chest to the Town scene.

Add the TreasureChest prefab to the scene, you can find it in Assets/Tutorial Assets/Prefabs/.

I’ve added mine in the lower left corner of the town.

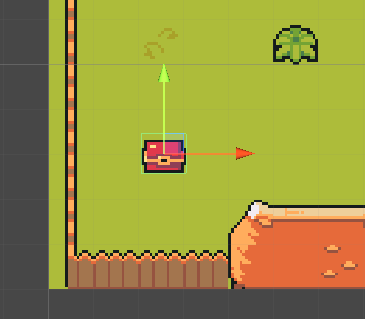
The prefab is already set up with everything we need, except the Item Collector.

Item Collector #

Add an Item Collector component to the game object using the component menu.

Usually, an item should only be collected once – this is automatically handled for us by the Scene ID setup of the item collector. This is by default enabled and each new item collector will automatically receive a new, unused scene ID. When the player collects the item, that scene ID is marked as collected (for the current scene) and the item will not be available again when returning to the scene. When copying item collectors (i.e. duplicating them in the same scene), you’ll need to manually get a new scene ID by clicking on the Get New Scene ID button, or reset all scene ID’s in the scene using the Reset All Scene IDs button.

  • Use Scene ID
    This should be enabled and have the scene ID 0 assigned, since this is the first item collector added to the scene.

Collection Settings #

  • Collection Type
    Select Single.
    We collect a single item and don’t use this as an item box.

We can use the default setup, but let’s take a look at some of the settings.

  • Destroy Object
    Disable this setting.
    We don’t want to destroy the game object after the collection, i.e. the open chest will remain in the scene.
  • Destroy Collected
    Enable this setting.
    However, we want the collected chests to be gone when we return to the scene.
    This setting will destroy the game object if it was already collected when loading the scene.
  • Show Dialogue
    Enable this setting.
    The item collection dialogue will be displayed.

The Control Block Settings handle blocking player controls as well as blocking the move AI for all combatants – this would e.g. prevent enemies hunting the player from getting closer during item collection. They should all be enabled by default, and we keep it that way.

We use the Schematic Settings to play the ChestOpen schematic and animate opening the chest.

  • Start Schematic
    Select the ChestOpen schematic.

Item Settings #

  • Spawn Prefab
    Disable this setting.
    Since we’re using a chest game object, we don’t need to spawn the item’s prefab (if one is set up).

You can add multiple items to an item collector – in Single collection type, one of the added items will be used randomly. We’ll just change the already added item.

  • Type
    Select Equipment.
  • Equipment
    Select Leather Armor.
  • Quantity
    Select Value >Value.
    Set the value to 1.

You can also use the item’s Chance to determine if the item is available for collection or not. The item can be marked as collected if the chance fails when also enabling Set On Fail.

Start Settings #

The item collector is by default set up as an interaction, i.e. using the Interact start type. You can also use different start types, e.g. on trigger enter (requires a collider with Is Trigger enabled).

If you want, you can also enable Mouse Up As Button in the Interaction stetings to open the chest on mouse click.

And that’s it for the town – save the scene.

More Chests #

Let’s also add a chest to the Forest and Deep Forest scenes.

Forest Scene #

Copy the TreasureChest game object in the Town scene to the clipboard (e.g. CTRL+C).

Open the Forest scene (Assets/Scenes/) and paste the copied chest.

Move it somewhere, e.g. I’ve moved it into the upper left corner of the scene.

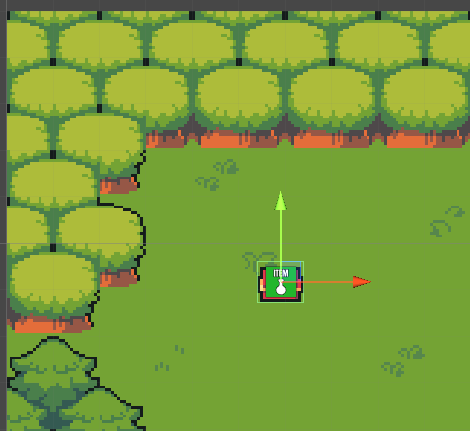
We only add 1 chest per scene, so the Scene ID of the Item Collector is no issue for us. If you add another chest to the scene, make sure to update the scene ID (e.g. getting a new one via Get New Scene ID button).

Item Collector > Item Settings > Item 0 #

We change the used item.

  • Equipment
    Select Cloth Vest.

Save the scene.

Deep Forest Scene #

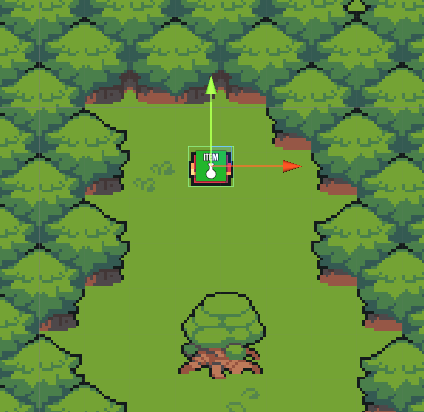
Open the Deep Forest sceneand paste the copied chest.

Move it somewhere, e.g. I’ve moved it at the end of the scene’s path, below the entrance.

Item Collector > Item Settings > Item 0 #

We change the used item.

  • Equipment
    Select Elemental Brooch.

Save the scene.

Testing #

Hit play and walk up to a chest.

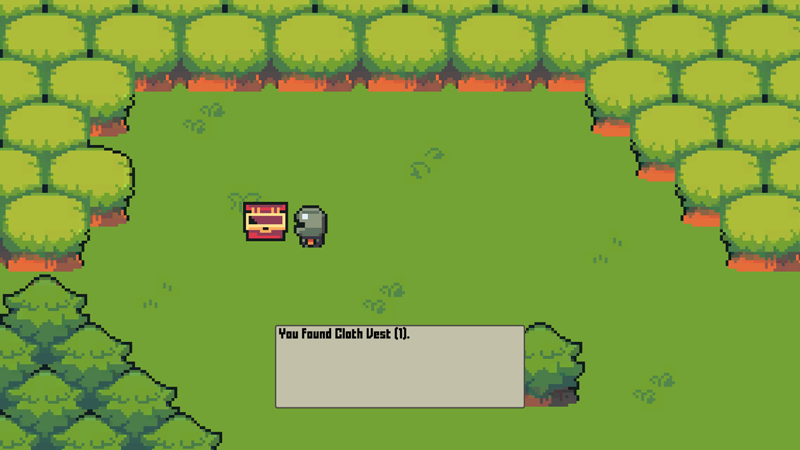
Interacting with it opens the chest and collects the item, great!


That’s it – we’re done with the 2D RPG Quickstart tutorials. Allow me to say some final words in the next and final part of this tutorial series.

Share This Article :
  • Facebook
  • Twitter
  • LinkedIn
  • Pinterest
Updated on February 22, 2023
Table of Contents
  • Item Collection Dialogue
    • Item Collection
      • Before Collection
      • Collection Dialogue
    • Item Box > Item List Settings
    • Save Changes
  • Chest Open Schematic
    • Play Mecanim Animation
  • Adding a Chest
    • Item Collector
      • Collection Settings
      • Item Settings
      • Start Settings
  • More Chests
    • Forest Scene
      • Item Collector > Item Settings > Item 0
    • Deep Forest Scene
      • Item Collector > Item Settings > Item 0
  • Testing
Sitemap
  • Features
  • Showcase
  • Guide
    • Documentation
    • Tutorials
    • API
  • ORK 2 Hub
    • Tutorials
    • Plugins
    • API
  • Support
  • Forum
  • Get ORK
  • Contact
  • Blog
  • Makinom
  • gamingislove.com
Categories
  • News (60)
  • ORK 2 (137)
    • Tutorial (137)
      • Game tutorial (50)
      • Gameplay (32)
      • How-to (55)
  • Release (130)
Search

© 2015 Gaming is Love e.U.

Disclosure: This site may contain affiliate links, which means I may receive a commission if you click a link and purchase something that I have recommended. While clicking these links won’t cost you any money, they will help me fund my development projects while recommending great assets!