
In this tutorial we’ll add visible equipment to our player combatants.
Equipment can be displayed on the game object of a combatant by using Equipment Viewer components. We’ll use them to display weapons and shields.
Equipment Prefabs #
First, we’ll set up the Viewer Prefab for our weapons and shields. This is the prefab that’ll be used by the Equipment Viewer component to display the equipment.
You can find the prefabs for the weapons in Assets/Tutorial Assets/Prefabs/Weapons/ in different sub-folders per weapon type. The shield prefabs are in Assets/Tutorial Assets/Prefabs/Shields/.
Navigate to Inventory > Equipment.
0: Dagger 1 #
Item Settings > Prefab Settings #
- Viewer Prefab
Select Dagger.
Make sure you’re using the prefab, not the fbx model.
The prefabs provided for the tutorial are already set up to be placed correctly – otherwise, you can correct this using the Position Offset and Rotation Offset settings.
1: Dagger 2 #
Item Settings > Prefab Settings #
- Viewer Prefab
Select Dagger_2.
2: Sword 1 #
By now you should already know where to find the prefab settings, so I’ll just list the viewer prefab you should use.
- Viewer Prefab
Select Sword.
3: Sword 2 #
- Viewer Prefab
Select Sword_2.
4: Axe 1 #
- Viewer Prefab
Select Axe_Small.
5: Axe 2 #
- Viewer Prefab
Select Axe.
6: Hammer 1 #
- Viewer Prefab
Select Hammer_Small.
7: Bow 1 #
- Viewer Prefab
Select Bow_Wooden.
8: Bow 2 #
- Viewer Prefab
Select Bow_Wooden2.
9: Staff 1 #
- Viewer Prefab
Select WoodenStaff.
10: Staff 2 #
- Viewer Prefab
Select Staff.
11: Shield 1 #
- Viewer Prefab
Select Shield_Round.
12: Shield 2 #
- Viewer Prefab
Select Shield_Round_2.
In case you also did the optional setup for weapons and other equipment, here’s the prefab setup for the rest.
Dagger 3 #
- Viewer Prefab
Select Dagger_Golden.
Master Dagger #
- Viewer Prefab
Select Rogue_Dagger.
Sword 3 #
- Viewer Prefab
Select Sword_Big.
Sword 4 #
- Viewer Prefab
Select Claymore.
Sword 5 #
- Viewer Prefab
Select Sword_Golden.
Master Sword #
- Viewer Prefab
Select Warrior_Sword.
Axe 3 #
- Viewer Prefab
Select Axe_Double.
Axe 4 #
- Viewer Prefab
Select Axe_small_Golden.
Axe 5 #
- Viewer Prefab
Select Axe_Double_Golden.
Hammer 2 #
- Viewer Prefab
Select Hammer_Double.
Hammer 3 #
- Viewer Prefab
Select Hammer_Double_Golden.
Bow 3 #
- Viewer Prefab
Select Bow_Evil.
Bow 4 #
- Viewer Prefab
Select Bow_Golden.
Master Bow #
- Viewer Prefab
Select Ranger_Bow.
Staff 3 #
- Viewer Prefab
Select IceStaff.
Melee Staff #
- Viewer Prefab
Select Cleric_Staff.
Master Staff #
- Viewer Prefab
Select Wizard_Staff.
Shield 3 #
- Viewer Prefab
Select Shield_Heater_2.
Shield 4 #
- Viewer Prefab
Select Shield_Heater.
Tank Shield #
- Viewer Prefab
Select Shield_Celtic_Golden.
Game State #
We’ll add a new game state to have more control over when the equipment will be displayed. While we could just use the In Battle state (available in new projects, automatically active during battles), it’s better to use a custom state that we’ll manually control, e.g. in battle start/end schematics to switch between showing and hiding the equipment at a time we want.
Navigate to Game > Game States and add a new game state.
- Name
Set to Show Equipment. - Initial State
Disable this setting.
The state is inactive at the start, not displaying the equipment.
For testing in-game, you can just enable the Initial State setting, just don’t forget to turn it off afterwards.
That’s it four our editor setup – don’t forget to save your changes by clicking on Save Settings at the bottom of the editor.
Equipment Viewer Setup #
Now, we’ll set up the Equipment Viewer components on our player combatant prefabs. You can find the prefabs in Assets/Tutorial Assets/Prefabs/Combatants/Player/.
We’ll add equipment viewers for the Weapon and Shield equipment slots to the following prefabs:
- Cleric
- Ranger
- Rogue
- Warrior
- Wizard
The monk doesn’t use weapons or shields, so no setup needed.
Weapon #
The weapon’s Equipment Viewer component is added to the Weapon child object, you can find it under:
CharacterArmature > Root > Body > Hips > Abdomen > Torso > Shoulder.R > UpperArm.R > LowerArm.R > Fist.R > Fist1.R > Weapon.R > Weapon
The placement is the same on all player prefabs.
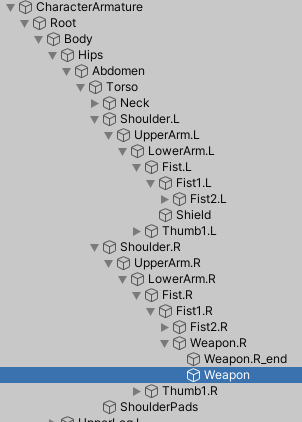
Add an Equipment Viewer component to the Weapon game object and change the following settings in the inspector.
Equipment Viewer Settings #
- Equipment Slot
Select Weapon.
Display Conditions #
We’ll add our game state as a condition.
Click on Add Condition.
- Condition Type
Select Game State.
Click on Add Game State.
- Condition Type
Select Game State. - Game State
Select Show Equipment. - Check State
Select Active.
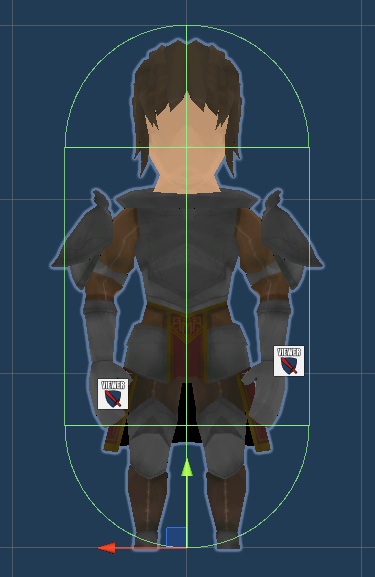
Equipment Preview #
You can use these settings to preview how equipment will be placed.
Shield #
The shield’s Equipment Viewer component is added to the Weapon child object, you can find it under:
CharacterArmature > Root > Body > Hips > Abdomen > Torso > Shoulder.L > UpperArm.L > LowerArm.L > Fist.L > Fist1.L > Shield
The placement is the same on all player prefabs.
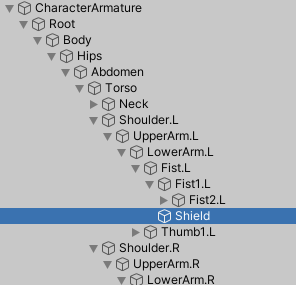
Add an Equipment Viewer component to the Shield game object and change the following settings in the inspector.
Equipment Viewer Settings #
- Equipment Slot
Select Shield.
Display Conditions #
Click on Add Condition.
- Condition Type
Select Game State.
Click on Add Game State.
- Condition Type
Select Game State. - Game State
Select Show Equipment. - Check State
Select Active.
Copy the Components #
For a faster setup on the other prefabs, just copy the Equipment Viewer components and paste them on the other prefab’s child objects.
To copy a component, right-click on it’s header in the inspector and select Copy Component.
To paste the copied component on a new game object, right-click on a component (e.g. the Transform) on that game object and select Paste Component As New.
Testing #
Hit play – no equipment is displayed, since the game state Show Equipment is inactive. So far, so good.
To test showing your equipment, enable the Initial State setting of the Show Equipment game state and save the changes (don’t forget to disable it after your test).
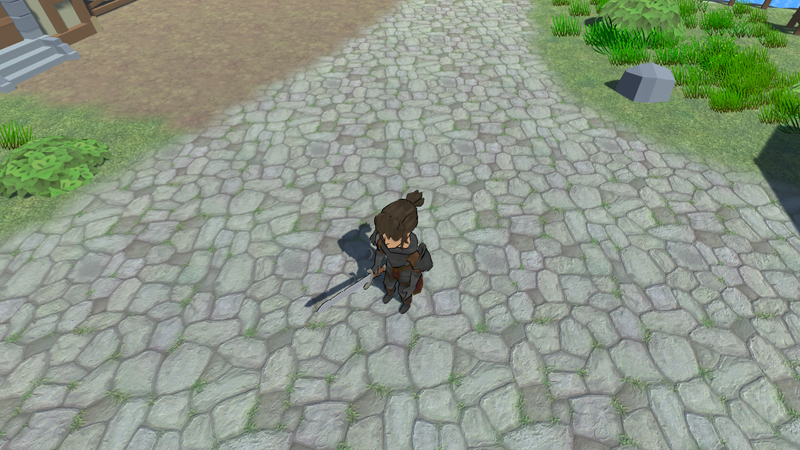
Now you’ll see the warrior holding a sword – no shield, since that’s not part of the start equipment.
Next, we’ll add prefabs to the other combatants – and add icons and portraits to them.


