
In this tutorial we’ll add a dialogue with choices that changes each time we talk to the NPC.
We already had a little chat with an NPC – let’s add another one! This time, we’ll use a choice dialogue, i.e. let the player select how to proceed.
Additionally, we’ll cycle through different dialogues each time we talk with the NPC. This is done by using object variables on the NPC’s game object.
Changing Dialogue Schematic #
First, we’ll set up the schematic handling our dialogue. The changing dialogue will be handled by an int object variable on the NPC’s game object (key: counter).
Open the editor, navigate to Schematics and start with a new schematic.
Settings #
- Block Player Control
Enable this setting.
We don’t want our player to run around while talking to the NPC.
Actors #
Dialogue speakers require actors, so let’s set them up.
Click on Add Actor.
- Actor Type
Select ORK Player.
This’ll use the player’s combatant.
Click on Add Actor to add another actor.
- Actor Type
Select Machine Object.
The Interaction Machine we’ll use to start the dialogue will be placed on the NPC, so the machine object will be the NPC’s game object. - Set Name
Enable this setting.
We’ll define a name here – alternatively, you can also set up a scene object and add it to the NPC’s game object. - Default Content
Set to Concerned Citizen.
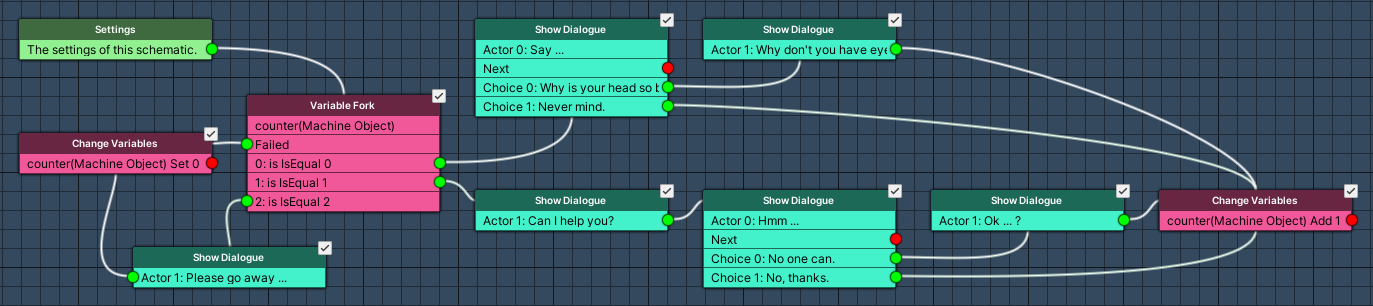
Variable Fork #
Add Node > Value > Variable > Variable Fork
This node works similar to the Check Variables node, but it checks a single variable for multiple values, each having it’s own Next slot.
We’ll cycle through 3 different dialogues, so we’ll need 3 conditions.
- Variable Key
Set to counter. - Variable Origin
Select Object.
This’ll use object variables attached to a game object (via an Object Variables component). - Object
Select Machine Object.
There’s already a variable condition added for us, so let’s change Variable Condition 0 to our needs.
- Type
Select Int. - Check Type
Select Is Equal. - Check Value
Select Value > Value.
Set the value to 0.
0 is also the default value for any not yet set int variable (for bool variables it’d be false, for string an empty text, etc.).
Copy Variable Condition 0.
- Check Value
Select Value > Value.
Set the value to 1.
Copy Variable Condition 1.
- Check Value
Select Value > Value.
Set the value to 2.
Show Dialogue #
Add Node > UI > Dialogue > Show Dialogue
We’ll show a Choice dialogue.
This node is connected to the is Equal 0 slot of the Variable Fork node.
- Dialogue Type
Select Choice. - UI Box
Select Beige Bottom Dialogue.
The Speaker Settings handle if a speaker is used, e.g. to display a name in the UI box’s title content.
- Use Speaker
Enable this setting. - Actor
Select ORK Player. - Show Name
Enable this setting. - Text (Message Content)
Set to: Say …
Choice Settings #
Click on Add Choice.
- Text (Choice 0)
Set to: Why is your head so big?
Click on Add Choice.
- Text (Choice 1)
Set to: Never mind.
Show Dialogue #
Add Node > UI > Dialogue > Show Dialogue
We’ll show the NPC’s reply.
This node is connected to the Choice 0 slot of the previous Show Dialogue node.
- Dialogue Type
Select Message. - UI Box
Select Beige Bottom Dialogue.
The Speaker Settings handle if a speaker is used, e.g. to display a name in the UI box’s title content.
- Use Speaker
Enable this setting. - Actor
Select Concerned Citizen. - Show Name
Enable this setting. - Text (Message Content)
Set to: Why don’t you have eyes?
Show Dialogue #
Copy the second Show Dialogue node (i.e. the Message dialogue), we’ll now start the dialogue for the 2nd time we talk to the NPC.
This node is connected to the is Equal 1 slot of the Variable Fork node.
Change the following settings.
- Text (Message Content)
Set to: Can I help you?
Show Dialogue #
Copy the first Show Dialogue node (i.e. the Choice dialogue).
This node is connected to the previous Show Dialogue node’s Next slot.
- Text (Message Content)
Set to: Hmm …
Choice Settings > Choice 0 #
- Text
Set to: No one can.
Choice Settings > Choice 1 #
- Text
Set to: No, thanks.
Show Dialogue #
Copy the second Show Dialogue node (i.e. the Message dialogue) again.
This node is connected to the Choice 0 slot of the previous Show Dialogue node.
Change the following settings.
- Text (Message Content)
Set to: Ok … ?
Change Variables #
Add Node > Value > Variable > Change Variables
We’ll now increase the counter variable by 1.
This node is connected to the the unused Choice slots of the choice Show Dialogue nodes and the unused Next slots of the message Show Dialogue nodes.
Click on Add Variable.
- Change Type
Select Variable. - Variable Key
Set to counter. - Variable Origin
Select Object. - Object
Select Machine Object. - Type
Select Int. - Operator
Select Add. - Float Value
Select Value > Value.
Set the value to 1.
Show Dialogue #
Copy the second Show Dialogue node (i.e. the Message dialogue) again, we’ll now start the 3rd time we talk to the NPC.
This node is connected to the is Equal 2 slot of the Variable Fork node.
Change the following settings.
- Text (Message Content)
Set to: Please go away …
Change Variables #
Copy the previous Change Variables node, we’ll now reset the counter to 0.
This node is connected to the previous Show Dialogue node’s Next slot and the Failed slot of the Variable Fork node.
- Operator
Select Set. - Float Value
Select Value > Value.
Set the value to 0.
And that’s it for the schematic – save it, e.g. as ChangingDialogue.
Adding the NPC #
Now, we’ll add the NPC to the town. Open the World scene (Assets/Scenes/) and add one of the NPC prefabs to the town area.
You can find the NPC prefabs in Assets/Tutorial Assets/Prefabs/NPCs/ – I’m using the Casual3_Male prefab and place it in front of the large bell tower.

Object Variables Component #
Add an Object Variables component to the NPC’s game object, either using the component menu or the Makinom scene wizard.
This component is used to bind object variables to a game object and allows the Object variable origin to find variables on a game object.
Object variables can either persist and be shared between multiple game objects by using the same Object ID to identiy them, or be used as local variables. We’ll use them as local variables, i.e. they’re only accessible for this game object, not shared and not saved with save games. Once the game object is destroyed (e.g. when we change scenes), they’ll be gone. That’s all we need for our changing dialogue.
- Local Variables
Enable this setting.
Interaction Machine #
Add an Interaction Machine component to the NPC’s game object, either using the component menu or the Makinom scene wizard.
Learn more about interaction machines in this Makinom documentation.
Start Settings #
- Interact
Enable this setting. - Mouse Up As Button
Enable this setting in case you also want to start the interaction by clicking on the NPC.
Machine Execution Settings #
- Schematic Asset
Select the ChangingDialogue schematic you created.
Expand the Object Turn Settings, we’ll let the player and NPC face each other.
- Turn Starting Object
Enable this setting. - Turn Machine Object
Enable this setting.
And that’s it – save the scene.
Testing #
Hit play, go to the NPC and annoy him a bit.
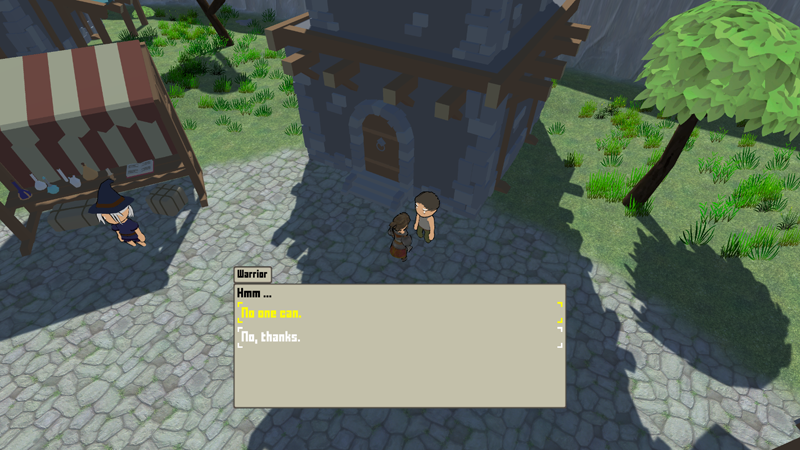
Success!
You can talk to the NPC multiple times, cycling through the different dialogues.
Next, we’ll spawn the player group in the field.


