
In this tutorial we’ll set up our player and some initial 2D related settings.
The player will not participate in battle – in fact, the player combatant will even be hidden from the player (playing the game) and only controlled when not in battle, i.e. running around in town. You might recognize this setup from games like Pokemon, where your trainer runs around in the world, but battles are handled by others.
Our player will be a princess, which commands her army of randomized combatants (with random names and appearance).
We’ll set up:
- a few 2D related settings
- game controls
- animations (already for all combatants)
- the princess
- town scene (spawn, camera borders)
- start game schematic
Let’s get to it, the princess is waiting.
2D Setup #
First, we’ll handle some settings for our 2D game – it’s pretty simple, we need to prioritize 2D raycasting (or limit it completely to 2D) and set the default horizontal plane to use a 2D top down setup.
Navigate to Game > Game Settings and change the following settings.
Base Settings #
- Default Horizontal Plane
Select XY.
Use this for 2D top down games. - Default Raycast Type
Select First 2D or Only 2D.
Using First 2D will check with 2D raycasting first and fall back to 3D raycasting if nothing was hit, use it in case you’re mixing 2D and 3D physics in your game.
Using Only 2D will only check with 2D raycasting.
Both are fine for our setup (though we only use 2D physics).
As their names suggest, these are the Default settings – everything that uses them has also options to overrule them with a custom setup, but you’ll usually not need that unless you have some special cases where you switch perspective or change between 2D and 3D.
ORK Game Settings > Player/Group Settings #
We also need to select the player’s faction and increase the battle group size – we want to have a maximum of 6 player combatants in battle.
- Default Faction
Select Player. - Battle Group Size
Set to 6.
Game Controls #
We’ll use ORK’s built-in Top Down 2D controls and the Top Down Border camera. A fresh project setup already comes with some default input keys (e.g. WASD movement keys) set up for us, so we just need to use them in our controls. You can learn more about game controls in ORK in this documentation.
Navigate to Base/Control > Game Controls.
ORK Control Settings > Player Controls #
We’ll use the Top Down 2D controls, which move the player using a Rigidbody 2D component.
- Player Control Type
Select Top Down 2D. - Vertical Axis
Select Vertical Move. - Horizontal Axis
Select Horizontal Move. - Rotate Z Axis
Enable this setting.
ORK Control Settings > Camera Controls #
We’ll use the Top Down Border camera – this camera control can be used in both 2D and 3D games (handling is based on the horizontal plane we just set up).
This camera control can also use Camera Border components in the scene to limit the viewing area for the camera, more on that below in the scene setup.
- Camera Control Type
Select Top Down Border. - Border Camera Edge
Enable this setting.
This’ll make the camera’s edges stop at the camera border (if one is used).
When disabled, the camera position (center) will be used.
Since this is a 2D game using Orthographic cameras, the distance/height settings can be ignored. However, we’ll set up panning for our battles to pan the camera using WASD keys.
Panning Settings #
- Use Panning In
Select Battle.
We’ll only use panning while in battle. - Reset On Target Change
Enable this setting.
When the camera target changes, the panning will be reset to focus on the target.
The camera target will change in battle to look at the currently active combatant. - Speed
Set to 10. - Horizontal Panning Key
Select Horizontal Move. - Vertical Panning Key
Select Vertical Move. - Limit Panning
Disable this setting.
We don’t need to limit the panning distance, since our camera will be limited by a Camera Border anyway.
You can also use Screen Edge Panning – this setup is optional in case you want to use it (I’ll not use it):
- Use Edge Panning In
Select Battle. - UI Blocks Panning
Enable this setting.
This’ll prevent panning when we try to interact with a UI. - Screen Edge Distance
Set to X=10, Y=10, Z=10, W=10.
I.e. we only pan when the cursor is really close to the edge of the screen.
Animation Types #
We’ll continue with setting up animations – first, we’ll set up a new animation type. You can learn more about animations in this documentation.
Navigate to Base/Control > Animation Types and add new type.
13: Use #
- Name
Set to Use.
Animations #
We’ll already set up the animations for all combatants – they all use the same setup, which makes it a lot easier. We’re using sprites (2D) as our combatants, i.e. our animations have to be set up using Mecanim (the legacy animation system doesn’t support sprite animations).
Let’s take a look at the animator controller, you can find it in Assets/Tutorial Assets/Animations/, the Combatant Controller is the basis for all combatants (they use animator override controllers to replace animations).
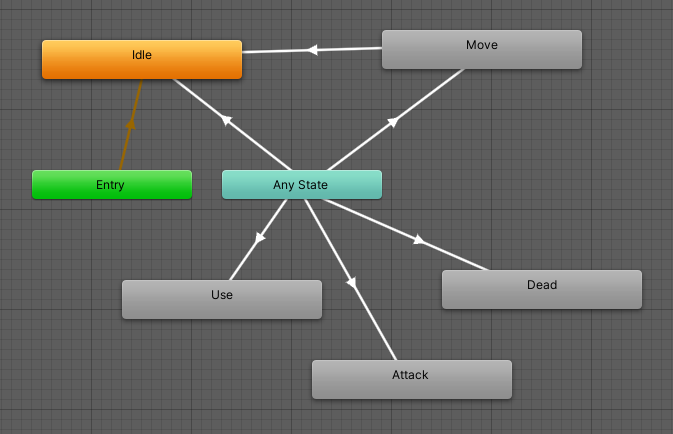
Idle, Move and Attack are blend trees, looking like this:
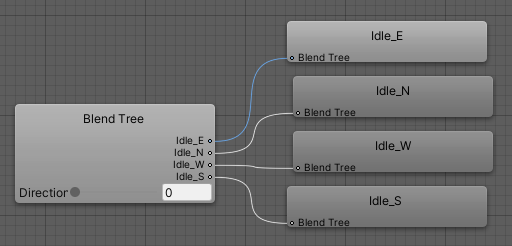
Since we’re dealing with 2D, we need different animations for different directions, this is handled by the blend trees, which use the combatant’s rotation interpreted into a 4-directional value (0-3), which is forwarded through our animation setup (see below).
Additionally, the Use, Attack and Dead animations are played by setting Bool parameters, i.e. they’ll play until we stop the animation (which switches the parameters off) – this lets us control the duration of these animations in our schematics, which will play and stop them as needed.
The animator controller uses the following parameters:
- Speed
The movement speed, forwarded from our animation setup.
Controls if idle or movement animations are used.
This is a Float parameter. - Direction
The direction the combatant is facing, forwarded from our animation setup.
Controls which direction animation is used.
This is a Float parameter. - Attack, Use and Dead
Play the according animations while toggled on.
These are Bool parameters.
This is just one possible setup for handling 2D animations, Mecanim and ORK are flexible and can support many different combinations and setups – ultimately, this’ll depend on what your game needs and how your combatants are moved.
Alright, let’s handle the setup in ORK. Navigate to Base/Control > Animations and change the Default animation setup.
Mecanim Settings #
We’ll forward the horizontal speed and the rotation (i.e. the direction) to the animator controller.
- Set Horizontal Speed
Enable this setting. - Horizontal Parameter
Set to Speed. - Set Z Rotation
Enable this setting.
In 2D environments, the directional rotation is the Z-axis (for 3D it’s usually the Y-axis). - Rotation Type
Select Direction 4.
The rotation of the combatant (0 to 360, or -180 to 180) will be translated into 4 directions, 0 (east), 1 (north), 2 (west) or 3 (south). - Set Float Parameter
Enable this setting.
We’ll set a float parameter, since blend trees only work with them. - Paremeter Name
Set to Direction.
We’ll now add 4 animations for attack, use, death and revive.
Mecanim Animaton 0 #
Click on Add Mecanim Animation.
- Animation Type
Select Attack.
Adjust the already added Animation 0. Since we play the animation via parameters and don’t need their duration, we don’t really need to set up anything beside the play/stop parameters.
Click on Add Parameter (Play).
- Parameter Name
Set to Attack. - Parameter Type
Select Bool. - Bool Value
Enable this setting.
Click on Add Parameter (Stop).
- Parameter Name
Set to Attack. - Parameter Type
Select Bool. - Bool Value
Disable this setting.
Mecanim Animation 1 #
Copy Mecanim Animation 0.
- Animation Type
Select Use.
We need to change the parameter names for play and stop.
- Parameter Name (Play)
Set to Use. - Parameter Name (Stop)
Set to Use.
Mecanim Animation 2 #
Copy Mecanim Animation 1.
- Animation Type
Select Death.
We need to change the parameter names for play and stop.
- Parameter Name (Play)
Set to Dead. - Parameter Name (Stop)
Set to Dead.
Mecanim Animation 3 #
Copy Mecanim Animation 2.
- Animation Type
Select Revive.
The revive animation will simply disable the Dead parameter when played.
- Bool Value (Play)
Disable this setting.
Remove the stop parameter change (Set Parameter (Stop) 0).
That’s it for the animations.
Combatants General Settings #
Next, we’ll handle some general settings for all our combatants. You can learn more about combatants in this documentation.
Navigate to Combatants > Combatants > General Settings.
Animations & Movement #
We’ll set up Mecanim as the default animation system and use the animations we just set up.
Additionally, we’ll set up the Default Movement Component for 2D movement.
Default Animation System #
- System Type
Select Mecanim.
Default Animations #
Click on Add Animations.
- Animations
Select Default.
Default Movement Component #
We’ll use the Default movement component – it’s a very simple component, in 3D it’ll move using a Character Controller, in 2D a Rigidbody 2D component (or rather, it uses the one it finds).
- Component Type
Select Default. - Add Component
Enable this setting.
The movement component is automatically added if it isn’t found.
In that case, it’ll use the setup provided here. - Face Target
Enable this setting.
The combatant will rotate into the direction it moves (in 2D on the Z-axis). - Smooth
Enable this setting.
This’ll make the movement a bit smoother. - Speed Smoothing
Set to 10.
Starting movement will not be immediately move at full speed and take a bit to reach full speed. - Rotation Damping
Set to 0.
We don’t want to smooth rotations, as it’s not needed for our 4-directional 2D animation setup.
Princess Combatant #
For our princess we only need to set up a prefab, we don’t need any status setup (other than the automatic default setup), since she doesn’t fight in battles.
Navigate to Combatants > Combatants and add a new combatant.
- Name
Set to Princess.
Base Settings > Prefab Settings #
- Prefab
Select the Princess prefab.
You can find it in Assets/Tutorial Assets/NinjaAdventure/Actor/Characters/Princess/. - Update Mode
Select Fixed Update.
Our combatants are moved by Rigidbody2D components, i.e. the update mode (which determines when things like the move speed or movement direction are calculated) has to be set to update in the physics frame.
Otherwise you’ll experience strange jumps in speed, as it’s 0 in one frame and a high value in another, since the physics frame (FixedUpdate) and the regular frame (Update) are not in sync.
Save Changes #
That’s it for the setup in the editor.
Don’t forget to save your changes by clicking on Save Settings at the bottom of the editor.
Scene Setup #
Open the Town scene (found in Assets/Scenes/).
We’ll add an ORK Game Starter, a Spawn Point. and Camera Borders.
Add Game Starter #
First, we’ll add a game starter to the scene and set it up for quick game testing. We’ll go with the ORK Game Starter variant.
Game starters are used to initialize your project, without it, you can’t access any functionality without causing errors. You can learn more about game starters in this documentation.
You can either use the scene hierarchy context menu or the scene wizard (e.g. via CTRL + ALT + W, or using the Unity menu: Window > Gaming Is Love > Makinom Scene Wizard).
I’ll use the context menu: ORK Framework > ORK Game Starter
The added game starter should already have your Project asset set up. Change the following setting in the ORK Game Starter component’s inspector.
- Start Game
Enable this setting.
It doesn’t really matter where you place the game starter.
Add Spawn Point #
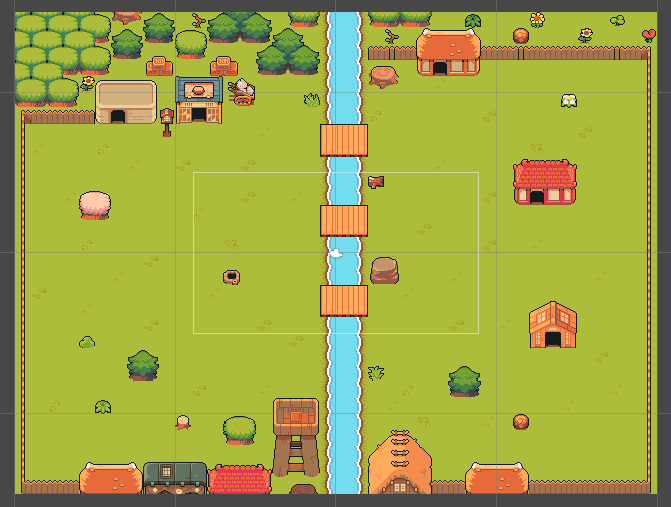
Next, we’ll add a spawn point – we’ll spawn on the right side of the river, somewhere in the center.

Like the game starter, you can add a spawn point via the context menu or the scene wizard. The scene wizard has searchable popups for adding game objects or components, which can get very convenient when having to set up multiple things.
I’ll use the context menu: Makinom > Spawn Point
The spawn point will be placed directly on the ground (or whatever else is hit by the raycast into the scene) at the screen’s center – and it automatically has the next free Spawn ID assigned. Spawn IDs are used to identify a spawn point, so when we (soon) spawn our player using a schematic, that’s the spawn ID we’ll use.
Since there wasn’t a spawn point in the scene before, we’ll have the spawn ID 0 assigned.
Add Camera Borders #
If you look at the scene hierarchy, you’ll see 2 game objects for our camera borders:
- Camera Border Left
- Camera Border Right
Those two already have a Box Collider 2D set up to cover their parts of the scene – when the player moves between them, the camera will switch over.
All we need to do is add a Camera Border component to each of them using the component menu. The component offers a few settings, but we don’t need any of them for our setup.
That’s it for the scene, save your changes.
Start Schematic #
Back to the editor, navigate to Schematics – it’s time to set up a schematic we’ll use when starting our game.
We’ll join the Princess to the player group, remove her from the battle group, hide the combatant and spawn at the spawn point (spawn ID 0). This procedure is needed to have our non-battle, hidden player.

Join Group #
Add Node > Group > Group > Join Group
First, we’ll add Princess to the player group. This will automatically join a combatant to the group’s battle group as well, unless no free slot is available.
- Group Origin
Select Active Player Group.
This’ll join the combatant to the currently active player group. - Combatant
Select Princess.
Leave Battle Group #
Add Node > Group > Battle Group > Leave Battle Group
We remove the Princess from the battle group, since she shouldn’t stain her hands with blood.
- Group Origin
Select Active Player Group. - Combatant
Select Princess. - Destroy Prefab
Disable this setting.
Our player isn’t yet spawned, but keep this setting in mind in case you do this when the player already is spawned.
Hide Member #
Add Node > Group > Group > Hide Member
And now we’ll hide the Princess – she’s still part of the group (and the player), but will be hidden, i.e. not listed when showing group members.
- Group Origin
Select Active Player Group. - Hide/Unhide
Enable this setting. - Combatant
Select Princess.
Spawn ORK Player #
Add Node > Game > Player > Spawn ORK Player
Now, we’ll spawn the player in the scene.
- Spawn At
Select Spawn Point. - Spawn Point ID
Set to 0.
And that’s it for the schematic. Click on Save Schematic to save it, e.g. as StartGame.
I usually save all my schematics in Assets/Schematics/ and sub folders of it.
Start Menu #
We don’t use a start menu in our game (we just hit play in the Town scene), but we’ll need to set up our start schematic.
Navigate to UI > Start Menu and change the following settings.
New Game Settings #
- Start Schematic
Select the StartGame schematic.
Save Changes #
And that’s it – we’re ready to take our player for a test walk!
Don’t forget to save your changes by clicking on Save Settings at the bottom of the editor.
Testing #
Alright – let’s take a walk. With the Town scene still open, hit play.

Great, we spawn, can walk around and the camera border is doing it’s job. The player’s sprite currently rotates into the movement direction – we’ll fix that in the next part!
Next, we’ll set up the interaction controller, music and some other things.


