
In this tutorial we’ll set up our first abilities.
The regular/base attack will deal physical damage to HP using a formula, which we’ll also set up. We’ll also set up a poison attack, that does reduced damage and adds poison to the target.
All abilities we’ll set up in this tutorial series (both physical and magical) will be very simple, we don’t use any hit chance or critical hit calculations – each attack will hit and deal regular damage.
We’ll also take a look at target selection templates – they’re used by abilities and items to define the targets that are available, e.g. targeting a single enemy or ally, a group of enemies, etc.
We’ll set up
- damage formulas
- target selection templates (only look at them)
- ability types
- 2 abilities
Let’s get to it!
Formulas #
We’ll start with setting up 2 formulas, one for physical and one for magical damage.
Formulas work as a steb-by-step calculation, calculating each node at a time to the current formula result. We’ll use sub-calculations (via Begin Sub Calculation and End Sub Calculation nodes) to make sure the math is still correct.
Open the Makinom editor and navigate to Game > Formulas. We’ll change the already added Default formula and add an additional formula. You can optionally use formula types for organizing them in the editor, but it’s not required (and isn’t part of this tutorial series).
Calculating Damage #
The physical damage is calculated like this:
User.ATK / ((50 + Target.DEF) / 50)
It uses the following values:
- User.ATK
The user’s ATK status value. - Target.DEF
The target’s DEF status value.
Due to how formulas work, we’ll pack the 2nd half of the formula ((50+Target.DEF) / 50) into a sub-calculation.
For magical damage, just replace ATK with MATK and DEF with MDEF.
0: Physical Damage #
This formula calculates the physical damage, using a sub calculation for the defence part of the formula.
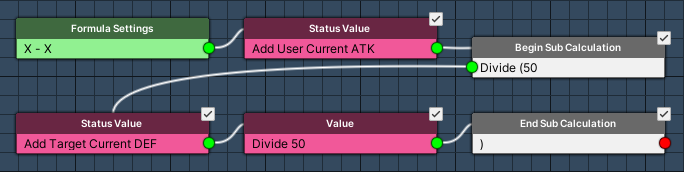
Formula Settings #
- Name
Set to: Physical Damage
Status Value #
Add Node > Combatant > Status Value
Add the user’s ATK.
In case using the formula uses an initial value (a starting value passed to the formula), the ATK is added to that value, increasing the used ATK value.
- Operator
Select Add. - Status Origin
Select User. - Status Value
Select ATK.
Begin Sub Calculation #
Add Node > Base > Begin Sub Calculation
This node starts a sub calculation.
The result of the sub calculation (ending using an End Sub Calculation node) is added to the current formula result using this node’s operator.
We’ll divide the current formula result by the sub calculation’s result. We’ll also immediately set the sub calculation’s current value to 50.
- Operator
Select Divide. - Initial Value
Select Value > Value.
Set the value to 50.
Tip! You can also have sub calculations within your sub calculations!
Status Value #
Add Node > Combatant > Status Value
Add the target’s DEF.
- Operator
Select Add. - Status Origin
Select Target. - Status Value
Select DEF.
Value #
Add Node > Value > Value
Divide by 50.
- Operator
Select Divide. - Value
Select Value > Value.
Set the value to 50.
End Sub Calculation #
Add Node > Base > End Sub Calculation
This ends our sub calculation, using it’s Begin Sub Calculation node’s operator to change the formulas value.
Any open sub calculation is closed at the end of a formula, i.e. we don’t really need to add this node, but it’s better to keep things clean and organized – every Begin Sub Calculation node should have an End Sub Calculation node.
No further settings needed.
1: Magical Damage #
This formula calculates the magical damage and works exactly like the physical damage formula, just with different status values.
So, we’ll copy the Physical Damage formula and change the status values.

Formula Settings #
- Name
Set to: Magical Damage
Status Value #
Change the 1st Status Value node’s status value to MATK.
- Status Value
Select MATK.
Status Value #
Change the 2nd Status Value node’s status value to MDEF.
- Status Value
Select MDEF.
Target Selection Templates #
As said, target selection templates define the target selection that is used by abilities and items. You can learn more about them in this documentation.
We’ll mainly use them in the form of the default target selections, which define templates that are used for e.g. Enemy Single or Ally Single selections.
A new project already has a wide range of templates set up and used for the default target selections – we don’t need to do any setup for our tutorial, but we’ll check out 2 of them to see how they work.
Navigate to Templates > Target Selection Templates and select the Enemy Single template.
Enemy Single #
This template is used for abilities and items that target a single enemy. Our tutorial project is pretty simple and doesn’t use any advanced setup like use ranges or affect ranges, so the target selections are mainly using 2 settings – Target Type (e.g. enemy or ally) and Target Range (e.g. single or group).
Target Settings #
- Target Type
Select Enemy. - Target Range
Select Single.
Ally Single #
Select the Ally Single template.
This template uses the Ally target type to target a single ally instead of an enemy.
Target Settings #
- Target Type
Select Ally. - Target Range
Select Single.
Default Target Selections #
The default target selections are set up in Battles > Target Settings.
A new project already uses the default templates that are created for the corresponding default target selections, e.g. Enemy Single and Ally Single.
We don’t need to change anything here, just remember that you can change them here. Also, ability types and item types can override the default target selections with custom templates for all abilities/items of their type.
Ability Types #
Ability types used to organize abilites, e.g. for displaying them in menus. Learn more about ability types in this documentation.
Navigate to Status > Ability Types, we’ll change the Default type and add additional types.
0: Skills #
Physical attacks will be using this ability type.
Content Information #
- Name
Set to: Skills
Ability Type Settings #
- Damage Type
Select Default.
The damage type manages which animations will be used on targets to animate damage, evade, etc.
The default damage type is already set up to use the default animation types added for these.
1: Spells #
Magical attacks will be using this ability type.
Copy the Skills ability type and change the following settings.
Content Information #
- Name
Set to: Spells
2: Support #
Support abilities will be using this ability type.
Copy the Spells ability type and change the following settings.
Content Information #
- Name
Set to: Support
Attack Ability #
Our first ability will be the standard attack of our combatants. We’ll set up more physical and magical abilities (also adding status effects) in a later tutorial.
Navigate to Status > Abilities, we’ll change the Default ability.
Content Information #
- Name
Set to: Attack - Sprite (Icon)
Select icons_332.
Click on the Find TMP Tag button to get the icon’s tag for displaying it in texts (via text codes). This uses TextMesh Pro’s sprite asset setup.
Ability Settings #
- Ability Type
Select Skills. - Useable In
Select Battle.
The attack is only available in battles.
Target Selection Settings #
These settings define who can be targeted by the ability.
We’ll use the Enemy Single default target selection (i.e. the target selection template we looked at previously).
- Target Selection Type
Select Default Enemy > Enemy Single.
Target Settings #
The target settings handle status changes on targets.
Target Changes #
Click on Add Target Change.
- Use Sound Type
Enable this setting.
We’ll play a sound type on the target when the attack hits (i.e. when it’s outcome is calculated). - Sound Type
Select Hit.
Click on Add Status Change. We’ll deal damage to HP.
- Change Type
Select Status Value. - Status Value
Select HP. - Operator
Select Sub. - Change Value
Select Value > Formula.
Select the Physical Damage formula.
Poison Attack Ability #
The poison attack ability is very similar to the attack, but it’ll cost 3 MP to use it. The ability will be used by enemies.
Copy the Attack ability and change some settings.
Content Information #
- Name
Set to: Poison Attack - Sprite (Icon)
Select icons_311.
Click on the Find TMP Tag button to get the icon’s tag for displaying it in texts (via text codes). This uses TextMesh Pro’s sprite asset setup.
User Settings > Use Cost > Status Changes #
Using the ability costs 3 MP.
Click on Add Status Change.
- Change Type
Select Status Value. - Status Value
Select MP. - Operator
Select Sub. - Change Value
Select Value > Value.
Set the value to 3.
Target Settings > Target Changes > Target Change 0 > Status Change 0 #
We’ll reduce the damage by changing the efficiency of the status change.
The poison attack should only do half the damage of the regular attack.
- Efficiency
Select Value > Value.
Set the value to 0.5.
Target Settings > Target Changes > Target Change 0 > Status Change 1 #
However, we add another status change to add the Poison effect to the target.
Click on Add Status Change and change the following settings in the new Status Change 1.
- Change Type
Select Status Effect. - Change Type
Select Add. - Status Effect
Select Poison.
Save Changes #
And that’s it for now – we’ll later return to those abilities to set up how they’re animated in battles (using schematics).
Save the changes using the Save Settings button at the bottom of the editor.
Next, we’ll continue the player’s setup.


