
In this tutorial we’ll set up a shop.
We’ll set up a shop layout, a shop and a shop interaction in the World scene. Additionally, we need to set up a quantity selection, to select how many items are bought or sold.
You can learn more about shops in this documentation.
Quantity Selection #
First, we’ll handle the quantity selection. They’re used to, well, select quantities – for this they’re using int inputs, e.g. an int slider or int button input (see the initial Unity UI setup tutorial).
Navigate to UI > Quantity Selections, we’ll change the Default quantity selection.
Base Settings #
- Name
Set to Shop Quantity. - UI Box
Select Blue Center Fit.
Content Settings #
- Text (Message Content)
Set to: <b><name></b>
Price: <price>
Total: <pricetotal>
Quantity Changes #
We’ll use horizontal input to change the quantity, this should be the default setup (but we’ll enable looping as well).
- Use Horizontal Change
Enable this setting.
Horizontal input will change the quantity. - Loop Horizontal
Enable this setting.
We change loop between highest/lowest value. - Horizontal Change
Select Value > Value.
Set the value to 1.
Additionally, we’ll set up horizontal input for +/-10 quantity changes (no looping).
- Use Vertical Change
Enable this setting. - Vertical Change
Select Value > Value.
Set the value to 10.
Quantity changes are displayed (and changed) using int inputs, you should already have int input prefabs set up by following the initial Unity UI setup tutorial. You can use a different input than the default (defined in UI > UI System) by selecting a prefab in the Custom Input Prefab setting.
I’ll use an int button input.
- Custom Input Prefab
Select a Int Button prefab with an int input setup.
You can create ready-to-use setups using the scene hierarchy context menu: Makinom > UI Box > Input (Value) > Int Button Horizontal
Input Content #
Defines the content displayed by the int input.
The default setup should be enough for us.
- Text
Set to: Quantity
The quantity value is displayed using Additional Content.
- Content ID
Set to value. - Text
Set to: <value>/<max>
Shop Layout #
Shop layouts are used to display a shop’s content and can be shared by multiple shops.
We’ll set up a simple layout using the UI boxes we already created for our menu screens – displaying item types, the list of shop items, a description and information (e.g. how many of the selected item are already in the inventory or equipped).
General Settings #
Navigate to UI > Shop Layouts > General Settings, we’ll first set up a background for the shop (same as for our menu screens).
General Backgrounds #
Click on Add General Background.
- UI Layer
Select Background. - Prefab
Select the Menu Background prefab we just created.
Backgrounds can also use schematics to animate opening/closing them, just like UI boxes, HUDs or flying texts.
I’m using the simple fade in and fade out schematics from the UI animations schematics to animate this UI box.
- Before Open Schematic
Select the UIFadeIn schematic. - Wait
Enable this setting. - Before Close Schematic
Select the UIFadeOut schematic. - Wait
Enable this setting.
Layout #
Navigate to UI > Shop Layouts, we’ll change the Default layout.
Buy/Sell Box #
This allows us to dislpay a buy/sell selection when opening the shop.
- Show Buy/Sell
Enable this setting. - UI Box
Select Blue Center Fit. - Show Title
Enable this setting. - Text (Title Content)
Set to: <name>
The rest of the buy/sell box settings should be correct as they are – having 3 buttons, Buy, Sell and Exit.
Type Box #
Display item types of the shop’s content (or the player’s inventory when selling).
- Type Display
Select UI Box. - UI Box
Select Blue Top Right Fit. - Merge Sub Types
Enable this setting.
This’ll merge our weapon and armor sub types into their parent types. - Show Title
Enable this setting. - Text (Title Content)
Set to: <shopname>: <name> - Add Back Button
Select Last. - Sort By
Select ID.
List Box #
Displays the items, equipment and other things that are sold by or to the shop.
- UI Box
Select Blue Menu Center Scroll. - Show Title
Enable this setting. - Text (Title Content)
Set to: <name> - Add Back Button
Select Last. - Sort By
Select ID.
The Content Layout defines the content of the button. The default setup should already work for us, showing icon and text (name) of the item and the info as additional content. In shops, the info displays the buy/sell price (depending on the shop’s current mode).
Description Box #
- Show Description
Enable this setting. - UI Box
Select Blue Top Left Fit. - Show in Buy/Sell
Disable this setting.
We don’t need to display the description in the buy/sell box.
The rest of the description box settings can be left as they are.
Info Box #
We’ll display how many of a selected item are already in the inventory or equipped, as well as the current gold the player owns.
- Show Info
Enable this setting. - UI Box
Select Blue Bottom Left Fit. - Text (Information Page 0 > Message Content)
Set to: In Inventory: <inventory>Equipped: <equipped><currency.name=2f15e4fb-ec14-4ce4-aecc-e99d6d6149c4>: <currency.inventory=2f15e4fb-ec14-4ce4-aecc-e99d6d6149c4>
Please note that the GUID of your currency might vary, so please use the buttons above the text editor to add that information. Click on the More button while editing the text to show more text code options.
See the overview menu tutorial for a more detailed explanation.
That’s it for the shop layout.
Price Texts #
Since we display prices in our shops, let’s set up a better display for our price texts.
Navigate to UI > Text Display Settings.
Formatting Texts > Price Texts #
These texts handle how buy and sell prices are displayed when they’re displayed as info content, e.g. in shops.
We’ll show the currency’s icon after the price, as well as a different text for free items (price 0).
Buy Price Text #
- Use Price 0 Text
Enable this setting.
This allows us to show a different text for items that are priced 0, i.e. they are free. - Text (Price Text)
Set to: <price> <icon> - Text (Price 0 Text)
Set to: <color=#00FF00FF>FREE</color>
Sell Price Text #
- Text (Price Text)
Set to: <price> <icon>
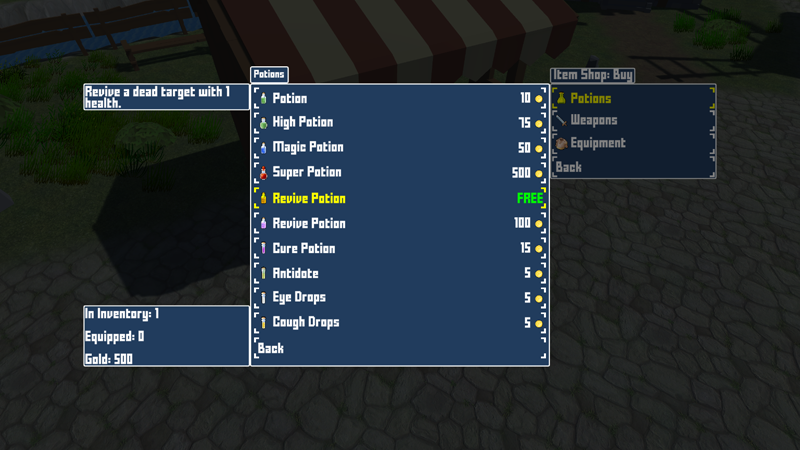
Shop #
Now it’s finally time to set up our shop’s content.
Navigate to Inventory > Shops, we’ll change the Default shop.
Content Information #
- Name
Set to: Item Shop
Shop Settings #
- Shop Layout
Select Default. - Block Control
Enable this setting. - Save Shop
Enable this setting.
The shop’s content is saved (when the Shop Interaction) uses a shop ID.
We’ll use this to keep track of a free item we’ll add to the shop.
Pause Settings #
- Pause Game
Enable this setting. - Freeze Pause
Enable this setting.
Currency Settings #
- Currency
Select Gold.
Items #
We’ll add several items – the order in which they’re added here doesn’t really matter, since the shop layout sorts them by ID for us (according to our setup).
Item 0 #
Let’s start with the free item, a Revive Potion.
Click on Add Item.
- Item
Select Revive Potion. - Limit Quantity
Enable this setting. - Quantity
Select Value > Value.
Set the value to 1. - Override Price
Enable this setting. - Price
Select Value > Value.
Set the value to 0.
Item 1 #
The rest of the items are regular purchases, so the setup is pretty simple – just adding and selecting items.
Click on Add Item.
- Item
Select Potion.
Item 2 #
Click on Add Item.
- Item
Select High Potion.
Item 3, 4, etc. #
You know how to do this now, add the following items.
- Magic Potion
- Super Potion
- Revive Potion
- Cure Potion
- Antidote
- Eye Drops
- Cough Drops
Equipment #
The setup for equipment is the same as for items.
Equipment 0 #
Click on Add Equipment.
- Equipment
Select Dagger 1.
Equipment 1, 2, etc. #
Add additional equipment to your liking.
E.g. I’m adding everything up to the Scope accessory.
Save Changes #
And that’s it for the editor setup
Don’t forget to save your changes by clicking on Save Settings at the bottom of the editor.
Adding a shop to the scene #
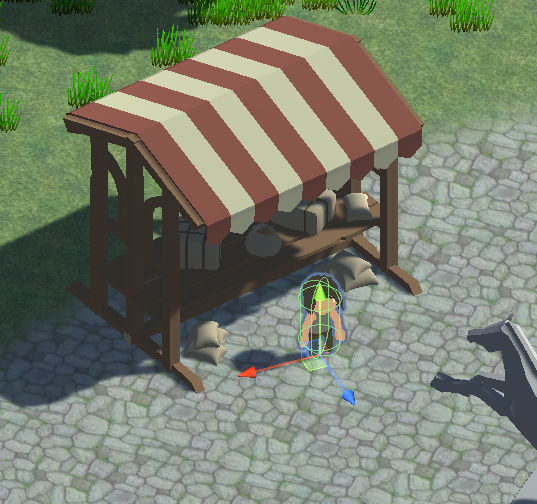
Now, we finally add the shop to the town. Open the World scene (Assets/Scenes/) and add one of the NPC prefabs to the town area.
You can find the NPC prefabs in Assets/Tutorial Assets/Prefabs/NPCs/ – I’m using the Casual3_Female prefab and place it in front of the market stand in the center of the town.
Shop Interaction #
Add a Shop Interaction component to the NPC’s game object, either using the component menu or the Makinom scene wizard.
- Use Shop ID
Enable this setting.
This allows saving the shop’s content (to keep track of our free item being gone or not).
There should automatically be a shop ID assigned to the shop interaction, but you can also set it to something else instead of using the complicated generated GUID.
Shop Settings #
- Shop
Select Item Shop.
Start Settings #
The interaction should already default to using Interact start type, of not, click on the Interact button to conveniently set it up.
However, we’ll adjust the Object Turn Settings to let player and NPC turn to each other.
- Turn Starting Object
Enable this setting.
This turns the player (who’s starting the interaction). - Turn Machine Object
Enable this setting.
This turns the NPC (who’s the machine interaction).
And that’s it – save the scene.
Testing #
Hit play, go to the shop NPC and interact with it.


Success!
Next, we’ll make our way to the dungeon – through random battles!


