ORK Framework Logo - RPG Editor for Unity
  • Features
  • Showcase
  • Guide
    • Documentation
    • Tutorials
    • API
  • ORK 2
    • Tutorials
    • Plugins
    • API
  • Support
  • Forum
  • Get ORK

Status System Setup

  • START Status System Setup
  • 01 Status Values
  • 02 Status Development
  • 03 Attack/Defence Modifiers
  • 04 Status Effects
  • 05 Formulas
  • 06 Ability & Item Types
  • 07 Abilities Part 1: Attacks
  • 08 Abilities Part 2: Support & Sabotage
  • 09 Abilities Part 3: Elemental Magic
  • 10 Items
  • 11 Equipment Part 1: Slots & Slot Set Templates
  • 12 Equipment Part 2: Weapons
  • 12.5 (Optional) Equipment Part 2.5: Weapons
  • 13 Equipment Part 3: Shields, Armor & Accessories
  • 13.5 (Optional) Equipment Part 3.5: Shields, Armor & Accessories
  • 14 Equipment Part 4: Available Equipment Templates
  • 15 Loot
  • 16 Battle AIs
  • 17 Combatants Part 1: General Settings
  • 18 Combatants Part 2: Players
  • 19 Combatants Part 3: Enemies
  • 20 Combatant Groups
  • END Status System Setup

3D RPG Playground

  • START 3D RPG Playground
  • 01 Player Setup
  • 02 Start Menu
  • 03 First Interaction
  • 04 Music
  • 05 Areas
  • 06 Collecting Items
  • 07 Displaying Equipment
  • 08 Combatant Prefabs, Icons & Portraits
  • 09 Combatant Animations
  • 10 Camera Positions
  • ANIM 01 Battle Start/End Schematics
  • ANIM 02 Use, Cast & Camera
  • ANIM 03 Abilities & Items
  • ANIM 04 Physical Attacks
  • ANIM 05 Special Actions
  • BATTLE 01 Battle Menu
  • BATTLE 02 Prepare for Battle
  • TURN 01 Turn Based Setup
  • TURN 02 Turn Order HUD
  • ATB 01 Active Time Setup
  • ATB 02 Cast Times
  • ATB 03 Timebar HUD
  • BATTLE 03 The First Battle
  • BATTLE 04 Hunting Move AI
  • BATTLE 05 Spawning Combatants
  • 11 Save Games
  • MENU 01 UI Boxes
  • MENU 02 Template HUDs
  • MENU 03 Overview Menu
  • MENU 04 Menu Screens
  • 12 Shop
  • BATTLE 06 Random Battles
  • DUNGEON 01 Enter the Dungeon
  • DUNGEON 02 The Trapdoor
  • DUNGEON 03 Enemies on Level 1 & 2
  • DUNGEON 04 Traps on Level 3
  • DUNGEON 05 Going Deeper
  • 13 Bestiary (+MENU+ANIM)
  • QUEST 01 Hunting Quests (+MENU)
  • QUEST 02 Guard NPC
  • QUEST 03 Forest Ruin Cheese
  • QUEST 04 Witch NPC with Cheese
  • QUEST 05 Quest Mark HUDs
  • 14 Research Trees (+MENU)
  • CRAFT 01 Crafting Materials
  • CRAFT 02 Crafting Recipes
  • CRAFT 03 Crafting Menu
  • CRAFT 04 Crafting Proficiency & Critical Crafting
  • CRAFT 05 Materials Loot
  • 15 Changing Choice Dialogue
  • 16 Follow Me!
  • BATTLE 07 Sequence Loot Dialogue

3D Action RPG

  • START 3D Action RPG
  • 01 Status System Setup
  • 02 Player Setup
  • 03 Player Weapon
  • 04 Player Attacks
  • 05 Enemy: Chomper
  • 06 Chomper Attack
  • 07 Hit & Death
  • 08 HUDs
  • 09 Rolling on the Floor
  • 10 Enemy: Spitter
  • 11 Spit Attack
  • 12 Potion
  • 13 Grenade
  • 14 Item HUD
  • 15 Enemy: Grenadier
  • 16 Grenadier Melee Attacks
  • 17 Grenadier Flamethrower
  • 18 Item Drops
  • END 3D Action RPG

2D Grid Battle RPG

  • START 2D Grid Battle RPG
  • 01 Player Setup
  • 02 Prefab & Music Setup
  • 03 Randomizing Combatants
  • 04 UI Setup
  • 05 Battle Start, End & Phase Schematics
  • 06 Battle System Setup
  • 07 Battle Grid Setup
  • 08 Grid Move
  • 09 Forest Battle Grid
  • 10 Battle AI
  • 11 Ability Ranges
  • 12 Death & Use Schematics
  • 13 Attack Schematic
  • 14 Shoot Schematics
  • 15 Battle Selection Interaction
  • END 2D Grid Battle RPG

Schematics

  • Simple Start Schematic
  • Battle Start Schematic
  • Battle End Schematic
  • Moving to Target and Back
  • Animating a Base Attack
  • Animating a Magic Ability
  • Grid Movement
  • Open and Close UI Animations
  • Flying Text Mover

UI Setups

  • Unity UI: Initial Setup
  • Unity UI: TextMesh Pro Setup
  • Unity UI: UI Box
  • Unity UI: Flying Text
  • Unity UI: Dragging Notification
  • Unity UI: Interaction HUD
  • Unity UI: Simple Player HUD
  • Unity UI: Quest HUD
  • Unity UI: Shortcuts HUD
  • Unity UI: Currency HUD
  • Unity UI: Tooltip HUD
  • Unity UI: Control HUD
  • Unity UI: Attack Modifiers
  • Unity UI: Defence Modifiers

Gameplay Bits

  • Combining Input Origins
  • Combining Status Value Flying Texts
  • Fun With Flying Text
  • HUD Effects With Conditional Schematics
  • Inventory Containers
  • Multi Interaction Controllers
  • World Space HUD
  • World Space Dialogue
  • Home
  • Guide
  • Tutorials
  • UI Setups
  • Unity UI: Currency HUD

Unity UI: Currency HUD

Table of Contents
  • HUD Prefab Setup
    • Rect Transform
    • Currency
      • Rect Transform
      • HUD Combatant Item
      • HUD Tooltip (Optional)
    • Currency Content
      • Rect Transform
      • ORK HUD Status Text Content
      • Image
      • Text
    • Create Prefab
  • HUD Setup
    • HUD Settings
    • Combatant Settings
    • Display Conditions
    • Unity UI
    • Schematics
    • Save Changes
  • Testing
  • Tip: Other items
  • Tip: Use as a template
    • Combatant (Part)
      • Entry Page 0

Create a simple HUD displaying the player’s currency using the Unity UI module.

In this tutorial we’ll create a Combatant type HUD to display the icon and quantity of the player’s currency.

Your project’s UI system should already be set to use the Unity UI module. If not, check the initial setup tutorial for the Unity UI module.

HUD Prefab Setup #

HUDs use prefabs to create their content when using the Unity UI module.

Use the scene hierarchy’s context menu to create the base HUD: Makinom > HUD > HUD

We’ll create a HUD without any layout.

Rect Transform #

Let’s display the HUD in the lower left corner of the screen.

Change the settings in the following order.

Select the bottom left anchor preset.

  • Pivot
    Set to X=0, Y=0.
  • Pox X
    Set to 50.
  • Pos Y
    Set to 50.
  • Width
    Set to 200.
  • Height
    Set to 50.

For your own HUD, you can naturally use the placement and size that best matches your project and UI.

Currency #

Add an empty game object to the HUD game object and name it Currency.

Rect Transform #

Select the stretch stretch anchor preset.

  • Left
    Set to 0.
  • Top
    Set to 0.
  • Right
    Set to 0.
  • Bottom
    Set to 0.

HUD Combatant Item #

Add a HUD Combatant Item component to the Currency child object using the component menu.

This component uses a defined item, currency, equipment, etc. as the content for other HUD components – we’ll use it to select the currency we want to display. Any components we add to this game object or it’s child objects will automatically select it as it’s content provider, i.e. use the defined currency for content display.

The component itself will (in our setup) use the HUD’s combatant to get the item.

  • Type
    Select Currency.
  • Currency
    Select the currency you want to use.
    E.g. Gold when you create this for the 3D RPG Playground project.
  • Show Empty
    Enable this setting.
    If the combatant doesn’t have any of the defined currency, it’ll be displayed with a quantity of 0.
    Otherwise the game object would be disabled.

HUD Tooltip (Optional) #

If you want to display a Tooltip HUD when the cursor is over the currency HUD, add a HUD Tooltip component to the Currency child object using the component menu.

The Content Provider will automatically use the HUD Combatant Item component as it’s content provider, displaying the tooltip for the selected currency.

Currency Content #

Use the scene hierarchy context menu on the Currency child object to add a text and icon content: ORK Framework > HUD > Content > Status Text+Icon Content

Rect Transform #

Select the Status Content child object that was created, we’ll adjust it’s positioning to match it’s parent.

Select the stretch stretch anchor preset.

  • Left
    Set to 0.
  • Top
    Set to 0.
  • Right
    Set to 0.
  • Bottom
    Set to 0.

ORK HUD Status Text Content #

This component defines the content that’s displayed.

We want to display currency content, while there is no specific status type for currency available, you can display all of the currencies information using the Shortcut status type.

When displaying an item instead of currency, you can e.g. use the Item status type to show item specific information.

  • Status Type
    Select Shortcut.
  • Use Content Icon
    Enable this setting.
    This’ll show the icon of the displayed content, i.e. the currency.
  • Default Content
    Set to: <quantity>

Image #

The Status Content > Image child object will display the icon of the currency.

If you want to adjust the size of the icon, you can e.g. use a Layout Element component and set a preferred width/height for the image.

Text #

The Status Content > Text child object will display the text, i.e. the quantity.

You can adjust the font, color and other settings in the TextMeshPro – Text (UI) component – let’s adjust it a bit.

  • Font Size
    Set to 20.
  • Vertex Color
    Select a yellow color.

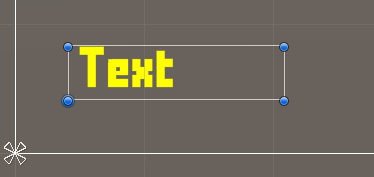
The finished HUD will now look something like this.

Create Prefab #

Create a prefab out of the HUD, e.g. save it as Currency HUD.

We’re done with the prefab setup, you can now remove the canvas.

HUD Setup #

Navigate to UI > HUDs and add a new HUD.

HUD Settings #

  • Name
    Set to Currency.
  • HUD Type
    Select Combatant.
  • Auto Display
    Enable this setting.
    This will automatically show the HUD. If you use a HUD only as a template, make sure to disable this setting.

Combatant Settings #

We only display this HUD for the player combatant, i.e. the leader of the player group.

  • Only Leaders
    Enable this setting.
  • Player
    Enable this setting.

Display Conditions #

You can use these settings to only show the HUD based on conditions. E.g. only when the player controls are active, etc.

We’ll ignore this for now.

Unity UI #

  • UI Layer
    Select HUDs (or any other UI layer you want the HUD to display on).
    UI layers are used to organize your UI, learn more in the Makinom documentation.
  • HUD Prefab
    Select the HUD prefab you just created.

Schematics #

You can optionally use schematics to animate opening and closing the HUD, e.g. fading it in/out. You can also set up default schematics for all HUDs.

See this tutorial for details.

Save Changes #

And that’s it for the HUD setup.

Don’t forget to save your changes by clicking on Save Settings at the bottom of the editor.

Testing #

Hit play and test your HUD – naturally, you need some of that currency, or it’ll just display with 0.

The in-game HUD will display the currency’s icon and current quantity in the player’s inventory.

Tip: Other items #

You can use a similar setup to display other items, equipment or abilities (via the HUD Combatant Ability component instead of the HUD Combatant Item component).

This can also include additional information, e.g. reuse times, equipment durability and more.

See this tutorial from the 3D Action RPG series, which uses a similar set up display the potions and grenades of the player.

Tip: Use as a template #

You can use such a setup as a template, e.g. to use it in menu screens.

For this, disable the Auto Display settinf or the HUD (i.e. it’ll not be displayed as a regular HUD, but you can also keep it on in case you still want to display it regularly).

In your menu screen, add a Combatant menu part.

Combatant (Part) #

  • UI Box
    Select the UI box that should display the information.
  • Combatant Scope
    Select Current.
    This’ll use the current menu user, i.e. usually the player.

Entry Page 0 #

The already added Entry Page will define the content that’s displayed. We add our HUD template here.

  • Add HUD
    Enable this setting.
  • HUD
    Select the Currency HUD you created.

Don’t forget to save your changes by clicking on Save Settings at the bottom of the editor.

UI
Share This Article :
  • Facebook
  • Twitter
  • LinkedIn
  • Pinterest
Updated on February 25, 2022
Table of Contents
  • HUD Prefab Setup
    • Rect Transform
    • Currency
      • Rect Transform
      • HUD Combatant Item
      • HUD Tooltip (Optional)
    • Currency Content
      • Rect Transform
      • ORK HUD Status Text Content
      • Image
      • Text
    • Create Prefab
  • HUD Setup
    • HUD Settings
    • Combatant Settings
    • Display Conditions
    • Unity UI
    • Schematics
    • Save Changes
  • Testing
  • Tip: Other items
  • Tip: Use as a template
    • Combatant (Part)
      • Entry Page 0
Sitemap
  • Features
  • Showcase
  • Guide
    • Documentation
    • Tutorials
    • API
  • ORK 2 Hub
    • Tutorials
    • Plugins
    • API
  • Support
  • Forum
  • Get ORK
  • Contact
  • Blog
  • Makinom
  • gamingislove.com
Categories
  • News (59)
  • ORK 2 (137)
    • Tutorial (137)
      • Game tutorial (50)
      • Gameplay (32)
      • How-to (55)
  • Release (129)
Search

© 2015 Gaming is Love e.U.

Disclosure: This site may contain affiliate links, which means I may receive a commission if you click a link and purchase something that I have recommended. While clicking these links won’t cost you any money, they will help me fund my development projects while recommending great assets!