ORK Framework Logo - RPG Editor for Unity
  • Features
  • Showcase
  • Guide
    • Documentation
    • Tutorials
    • API
  • ORK 2
    • Tutorials
    • Plugins
    • API
  • Support
  • Forum
  • Get ORK

2D RPG Quickstart

30
  • START 2D RPG Quickstart
  • 01 Initial Setup
  • 02 Player Setup
  • 03 Music & Scenes
  • 04 UI System Setup
  • 05 UI Boxes
  • 06 Flying Texts
  • 07 Status Values
  • 08 Status Effects
  • 09 First Abilities
  • 10 Fighter Setup
  • 11 First Enemies & Battle AI
  • 12 Battle System Setup
  • 13 Animating Battle Start and End
  • 14 Random Battles
  • 15 Animating Actions
  • 16 Player Battle HUD
  • 17 Elemental Attacks
  • 18 Animating More Actions
  • 19 Inventory & Loot
  • 20 Equipment
  • 21 Loot, Start Equipment & Viewers
  • 22 Magic Abilities
  • 23 Caster Setup
  • 24 More Enemies
  • 25 Start Menu & Save Games
  • 26 Menu Screens
  • 27 Interactions
  • 28 Item Collectors
  • END 2D RPG Quickstart

3D RPG Quickstart

30
  • START 3D RPG Quickstart
  • 01 Initial Setup
  • 02 Player Setup
  • 03 Music & Scenes
  • 04 UI System Setup
  • 05 UI Boxes
  • 06 Flying Texts
  • 07 Status Values
  • 08 Status Effects
  • 09 First Abilities
  • 10 Fighter Setup
  • 11 First Enemies & Battle AI
  • 12 Battle System Setup
  • 13 Animating Battle Start and End
  • 14 Random Battles
  • 15 Animating Actions
  • 16 Player Battle HUD
  • 17 Elemental Attacks
  • 18 Animating More Actions
  • 19 Inventory & Loot
  • 20 Equipment
  • 21 Loot, Start Equipment & Viewers
  • 22 Magic Abilities
  • 23 Caster Setup
  • 24 More Enemies
  • 25 Start Menu & Save Games
  • 26 Menu Screens
  • 27 Interactions
  • 28 Item Collectors
  • END 3D RPG Quickstart

Status System Setup

24
  • START Status System Setup
  • 01 Status Values
  • 02 Status Development
  • 03 Attack/Defence Modifiers
  • 04 Status Effects
  • 05 Formulas
  • 06 Ability & Item Types
  • 07 Abilities Part 1: Attacks
  • 08 Abilities Part 2: Support & Sabotage
  • 09 Abilities Part 3: Elemental Magic
  • 10 Items
  • 11 Equipment Part 1: Slots & Slot Set Templates
  • 12 Equipment Part 2: Weapons
  • 12.5 (Optional) Equipment Part 2.5: Weapons
  • 13 Equipment Part 3: Shields, Armor & Accessories
  • 13.5 (Optional) Equipment Part 3.5: Shields, Armor & Accessories
  • 14 Equipment Part 4: Available Equipment Templates
  • 15 Loot
  • 16 Battle AIs
  • 17 Combatants Part 1: General Settings
  • 18 Combatants Part 2: Players
  • 19 Combatants Part 3: Enemies
  • 20 Combatant Groups
  • END Status System Setup

3D RPG Playground

53
  • START 3D RPG Playground
  • 01 Player Setup
  • 02 Start Menu
  • 03 First Interaction
  • 04 Music
  • 05 Areas
  • 06 Collecting Items
  • 07 Displaying Equipment
  • 08 Combatant Prefabs, Icons & Portraits
  • 09 Combatant Animations
  • 10 Camera Positions
  • ANIM 01 Battle Start/End Schematics
  • ANIM 02 Use, Cast & Camera
  • ANIM 03 Abilities & Items
  • ANIM 04 Physical Attacks
  • ANIM 05 Special Actions
  • BATTLE 01 Battle Menu
  • BATTLE 02 Prepare for Battle
  • TURN 01 Turn Based Setup
  • TURN 02 Turn Order HUD
  • ATB 01 Active Time Setup
  • ATB 02 Cast Times
  • ATB 03 Timebar HUD
  • BATTLE 03 The First Battle
  • BATTLE 04 Hunting Move AI
  • BATTLE 05 Spawning Combatants
  • 11 Save Games
  • MENU 01 UI Boxes
  • MENU 02 Template HUDs
  • MENU 03 Overview Menu
  • MENU 04 Menu Screens
  • 12 Shop
  • BATTLE 06 Random Battles
  • DUNGEON 01 Enter the Dungeon
  • DUNGEON 02 The Trapdoor
  • DUNGEON 03 Enemies on Level 1 & 2
  • DUNGEON 04 Traps on Level 3
  • DUNGEON 05 Going Deeper
  • 13 Bestiary (+MENU+ANIM)
  • QUEST 01 Hunting Quests (+MENU)
  • QUEST 02 Guard NPC
  • QUEST 03 Forest Ruin Cheese
  • QUEST 04 Witch NPC with Cheese
  • QUEST 05 Quest Mark HUDs
  • 14 Research Trees (+MENU)
  • CRAFT 01 Crafting Materials
  • CRAFT 02 Crafting Recipes
  • CRAFT 03 Crafting Menu
  • CRAFT 04 Crafting Proficiency & Critical Crafting
  • CRAFT 05 Materials Loot
  • 15 Changing Choice Dialogue
  • 16 Follow Me!
  • BATTLE 07 Sequence Loot Dialogue

3D Action RPG

20
  • START 3D Action RPG
  • 01 Status System Setup
  • 02 Player Setup
  • 03 Player Weapon
  • 04 Player Attacks
  • 05 Enemy: Chomper
  • 06 Chomper Attack
  • 07 Hit & Death
  • 08 HUDs
  • 09 Rolling on the Floor
  • 10 Enemy: Spitter
  • 11 Spit Attack
  • 12 Potion
  • 13 Grenade
  • 14 Item HUD
  • 15 Enemy: Grenadier
  • 16 Grenadier Melee Attacks
  • 17 Grenadier Flamethrower
  • 18 Item Drops
  • END 3D Action RPG

2D Grid Battle RPG

17
  • START 2D Grid Battle RPG
  • 01 Player Setup
  • 02 Prefab & Music Setup
  • 03 Randomizing Combatants
  • 04 UI Setup
  • 05 Battle Start, End & Phase Schematics
  • 06 Battle System Setup
  • 07 Battle Grid Setup
  • 08 Grid Move
  • 09 Forest Battle Grid
  • 10 Battle AI
  • 11 Ability Ranges
  • 12 Death & Use Schematics
  • 13 Attack Schematic
  • 14 Shoot Schematics
  • 15 Battle Selection Interaction
  • END 2D Grid Battle RPG

Schematics

10
  • Simple Start Schematic
  • Battle Start Schematic
  • Battle End Schematic
  • Moving to Target and Back
  • Animating a Base Attack
  • Animating a Magic Ability
  • Animating Target Selection
  • Grid Movement
  • Open and Close UI Animations
  • Flying Text Mover

UI Setups

16
  • Unity UI: Initial Setup
  • Unity UI: TextMesh Pro Setup
  • Unity UI: UI Box
  • Unity UI: Flying Text
  • Unity UI: Dragging Notification
  • Unity UI: Canvas with Screen Space Camera
  • Unity UI: Interaction HUD
  • Unity UI: Simple Player HUD
  • Unity UI: Quest HUD
  • Unity UI: Battle Actions HUD
  • Unity UI: Shortcuts HUD
  • Unity UI: Currency HUD
  • Unity UI: Tooltip HUD
  • Unity UI: Control HUD
  • Unity UI: Attack Modifiers
  • Unity UI: Defence Modifiers

Gameplay Bits

13
  • 2.5D Setup
  • Body Part Weakpoint
  • Click Attack
  • Combining Input Origins
  • Combining Status Value Flying Texts
  • Fun With Flying Text
  • HUD Effects With Conditional Schematics
  • Inventory Containers
  • Local Multiplayer
  • Multi Interaction Controllers
  • Target Selection Lines
  • World Space HUD
  • World Space Dialogue
  • Home
  • Guide
  • Tutorials
  • Gameplay Bits
  • Target Selection Lines
View Categories

Target Selection Lines

Use target highlight prefabs with line renderers to create a line from user to selected target.

Selected targets can be highlighted in different ways – e.g. using a prefab to spawn a cursor on the target’s game object, blink the game object or HUD of the target in a color or play schematics. Using a prefab to highlight targets allows you to use additional visual cues via cursor prefab components.

In this tutorial, we’ll use a Target Selection Cursor: Line component to create a line between the user and target.

This tutorial is based on the 3D RPG Quickstart tutorials, but can be used for any kind of project.

Cursor Prefab #

All we need to do is make some changes to the cursor prefab that is used by the 3D RPG Quickstart tutorials.

You can find the Cursor prefab in Assets/Tutorial Assets/Prefabs/ – open it for editing (e.g. via double click on the prefab).

Line Renderer #

We’ll start with adding a Line Renderer component to the root Cursor game object. A line renderer is used to show a line in the game world.

Use the component menu to add a Line Renderer component.

We’ll now set up a few points for our line (they’ll be automatically adjusted in-game by the cursor component) and other line-related settings.
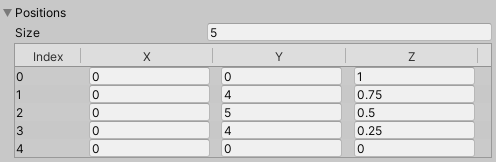
Positions #

Extend the Positions to get the list of added points, we’ll add a few to have a total of 5 points, we’ll need to change the Size for this.

  • Size
    Set to 5.

I’ll now list the Index and the X, Y and Z position used:

  • Index 0
    Set to X=0, Y=0, Z=1.
  • Index 1
    Set to X=0, Y=4, Z=0.75.
  • Index 2
    Set to X=0, Y=5, Z=0.5.
  • Index 3
    Set to X=0, Y=4, Z=0.25.
  • Index 4
    Set to X=0, Y=0, Z=0.

The line setup should now look like this:

Line Width #

The line is currently pretty thick – this is managed by the Width curve. You can e.g. have different widths along the line by adding multiple keys on the curve graph.

We’ll simply change the width to 0.2 by editing the added key. You can do this by right/context clicking on the small red dot on the red line in the graph:

Right/context click on the key and select Edit Key…

  • Value
    Set to 0.2.

Line Visuals #

We’ll continue with the remaining visual settings for the line.

  • Use World Space
    Enable this setting.
    It also works fine with this disabled, but in this case the line can be influenced by the scale of the game object (e.g. coming from the combatant it’s mounted to).

Expand the Materials setting and change the Element 0 material.

  • Element 0
    Select CursorMaterial (or any other material you want).
    Like with any other visual element in your scenes, the material handles the look and used shader of the line.

That’s it for the Line Renderer.

Target Selection Cursor: Line #

All that’s left to do is add the cursor component using the Line Renderer.

Use the component menu to add a Target Selection Cursor: Line component.

  • Line Renderer
    Select the Line Renderer component we just added to the same game object.
  • User Offset
    Set to X=0, Y=1, Z=0.
    Offset added to the line from the user’s position.
  • Target Offset
    Set to X=0, Y=1, Z=0.
    Offset added to the line from the target’s position.
  • Adjust Inline Positions
    Enable this setting.
    This’ll adjust the positions of the inner points (i.e. excluding index 0 and the last index of the line).
    They’ll be adjusted according to the position placement along the Z-axis used as a scale from 0 to 1 on how far it is from the target (0 being at the target, 1 at the user).

And that’s it for the cursor prefab.

Save the changes and exit editing the prefab.

Target Highlight #

The Cursor prefab is already set up as a Prefab target highlight in the 3D RPG Playground tutorials, but in case you didn’t do that, here’s how this is done.

Open the Makinom editor and navigate to Battles > Target Settings.

Target Selection > Target Highlight #

Click on Add Highlight.

  • Highlight Type
    Select Prefab.
  • Prefab
    Select the Cursor prefab.
  • On Child
    Select Path.
    The 3D RPG Playground places the cursor on a child object we define via a path.
  • Find Child
    Set to: Cursor
    This is the child object that’s used.
  • Local Space
    Enable this setting.
  • Ignore Scale
    Enable this setting.

Save Changes #

And that’s it – click on Save Settings to save the changes.

Testing #

Hit play and test the new line target selection highlight.

https://orkframework.com/wp-content/uploads/ork3_tutorial_gameplay_bits__target_selection_lines__test.mp4

Great – there’s now a line connecting user and target!

You can further adjust the line to your needs, e.g. using a different material/shader, add more points on the line to make it ’rounder’, etc.

Share This Article :

  • Facebook
  • X
  • LinkedIn
  • Pinterest
Table of Contents
  • Cursor Prefab
    • Line Renderer
      • Positions
      • Line Width
      • Line Visuals
    • Target Selection Cursor: Line
  • Target Highlight
    • Target Selection > Target Highlight
    • Save Changes
  • Testing
Sitemap
  • Features
  • Showcase
  • Guide
    • Documentation
    • Tutorials
    • API
  • ORK 2 Hub
    • Tutorials
    • Plugins
    • API
  • Support
  • Forum
  • Get ORK
  • Contact
  • Blog
  • Makinom
  • gamingislove.com
Categories
  • News (71)
  • ORK 2 (137)
    • Tutorial (137)
      • Game tutorial (50)
      • Gameplay (32)
      • How-to (55)
  • Release (154)
Search

© 2015 Gaming is Love e.U.

Disclosure: This site may contain affiliate links, which means I may receive a commission if you click a link and purchase something that I have recommended. While clicking these links won’t cost you any money, they will help me fund my development projects while recommending great assets!