ORK Framework Logo - RPG Editor for Unity
  • Features
  • Showcase
  • Guide
    • Documentation
    • Tutorials
    • API
  • ORK 2
    • Tutorials
    • Plugins
    • API
  • Support
  • Forum
  • Get ORK

2D RPG Quickstart

30
  • START 2D RPG Quickstart
  • 01 Initial Setup
  • 02 Player Setup
  • 03 Music & Scenes
  • 04 UI System Setup
  • 05 UI Boxes
  • 06 Flying Texts
  • 07 Status Values
  • 08 Status Effects
  • 09 First Abilities
  • 10 Fighter Setup
  • 11 First Enemies & Battle AI
  • 12 Battle System Setup
  • 13 Animating Battle Start and End
  • 14 Random Battles
  • 15 Animating Actions
  • 16 Player Battle HUD
  • 17 Elemental Attacks
  • 18 Animating More Actions
  • 19 Inventory & Loot
  • 20 Equipment
  • 21 Loot, Start Equipment & Viewers
  • 22 Magic Abilities
  • 23 Caster Setup
  • 24 More Enemies
  • 25 Start Menu & Save Games
  • 26 Menu Screens
  • 27 Interactions
  • 28 Item Collectors
  • END 2D RPG Quickstart

3D RPG Quickstart

30
  • START 3D RPG Quickstart
  • 01 Initial Setup
  • 02 Player Setup
  • 03 Music & Scenes
  • 04 UI System Setup
  • 05 UI Boxes
  • 06 Flying Texts
  • 07 Status Values
  • 08 Status Effects
  • 09 First Abilities
  • 10 Fighter Setup
  • 11 First Enemies & Battle AI
  • 12 Battle System Setup
  • 13 Animating Battle Start and End
  • 14 Random Battles
  • 15 Animating Actions
  • 16 Player Battle HUD
  • 17 Elemental Attacks
  • 18 Animating More Actions
  • 19 Inventory & Loot
  • 20 Equipment
  • 21 Loot, Start Equipment & Viewers
  • 22 Magic Abilities
  • 23 Caster Setup
  • 24 More Enemies
  • 25 Start Menu & Save Games
  • 26 Menu Screens
  • 27 Interactions
  • 28 Item Collectors
  • END 3D RPG Quickstart

Status System Setup

24
  • START Status System Setup
  • 01 Status Values
  • 02 Status Development
  • 03 Attack/Defence Modifiers
  • 04 Status Effects
  • 05 Formulas
  • 06 Ability & Item Types
  • 07 Abilities Part 1: Attacks
  • 08 Abilities Part 2: Support & Sabotage
  • 09 Abilities Part 3: Elemental Magic
  • 10 Items
  • 11 Equipment Part 1: Slots & Slot Set Templates
  • 12 Equipment Part 2: Weapons
  • 12.5 (Optional) Equipment Part 2.5: Weapons
  • 13 Equipment Part 3: Shields, Armor & Accessories
  • 13.5 (Optional) Equipment Part 3.5: Shields, Armor & Accessories
  • 14 Equipment Part 4: Available Equipment Templates
  • 15 Loot
  • 16 Battle AIs
  • 17 Combatants Part 1: General Settings
  • 18 Combatants Part 2: Players
  • 19 Combatants Part 3: Enemies
  • 20 Combatant Groups
  • END Status System Setup

3D RPG Playground

53
  • START 3D RPG Playground
  • 01 Player Setup
  • 02 Start Menu
  • 03 First Interaction
  • 04 Music
  • 05 Areas
  • 06 Collecting Items
  • 07 Displaying Equipment
  • 08 Combatant Prefabs, Icons & Portraits
  • 09 Combatant Animations
  • 10 Camera Positions
  • ANIM 01 Battle Start/End Schematics
  • ANIM 02 Use, Cast & Camera
  • ANIM 03 Abilities & Items
  • ANIM 04 Physical Attacks
  • ANIM 05 Special Actions
  • BATTLE 01 Battle Menu
  • BATTLE 02 Prepare for Battle
  • TURN 01 Turn Based Setup
  • TURN 02 Turn Order HUD
  • ATB 01 Active Time Setup
  • ATB 02 Cast Times
  • ATB 03 Timebar HUD
  • BATTLE 03 The First Battle
  • BATTLE 04 Hunting Move AI
  • BATTLE 05 Spawning Combatants
  • 11 Save Games
  • MENU 01 UI Boxes
  • MENU 02 Template HUDs
  • MENU 03 Overview Menu
  • MENU 04 Menu Screens
  • 12 Shop
  • BATTLE 06 Random Battles
  • DUNGEON 01 Enter the Dungeon
  • DUNGEON 02 The Trapdoor
  • DUNGEON 03 Enemies on Level 1 & 2
  • DUNGEON 04 Traps on Level 3
  • DUNGEON 05 Going Deeper
  • 13 Bestiary (+MENU+ANIM)
  • QUEST 01 Hunting Quests (+MENU)
  • QUEST 02 Guard NPC
  • QUEST 03 Forest Ruin Cheese
  • QUEST 04 Witch NPC with Cheese
  • QUEST 05 Quest Mark HUDs
  • 14 Research Trees (+MENU)
  • CRAFT 01 Crafting Materials
  • CRAFT 02 Crafting Recipes
  • CRAFT 03 Crafting Menu
  • CRAFT 04 Crafting Proficiency & Critical Crafting
  • CRAFT 05 Materials Loot
  • 15 Changing Choice Dialogue
  • 16 Follow Me!
  • BATTLE 07 Sequence Loot Dialogue

3D Action RPG

20
  • START 3D Action RPG
  • 01 Status System Setup
  • 02 Player Setup
  • 03 Player Weapon
  • 04 Player Attacks
  • 05 Enemy: Chomper
  • 06 Chomper Attack
  • 07 Hit & Death
  • 08 HUDs
  • 09 Rolling on the Floor
  • 10 Enemy: Spitter
  • 11 Spit Attack
  • 12 Potion
  • 13 Grenade
  • 14 Item HUD
  • 15 Enemy: Grenadier
  • 16 Grenadier Melee Attacks
  • 17 Grenadier Flamethrower
  • 18 Item Drops
  • END 3D Action RPG

2D Grid Battle RPG

17
  • START 2D Grid Battle RPG
  • 01 Player Setup
  • 02 Prefab & Music Setup
  • 03 Randomizing Combatants
  • 04 UI Setup
  • 05 Battle Start, End & Phase Schematics
  • 06 Battle System Setup
  • 07 Battle Grid Setup
  • 08 Grid Move
  • 09 Forest Battle Grid
  • 10 Battle AI
  • 11 Ability Ranges
  • 12 Death & Use Schematics
  • 13 Attack Schematic
  • 14 Shoot Schematics
  • 15 Battle Selection Interaction
  • END 2D Grid Battle RPG

Schematics

10
  • Simple Start Schematic
  • Battle Start Schematic
  • Battle End Schematic
  • Moving to Target and Back
  • Animating a Base Attack
  • Animating a Magic Ability
  • Animating Target Selection
  • Grid Movement
  • Open and Close UI Animations
  • Flying Text Mover

UI Setups

16
  • Unity UI: Initial Setup
  • Unity UI: TextMesh Pro Setup
  • Unity UI: UI Box
  • Unity UI: Flying Text
  • Unity UI: Dragging Notification
  • Unity UI: Canvas with Screen Space Camera
  • Unity UI: Interaction HUD
  • Unity UI: Simple Player HUD
  • Unity UI: Quest HUD
  • Unity UI: Battle Actions HUD
  • Unity UI: Shortcuts HUD
  • Unity UI: Currency HUD
  • Unity UI: Tooltip HUD
  • Unity UI: Control HUD
  • Unity UI: Attack Modifiers
  • Unity UI: Defence Modifiers

Gameplay Bits

13
  • 2.5D Setup
  • Body Part Weakpoint
  • Click Attack
  • Combining Input Origins
  • Combining Status Value Flying Texts
  • Fun With Flying Text
  • HUD Effects With Conditional Schematics
  • Inventory Containers
  • Local Multiplayer
  • Multi Interaction Controllers
  • Target Selection Lines
  • World Space HUD
  • World Space Dialogue
  • Home
  • Guide
  • Tutorials
  • 3D Action RPG
  • 14 Item HUD
View Categories

14 Item HUD

In this tutorial we’ll set up a HUD to show the player’s items.

We’ll show the quantity and running reuse time of the potion and grenade items in a HUD.

We’ll set up:

  • the HUD’s prefab
  • the HUD (in the editor)

Let’s get to it!

HUD Prefab Setup #

The HUD will be displayed in the lower right corner of the screen, each item will be displayed on a background item and show their icon (also used as a value bar for the reuse time), the quantity in inventory and the reuse time (when it’s running).

HUD Base #

Use the scene hierarchy’s context menu to create the base HUD: Makinom > HUD > HUD

We’ll create a HUD without any layout.

Rect Transform #

Change the settings in the following order.

Select the bottom right anchor preset.

  • Pivot
    Set to X=1, Y=0.
  • Pox X
    Set to -50.
  • Pos Y
    Set to 50.
  • Width
    Set to 200.
  • Height
    Set to 150.

Potion #

Add an empty game object to the HUD game object and name it Potion.

Rect Transform #

Change the settings in the following order.

Select the bottom left anchor preset.

  • Pivot
    Set to X=0, Y=0.
  • Pox X
    Set to 0.
  • Pos Y
    Set to 0.
  • Width
    Set to 100.
  • Height
    Set to 100.

Image #

Add an Image component to the Potion child object using the component menu.

  • Source Image
    Select ItemRound.

HUD Combatant Item #

Add a HUD Combatant Item component to the Potion child object using the component menu.

This component uses a defined item as the content for other HUD components – any components we add to this game object or it’s child objects will automatically select it as it’s content provider, i.e. use the defined item for content display.

The component itself will (in our setup) use the HUD’s combatant to get the item.

  • Type
    Select Item.
  • Item
    Select Potion.
  • Show Empty
    Enable this setting.
    If the combatant doesn’t have any of the defined item, it’ll be displayed with a quantity of 0.
    Otherwise the game object would be disabled.

Potion Icon #

Use the scene hierarchy context menu on the Potion child object to add an icon content: ORK Framework > HUD > Content > Status Icon Content

Rect Transform #

Select the stretch stretch anchor preset.

  • Left
    Set to 15.
  • Top
    Set to 15.
  • Right
    Set to 15.
  • Bottom
    Set to 15.

ORK HUD Status Text Content #

This component is used to define which status will be displayed.

We’ll use it to show the item’s icon – since we only have an Image component and no text attached, we can ignore the text.

  • Status Type
    Select Item.
  • Use Content Icon
    Enable this setting.

Image #

Select any sprite as a dummy content in the Source Image setting to be able to set up the icon filling settings.

  • Source Image
    E.g. select icons_54 to show how the potion’s icon is displayed.
  • Image Type
    Select Filled.
  • Fill Method
    Select Vertical.
  • Fill Origin
    Select Bottom.

You can now remove the dummy sprite again (or keep it, it’ll automatically be replaced by the item’s content anyway). This’ll hide the settings we made, but the setup will still remain as we set it up.

Potion Value Bar #

Use the scene hierarchy context menu on the Potion child object to add a value bar: ORK Framework > HUD > Content > Value Bar (Sprite)

However, we don’t need the sprite child objects, so remove the following game objects:

  • Value Bar > Empty Sprite
  • Value Bar > Value Sprite

We’ll instead use the icon we added as the value bar.

Rect Transform #

  • Left
    Set to 0.
  • Top
    Set to 0.
  • Right
    Set to 0.
  • Bottom
    Set to 0.

ORK HUD Value Bar Content #

We’ll use the value bar to display the reuse time, filling the item’s icon.

  • Value Type
    Select Reuse Time.
  • Invert Time
    Enable this setting.

HUD Value Bar #

We’ll use the icon’s Image component as the value sprite.

  • Value Image
    Select the Image component from the Status Icon Content child object.
    E.g. just drag the child object on the field.

Potion Reuse Time Text #

Use the scene hierarchy context menu on the Potion child object to add a text content: ORK Framework > HUD > Content > Status Text Content

Rename the created game object to Reuse Time.

Rect Transform #

Select the stretch stretch anchor preset.

  • Left
    Set to 0.
  • Top
    Set to 0.
  • Right
    Set to 0.
  • Bottom
    Set to 0.

ORK HUD Status Text Content #

  • Status Type
    Select Reuse Time.
  • Default Content (Text)
    Set to: <time>

TextMeshPro – Text (UI) #

This component handles displaying the text.

  • Font Size
    Set to 20.
  • Vertex Color
    Select a white color with full alpha.
    E.g. I’m using this hexadecimal color code: FFFFFF
  • Alignment
    Set to Center and Middle.
  • Wrapping
    Select Disabled.

Potion Quantity Text #

Duplicate the Reuse Time game object and rename the copy to Quantity.

ORK HUD Status Text Content #

  • Status Type
    Select Item.
  • Default Content (Text)
    Set to: <quantity>

TextMeshPro – Text (UI) #

This component handles displaying the text.

  • Font Size
    Set to 30.
  • Vertex Color
    Select a yellow color with full alpha.
    E.g. I’m using this hexadecimal color code: FFFF00
  • Alignment
    Set to Right and Bottom.

That’s it for the potion – the hard part is over.

Grenade #

Duplicate the Potion child object and rename the copy to Grenade.

Select the top right anchor preset.

  • Pivot
    Set to X=1, Y=1.
  • Pox X
    Set to 0.
  • Pos Y
    Set to 0.
  • Width
    Set to 100.
  • Height
    Set to 100.

HUD Combatant Item #

  • Item
    Select Grenade.

And that’s it – the finished HUD should look like this (with the dummy icons):

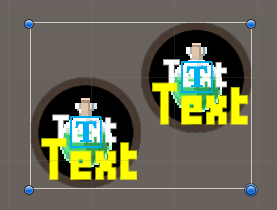
Don’t forget to remove the dummy icons before creating a prefab out of it!

Create Prefab #

Create a prefab out of the HUD, e.g. save it as Items HUD.

We’re done with the prefab setup, you can now remove the canvas (if you’ve worked in the Scene scene).

HUD Setup #

Navigate to UI > HUDs and copy the Player Health HUD.

HUD Settings #

  • Name
    Set to Items.

Unity UI #

  • HUD Prefab
    Select the Items HUD prefab.

Save Changes #

And that’s it for the HUD setup.

Don’t forget to save your changes by clicking on Save Settings at the bottom of the editor.

Testing #

Hit play (in the Scene scene) and you’ll see your items in the bottom right corner of the screen.

It works and displays our icons and quantities.

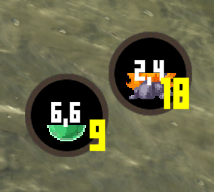
Using items reduces the quantities and displays the reuse time (and fills the icons).


Next, we’ll add the final enemy – the grenadier.

Share This Article :

  • Facebook
  • X
  • LinkedIn
  • Pinterest
Table of Contents
  • HUD Prefab Setup
    • HUD Base
      • Rect Transform
    • Potion
      • Rect Transform
      • Image
      • HUD Combatant Item
    • Potion Icon
      • Rect Transform
      • ORK HUD Status Text Content
      • Image
    • Potion Value Bar
      • Rect Transform
      • ORK HUD Value Bar Content
      • HUD Value Bar
    • Potion Reuse Time Text
      • Rect Transform
      • ORK HUD Status Text Content
      • TextMeshPro - Text (UI)
    • Potion Quantity Text
      • ORK HUD Status Text Content
      • TextMeshPro - Text (UI)
    • Grenade
      • HUD Combatant Item
    • Create Prefab
  • HUD Setup
    • HUD Settings
      • Unity UI
  • Save Changes
  • Testing
Sitemap
  • Features
  • Showcase
  • Guide
    • Documentation
    • Tutorials
    • API
  • ORK 2 Hub
    • Tutorials
    • Plugins
    • API
  • Support
  • Forum
  • Get ORK
  • Contact
  • Blog
  • Makinom
  • gamingislove.com
Categories
  • News (71)
  • ORK 2 (137)
    • Tutorial (137)
      • Game tutorial (50)
      • Gameplay (32)
      • How-to (55)
  • Release (152)
Search

© 2015 Gaming is Love e.U.

Disclosure: This site may contain affiliate links, which means I may receive a commission if you click a link and purchase something that I have recommended. While clicking these links won’t cost you any money, they will help me fund my development projects while recommending great assets!