

In this tutorial we’ll finally get the grid battle ready.
This tutorial is part 6 of a mini-series covering grid battles. You can find the start of this series here.
We’ve got our grid, but we still need to make it work. Beside a battle start schematic that uses our grid and starts the player placement selection, we also need to add the grid move command to the battle menu and battle AI, and show the available move range in the player HUD.
We’ll set up:
- battle start schematic for grids (and using it in the phase battle system)
- updating action start/end animations
- adding a move range HUD (optional)
This tutorial is based on the ORK 4 Unity Quickstart 3D tutorials and using a phase battle system, but can be used in any project and with any battle system.
Grid Battle Start Schematic #
When a battle takes place in the same scene as it starts, it can automatically use a nearby or defined grid – but our battles start in a different scene, so we’ll have to search for the grid after we load into the scene.
We’ll also initiate the player’s grid placement selection to let the player decide where to place the player group members.
Instead of creating a new schematic from scratch, we’ll make use of the regular BattleStart schematic we’ve set up in the quickstart 3D tutorials and save it as a new schematic.
Open the schematic editor and open the BattleStart schematic, the schematic currently looks like this:
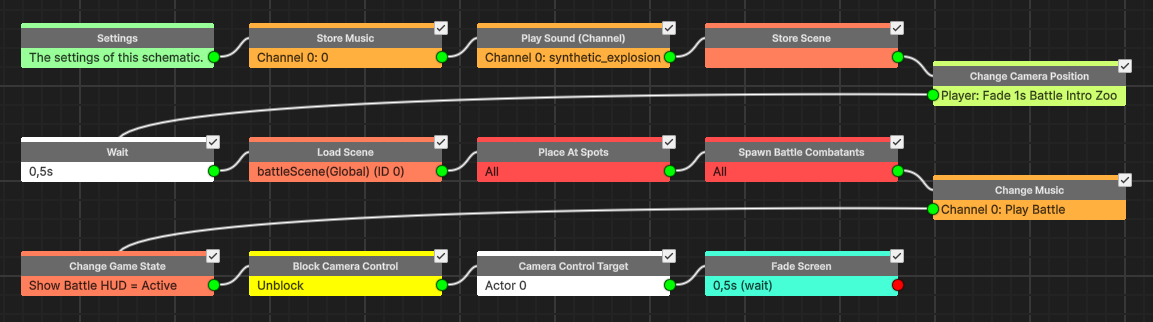
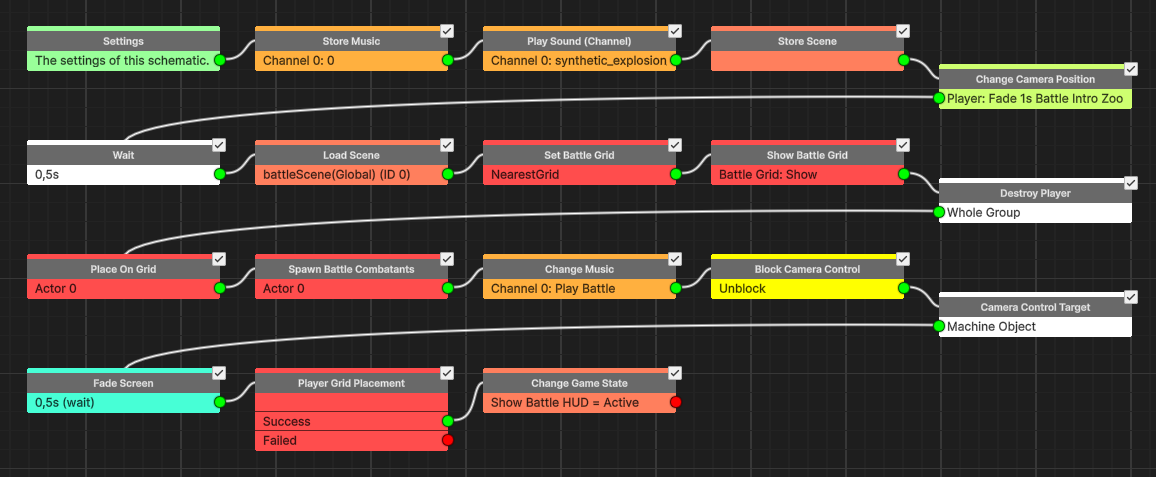
The new version will look like this:
Settings #
We’ll change the added actor – we don’t need the battle arena, but we need the enemies that are part of the battle.
Actors > Actor 0 #
- Actor Type
Select: Enemies (Battle)
Place At Spots #
We don’t use battle spots in grid battles.
Remove this node, we’ll replace it with 4 other nodes.
Set Battle Grid #
Add Node > Battle > Grid > Set Battle Grid
This node is used to set a battle’s grid. We’ll put it where the Place At Spots node was, i.e. the Load Scene node’s Next slot connects to this node.
- Grid Use Type
Select: Nearest
Show Battle Grid #
Add Node > Battle > Grid > Show Battle Grid
This node is used to show or hide the battle grid. Since we’ve set our grids to not show automatically, we’ll need to show it manually.
- Show/Hide
Enable
Destroy Player #
Add Node > Game > Player > Destroy Player
This node is used to destroy the player’s object or all spawned combatants of the player group.
Since our scene transition also keeps the player group objects alive, we’ll destroy them. We’re going to use grid placement to let the player decide where to place the combatants on the grid.
Without destroying the player, it’d just awkwardly stand around somewhere.
- Whole Group
Enable
In case you’ve followed the player group spawn tutorial, this’ll make sure the entire player group objects will be destroyed.
Place On Grid #
Add Node > Battle > Spawn > Place On Grid
Add this node between Set Battle Grid node and Spawn Battle Combatants node.
This node will place the already spawned combatants on the grid.
This node’s Next slot will connect to the Spawn Battle Combatants node.
- Use Deployment Cells
Enable - Place All
Enable - Object (Group)
Select: Actor 0
Spawn Battle Combatants #
We’ll only spawn the enemies using the changed actor.
- Spawn All
Disable - Object (Group)
Select: Actor 0
Camera Control Target #
Since the actor changed (now being the enemies), we’ll also change the camera to use the machine object.
This’ll place it where the battle spawns in the scene, and that’s also where the player deployment cells are.
- Object (Target Object)
Select: Machine Object
Player Grid Placement #
Add Node > Battle > Spawn > Player Grid Placement
This node starts the player’s grid placement selection.
Add it at the end of the schematic, i.e. the Fade Screen node’s Next slot connects to this node.
No further settings needed in this node.
Change Game State #
Move the Change Game State node to the end of the schematic (Success slot of the Player Grid Placement node).
We’ll show the battle HUD after the player placed the combatants.
Save As New Schematic #
And that’s it – click on Save Schematic As … to save it as a new schematic and name it BattleStartGrid.
Updating Phase Battle System #
I’m using the phase battle system setup for the grid battles – if you use a different battle system, make the following changes in your battle system’s settings.
Open the ORK editor, navigate to Battles > Battle System and select the Phase battle system.
Base Settings > Battle Start/End Schematics #
We’ll simply change the battle start schematic.
- Start Schematic
Select: BattleStartGrid
Save Changes #
And that’s it for now.
Don’t forget to save your changes by clicking on Save Settings at the bottom of the editor.
Testing #
With the battle start schematic set up, we can finally test our first grid battle.
Hit play and start a battle.
We’ve got a working grid battle!
But there are still some things to handle.
Updating Action Start/End Animations #
If you’ve noticed during battle, using abilities or items will have the user first take a step forward before the action, and move back after the action.
This was set up in the quickstart 3D tutorials using the start and end animations for abilities and items. While this works great for the regular arena-style battles, on battle grids that doesn’t look that good.
So, let’s change this and only use them in non-grid battles.
New Start Animation Schematic #
Additionally, we’ll set up a new schematic that’ll rotate toward the target (on the grid) instead.
Open the schematic editor.

Grid Rotate To Target #
Add Node > Battle > Grid > Grid Rotate To Target
This node is used to rotate an object toward another object and limiting the rotation to grid directions.
- Object (User)
Select: Machine Object - Object (Target)
Select: Starting Object - Use Nearest
Enable
In case multiple combatants are targeted, we’ll use the nearest one to the user.
And that’s it for the schematic – click on Save Schematic and save it as GridRotateToTarget.
Updating the Settings #
Open the ORK editor and navigate to Battles > Battle Actions.
Ability Settings > Ability Start Animation #
- Grid Battles
Select: No
Copy Battle Animation 0 and change the copy’s settings.
- Schematic Asset
Select: GridRotateToTarget. - Grid Battles
Select: Yes
Ability Settings > Ability End Animation #
- Grid Battles
Select: No
Item Settings > Item Start Animation #
- Grid Battles
Select: No
Copy Battle Animation 0 and change the copy’s settings.
- Schematic Asset
Select: GridRotateToTarget. - Grid Battles
Select: Yes
Item Settings > Item End Animation #
- Grid Battles
Select: No
Save Changes #
And that’s it.
Don’t forget to save your changes by clicking on Save Settings at the bottom of the editor.
Move Range HUD (Optional) #
We also want to display the remaining move range of the current combatant.
Follow this move range HUD tutorial to set it up.
The next part of the grid mini-series will set up larger use ranges for magic spells and also add affect ranges for magic attack spells.