

In this tutorial we’ll add items and a currency to the game.
Items can do the same things abilites can, but are (usually) consumables that are removed from the inventory upon use. You can also create non-consumable and even non-useable items, e.g. for quests or crafting recipes.
Currency can be used to purchase things in shops, to pay for status upgrades (e.g. via research trees) and more.
We’ll set up multiple inventory-related things:
- content types
- inventory settings
- currency
- 5 items (potions)
- loot
- start inventory
Let’s get to it!
Content Types #
We’ll start with adding new content types.
Open the ORK editor and navigate to Content > Content Types. We need a content type for potions, equipment and valueables – the default setup already contains Equipment, so we need to add 2 more content types.
8: Potions #
Content Information #
- Name
Set to: Potions
Base Settings #
- Damage Type
Select: Default
The damage type manages which animations will be used on targets to animate damage, evade, etc.
The Target Selection Settings define which targets are available to abilities and items of this type. Potions should target a single ally
- Target Selection Type
Select: Default Ally > Ally Single
9: Valueables #
Copy the Potions content type and change the following settings.
Content Information #
- Name
Set to: Valueables
Inventory Settings #
Navigate to Inventory > Inventory Settings, we’ll check how the inventory system is set up. You can learn more about the inventory settings in this documentation.
We’ll use the group inventory (i.e. all combatants in a group share the inventory), auto stack items and equipment and not use any kind of quantity or stack size limit – so, we’ll stick with the default setup of a new project.
- Inventory Type
Select: Group - Item Stack Type
Select: Auto Stack
Items will automatically stack when added to the inventory. - Equipment Stack Type
Select: Auto Stack - Limit Quantity
Disable - Limit Stack
Disable
Default Item Prefab #
We’ll set up the default item prefab that’ll be used by all items, equipment, etc. – individual items/equipment/etc. can optionally override that to use a different prefab.
- Item Prefab
Select: Item
This prefab is a simple object with a Box Collider (for being able to interact with it) and a particle effect to make it noticable.
If you use a different prefab, check where the object’s root position is, i.e. local X=0, Y=0, Z=0. The Item prefab used here is set up to have that position at the bottom of the collider. If the prefab’s root position would be somewhere else, e.g. in the center of a collider, you can use the Spawn Offset to adjust for that position, otherwise items could spawn in the ground.
Currencies #
Next, we’ll set up the currency for our game. You can add multiple currencies, but we’ll just use one.
Navigate to Inventory > Currencies and select the Default currency.
Content Information #
- Name
Set to: Gold - Sprite (Icon)
Select: icons_116
Click on the Find TMP Tag button to get the icon’s tag for displaying it in texts (via text codes). This uses TextMesh Pro’s sprite asset setup.
Base Settings #
- Content Type
Select: Valueables
Potion #
Our first item will be a potion to restore some HP.
Navigate to Inventory > Items, we’ll change the Default item.
Content Information #
- Name
Set to: Potion - Description
Set to: Restores 100 HP - Sprite (Icon)
Select: icons_164
Click on the Find TMP Tag button to get the icon’s tag for displaying it in texts (via text codes). This uses TextMesh Pro’s sprite asset setup.
Base Settings #
- Content Type
Select: Potions
Price Settings #
You can set a price to purchase the potion in shops here. We don’t add a shop in this tutorial series, but we’ll still set up a price.
- Sellable
Enable - Buy Price
Select: Value > Value
Set the value to: 5
The default sell price is set to 50% of the buy price, we’ll stick with that.
Use Settings #
- Useable In
Select: Both
Animation Settings #
We’ll use the Use schematic and replace the prefab and audio asset.
Click on Add Battle Animation.
- Schematic Asset
Select: Use
Resource Overrides #
Click on Add Prefab Override.
- Auto Destroy After Time
Enable - Time
Set to: 3 - Prefab
Select: HealEffect
Click on Add Audio Clip Override.
- Audio Asset
Select: bottle
Use Costs #
- Consume
Enable - Auto Consume
Select: On Selection
This’ll automatically remove the item from the user’s inventory when selecting a target (i.e. when the action was registered with the system)
You can also use other options, e.g. consuming it when the outcome is calculated (select No for that).
Target Settings #
Target Selection Settings #
We’ll use the potion content type’s setup.
- Use Content Type
Enable
Target Changes #
Click on Add Target Change.
Click on Add Status Change.
- Change Type
Select: Status Value - Status Value
Select: HP - Operator
Select: Add - Change Value
Select: Value > Value
Select: 100
High Potion #
The high potion does the same as the potion – it just heals more HP.
Copy the Potion item and change the following settings.
Content Information #
- Name
Set to: High Potion - Description
Set to: Restores 500 HP - Sprite (Icon)
Select: icons_167
Click on the Find TMP Tag button to get the icon’s tag for displaying it in texts (via text codes). This uses TextMesh Pro’s sprite asset setup.
Base Settings > Price Settings #
- Buy Price
Select: Value > Value
Set the value to: 20
Target Settings > Target Changes > Target Change 0 > Status Change 0 #
- Change Value
Select Value > Value.
Set the value to 500.
Magic Potion #
The magic potion restores MP instead of healing HP.
Copy the High Potion item and change the following settings.
Content Information #
- Name
Set to: Magic Potion - Description
Set to: Restores 50 MP - Sprite (Icon)
Select: icons_155
Click on the Find TMP Tag button to get the icon’s tag for displaying it in texts (via text codes). This uses TextMesh Pro’s sprite asset setup.
Base Settings > Price Settings #
- Buy Price
Select: Value > Value
Set the value to: 15
Animation Settings > Battle Animation 0 > Resource Overrides #
We’ll change the prefab.
- Prefab
Select: StarEffect
Target Settings > Target Changes > Target Change 0 > Status Change 0 #
- Status Value
Select: MP - Change Value
Select: Value > Value
Set the value to: 50
Revive Potion #
The revive potion revives the target and restores a 50 HP.
Copy the Potion item and change the following settings.
Content Information #
- Name
Set to: Revive Potion - Description
Set to: Revives the target with 50 HP - Sprite (Icon)
Select: icons_173
Click on the Find TMP Tag button to get the icon’s tag for displaying it in texts (via text codes). This uses TextMesh Pro’s sprite asset setup.
Base Settings > Price Settings #
- Buy Price
Select: Value > Value
Set the value to: 25
Animation Settings > Battle Animation 0 > Resource Overrides #
We’ll change the prefab and audio clip.
- Prefab
Select: ReviveEffect - Audio Asset
Select: blessing2
Target Settings #
Target Selection Settings #
We need to be able to target dead combatants – let’s limit the use on dead combatants.
We’ll set up a Custom target selection, but you can also set up a new target selection template (or later create a template out of the custom setup).
- Target Selection Type
Select: Custom - Target Type
Select: Ally - Target Range
Select: Single - Is Dead
Select: Yes
If you select Ignore you can also target alive combatants.
Target Changes > Target Change 0 > Status Change 0 #
Copy status change 0 before changing it.
- Change Type
Select: Revive
This will remove the death state from the target – but it doesn’t change it’s HP.
Make sure to always change a combatant’s health after reviving, or it’ll immediately die again.
Target Changes > Target Change 0 > Status Change 1 #
- Change Value
Select: Value > Value
Set the value to: 50
Cure Potion #
The cure potion will remove all negative status effects.
Copy the Potion item and change the following settings.
Content Information #
- Name
Set to: Cure Potion - Description
Set to: Removes all negative effects - Sprite (Icon)
Select: icons_185
Click on the Find TMP Tag button to get the icon’s tag for displaying it in texts (via text codes). This uses TextMesh Pro’s sprite asset setup.
Base Settings > Price Settings #
- Buy Price
Select: Value > Value
Set the value to: 3
Animation Settings > Battle Animation 0 > Resource Overrides #
We’ll change the prefab and audio clip.
- Prefab
Select: CureEffect. - Audio Clip
Select: bubble2
Target Settings > Target Changes > Target Change 0 > Status Change 0 #
Instead of changing a status value, we’ll change status effects.
- Change Type
Select: Status Effect - Change
Select: Remove - Use Content Type
Enable
We’ll remove based on the status effect’s content type. - Content Type
Select: Negative - Remove Type
Select: All
Loot #
Loot allows setting up different loot tables, optionally based on level checks or other conditions, e.g. an enemy can drop a regular Potion for level 1 to 25 and a High Potion for level 26 to 50.
We’ll set up 2 loot tables for our enemies to give gold and potions as battle spoils, without any level checks or other conditions.
Navigate to Inventory > Loot, we’ll change the Default loot and add another new loot.
Gold #
We’ll give a random amount of gold between 1 and 20.
- Name
Set to: Gold
Loot Table 0 #
Click on Add Loot Table.
Click on Add Item in the Loot Settings.
- Type
Select: Currency - Currency
Select: Gold - Quantity
Select: Value > Random
Set the 1st value to: 1
Set the 2nd value to: 20
Potion #
Add a new Loot setup.
- Name
Set to: Random Potion
Loot Table 0 #
Click on Add Loot Table.
We’ll add multiple potions and randomly get one in the Loot Settings.
- Draw Type
Select: Random
We’ll get one of the defined items randomly – the individual item’s chance check is still used.
Click on Add Item.
- Type
Select: Item - Item
Select: Potion - Quantity
Select: Value > Value
Set the value to: 1 - Chance
Select: Value > Value
Set the value to: 75
Copy the Potion item.
- Item
Select: Magic Potion - Chance
Set the value to: 40
Copy the Magic Potion item.
- Item
Select: Cure Potion - Chance
Set the value to: 30
Copy the Cure Potion item.
- Item
Select: High Potion - Chance
Set the value to: 20
Copy the High Potion item.
- Item
Select: Revive Potion - Chance
Set the value to: 10
Combatants General Settings #
We’ll add the loot as default loot for all combatants.
Navigate to Combatants > Combatants and select the General Settings.
Inventory & Equipment > Loot Settings #
We’ll use both Gold and Random Potion as loot.
- Loot Origin
Select: Loot
Click on Add Loot.
- Loot
Select: Gold
Click on Add Loot again.
- Loot
Select: Random Potion
Player Start Inventory #
We’ll add some items to the start inventory of our player combatant.
Select the Fighter combatant.
Inventory & Equipment > Start Inventory #
Click on Add Item.
- Type
Select: Currency - Currency
Select: Gold - Quantity
Select: Value > Value
Set the value to: 50
Click on Add Item.
- Type
Select: Item - Item
Select: Potion - Quantity
Select: Value > Value
Set the value to: 5
Copy the Potion item.
- Item
Select: Magic Potion - Quantity
Set the value to: 3
Copy the Magic Potion item.
- Item
Select: Cure Potion
Copy the Cure Potion item.
- Item
Select: High Potion - Quantity
Set the value to: 1
Copy the High Potion item.
- Item
Select: Revive Potion
Save Changes #
And that’s it for now!
Save the changes using the Save Settings button at the bottom of the editor.
Testing #
Hit play and start a battle.

You now have items available and can use them in battle.
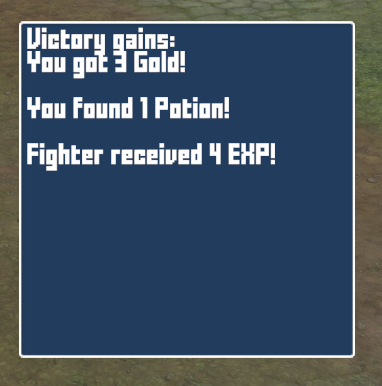
And we get loot from killed enemies.
Next, we’ll add equipment.