

ORK Framework Logo - RPG Editor for Unity
  • ORK 4 BETA
  • Features
  • Guide
    • Documentation
    • Tutorials
    • API
  • ORK 2
    • Tutorials
    • Plugins
    • API
  • Support
  • Forum
  • Get ORK

ORK 4 Documentation

  • Getting Started
    • Welcome
    • First Steps (Unity)
  • Features
    • The Status System
    • Schematics
    • Schematic Nodes
    • Dialogue Importer
    • Variables
    • Selected Data
  • Components
    • Battle Components
    • Combatant Components
    • Control Components
    • Cursor Prefab Components
    • Game Starters
    • Interactable Components
    • Move AI Components
    • Scene Setup Components
  • Editor
    • The ORK 4 Editor
    • Sections & Sub-Sections
    • Node Editor
    • Schematic Editor
    • Asset Sources
    • Unity Overlay Toolbar
  • Section: System
    • System Settings
    • Languages
    • Organizer Types
    • Game States & Conditions
    • General Condition Templates
    • Object Pools
    • Prefab Savers
    • Scene Connections
  • Section: Controls
    • Game Controls
    • Interaction Settings
    • Player Controls
    • Camera Controls
    • Input Keys
    • Control Maps
    • Camera Positions
    • Battle Camera
  • Section: Gameplay
    • Game Settings
    • Formulas
    • Difficulties
    • Shortcut Slots & Settings
    • Custom Settings & Global Custom Settings
    • Global Machines
    • Machine Templates
  • Section: Status
    • Status Values
    • Status Effects
    • Attack Modifiers
    • Defence Modifiers
    • Abilities & Ability Developments
    • Status Developments
    • Research Trees
    • Damage Types
    • Status Bonuses & Templates
    • Status Condition Templates
  • Section: Inventory
    • Inventory Settings
    • Inventory Containers
    • Currencies
    • Items
    • AI Rulesets
    • Crafting Recipes
    • Equipment Slots & Slot Set Templates
    • Equipment & Available Equipment Templates
    • Shops
    • Loot
  • Section: Combatants
    • Combatants
    • Combatant Groups
    • Class Slots
    • Classes
    • Factions & Faction Benefits
    • Animations
    • Move AIs
    • Formations
    • Action Combos
  • Section: Battles
    • Battle Systems
    • Turn Based Battles
    • Active Time Battles
    • Real Time Battles
    • Phase Battles
    • Battle Spots
    • Battle AIs
    • Battle Actions Settings
    • Special Commands Settings
    • Target Settings
    • Target Selection Templates
    • Battle Range Templates
    • Battle Grid Settings
    • Battle Grid Highlights
    • Battle Grid Cell Types
    • Battle Grid Formations
  • Section: Content
    • Content Types
    • Music
    • Sound Templates
    • Areas
    • Teleports
    • Quests & Quest Tasks
    • Logs & Log Texts
    • Object Contents
  • Section: UI
    • UI Settings
    • UI Layers
    • UI Layouts
    • UI Boxes
    • HUDs
    • Notifications
    • Cursor Settings
  • Section: Menus
    • Start Menu
    • Save Game Settings
    • Option Categories
    • Menu Screens
    • Menu Requirements
    • Battle Menus
    • Loot Dialogues
    • Item Collection
    • Combatant Selections
    • Quantity Selections
    • Shop Layouts
  • Section: Texts
    • Text Settings
    • Formatting Settings
    • Flying Texts
    • Use Cost Display
    • Status Preview Display
    • Bonus Display
    • Status Change Display
    • Console Settings & Console Types
    • Text Codes
  • Sections: Editor
    • Editor Settings
    • Backups
    • Variables
    • Plugins
  • Scripting
    • Access Handler
    • Custom Nodes
    • Custom Save Data
    • Custom Component Save Data

ORK 4 Tutorials

  • ORK 4 Unity Quickstart Tutorials (3D)
    • ORK 4 Unity Quickstart 3D
    • 01 Initial ORK Setup
    • 02 Player Setup
    • 03 Music & Scenes
    • 04 UI System Setup
    • 05 UI Boxes
    • 06 Flying Texts
    • 07 Status Values
    • 08 Status Effects
    • 09 First Abilities
    • 10 Fighter Setup
    • 11 First Enemies & Battle AI
    • 12 Battle System Setup
    • 13 Animating Battle Start and End
    • 14 Random Battles
    • 15 Animating Actions
    • 16 Player Battle HUD
    • 17 Elemental Attacks
    • 18 Animating More Actions
    • 19 Inventory & Loot
    • 20 Equipment
    • 21 Loot, Start Equipment & Viewers
    • 22 Magic Abilities
    • 23 Caster Setup
    • 24 More Enemies
    • 25 Start Menu & Save Games
    • 26 Menu Screens
    • 27 Interactions
    • 28 Item Collectors
    • Quickstart Extended
  • Battle Tutorials
    • Adding Active Time Battles
    • Adding Phase Battles
    • Hit & Miss
    • Critical Hits
    • Cast Time
    • Grid 01: Battle Grid Setup
    • Grid 02: Highlights
    • Grid 03: Cell Types
    • Grid 04: Move Command
    • Grid 05: Scene Grid Setup
    • Grid 06: Battle Ready
    • Grid 07 Use & Affect Ranges
    • Grid 08: Better Camera Control
  • Gameplay Tutorials
    • Multiple Interaction Controllers
    • Player Group Spawn & Follow
    • Spawn Hunting Enemies
    • Gamepad Controls (Unity Input System)
    • Combined Inputs
    • Quests 01: Menu Screen
    • Quests 02: Hunting
    • Quests 03: Collect Potion Materials
    • Quests 04: Collect Equipment Materials
    • Quests 05: Quest Mark HUDs
    • Crafting 01: Menu Screen
    • Crafting 02: Materials & Recipes
    • Crafting 03: Getting Materials
    • Crafting 04: Proficiency & Critical Outcome
    • Shop
    • Inventory Containers
  • Schematics Tutorials
    • UI Animation Schematics
    • Flying Text Animation Schematics
    • HUD Conditional Schematics
  • UI Tutorials
    • Unity UI: Initial Setup
    • Unity UI: Status Value UI Setup
    • Unity UI: Status Effect UI Setup
    • Unity UI: Shortcut UI Setup
    • Unity UI: Dragging Notification
    • Unity UI: Interaction HUD
    • Unity UI: Shortcut HUD
    • Unity UI: Turn Order HUD
    • Unity UI: Cast Time HUD
    • Unity UI: Quest HUD
    • Unity UI: Tooltip HUD
    • Unity UI: Move Range HUD

ORK 4 Extensions

  • Plugins
    • Save Game Compression Plugin
  • Schematic Nodes
    • Footstepper Nodes (Unity)
  • Scripts
    • A* Pathfinding Movement Component (Unity)
    • PolyNav 2D Movement Component (Unity)
    • Cinemachine Camera Control Type (Unity)
    • Rewired Input Key (Unity)
    • Unity Legacy Input Key (Unity)
    • Core GameKit Wrapper (Unity)
    • Pool Boss Wrapper (Unity)
View Categories
  • Guide
  • ORK 4
  • ORK 4 Tutorials
  • UI Tutorials

Unity UI: Interaction HUD

In this tutorial we’ll create an Interaction type HUD using the Unity UI system.

Interaction HUDs are used to display if an interaction is available.

This tutorial is based on the ORK 4 Unity Quickstart 3D tutorials, but can be used in any project.

Your project’s UI system should already be set to Unity UI. If not, check the initial setup tutorial for Unity UI.

HUD Prefab Setup #

HUDs use prefabs to create their content when using Unity UI. All we need is a text that’s displayed in our HUD.

It’s best to work in your UI Environment scene.

Use the scene hierarchy context menu (ORK Framework > HUD > Content > HUD: Text Content) or ORK toolbar (search for: HUD Text Content) to create a HUD and text content in one go.

This’ll create a HUD (without layout groups) and add a text content to it – we’ve already the Text Content child object selected, so let’s start with this.

Text Content #

This child object manages the displayed text and it’s style.

Rect Transform #

Select the stretch anchor presets, i.e. we’ll stretch the transform both horizontally and vertically with it’s parent, so we’ll automatically adjust to the parent’s size.

  • Left, Top, Right, Bottom
    Set to: 5
    This’ll add a bit of padding to the parent’s bounds.

HUD Text Content #

This component defines the text that is displayed.

  • Default Content
    Set to: Interact

TextMeshPro – Text (UI) #

This component manages how the text is displayed.

Style it to your liking, e.g. change the font, font size or alignment. E.g. I’ll use the Middle Center alignment to place the text in the center of the HUD.

HUD #

Select the HUD object, we’ll now style and place the HUD itself.

Image (Optional) #

To add a background image, add an Image component to the object.

I’m using the BoxBlue sprite, feel free to use any image you like.

  • Source Image
    Select: BoxBlue

Rect Transform #

Place the HUD on the canvas where you want it to show and use appropriate anchor presets. Adjust the size to your liking

E.g. I’m placing it at the center of the top of the screen, using a width of 250 and a height of 70.

Change the settings in this order:

Select the top center anchor preset.

  • Pivot
    Set to: X=0.5, Y=1
  • Pos X
    Set to: 0
  • Pos Y
    Set to: -150
  • Width
    Set to: 250
  • Height
    Set to: 70

Create Prefab #

Create a prefab out of the HUD object, e.g. naming it Interaction HUD.

Don’t forget to remove the HUD from the canvas (or also remove the canvas when you’ve set it up in a game scene).

HUD Setup #

Now we’ll use the HUD’s prefab in a HUD.

Open the ORK editor, navigate to UI > HUDs and add a new HUD.

HUD Settings #

  • Name
    Set to: Interaction
  • HUD Type
    Select: Interaction
  • Auto Display
    Enable

Unity UI #

  • UI Layer
    Select: HUDs
    Or any other UI layer you want the HUD to display on.
  • HUD Prefab
    Select: Interaction HUD

Schematics #

You can optionally use schematics to animate opening and closing the HUD, e.g. fading it in/out.

See this tutorial for details.

Save Settings #

Don’t forget to save your changes by clicking on Save Settings at the bottom of the editor.

Testing #

Hit play and test your HUD!

Naturally, you need an interaction and player with an interaction controller for this to work.
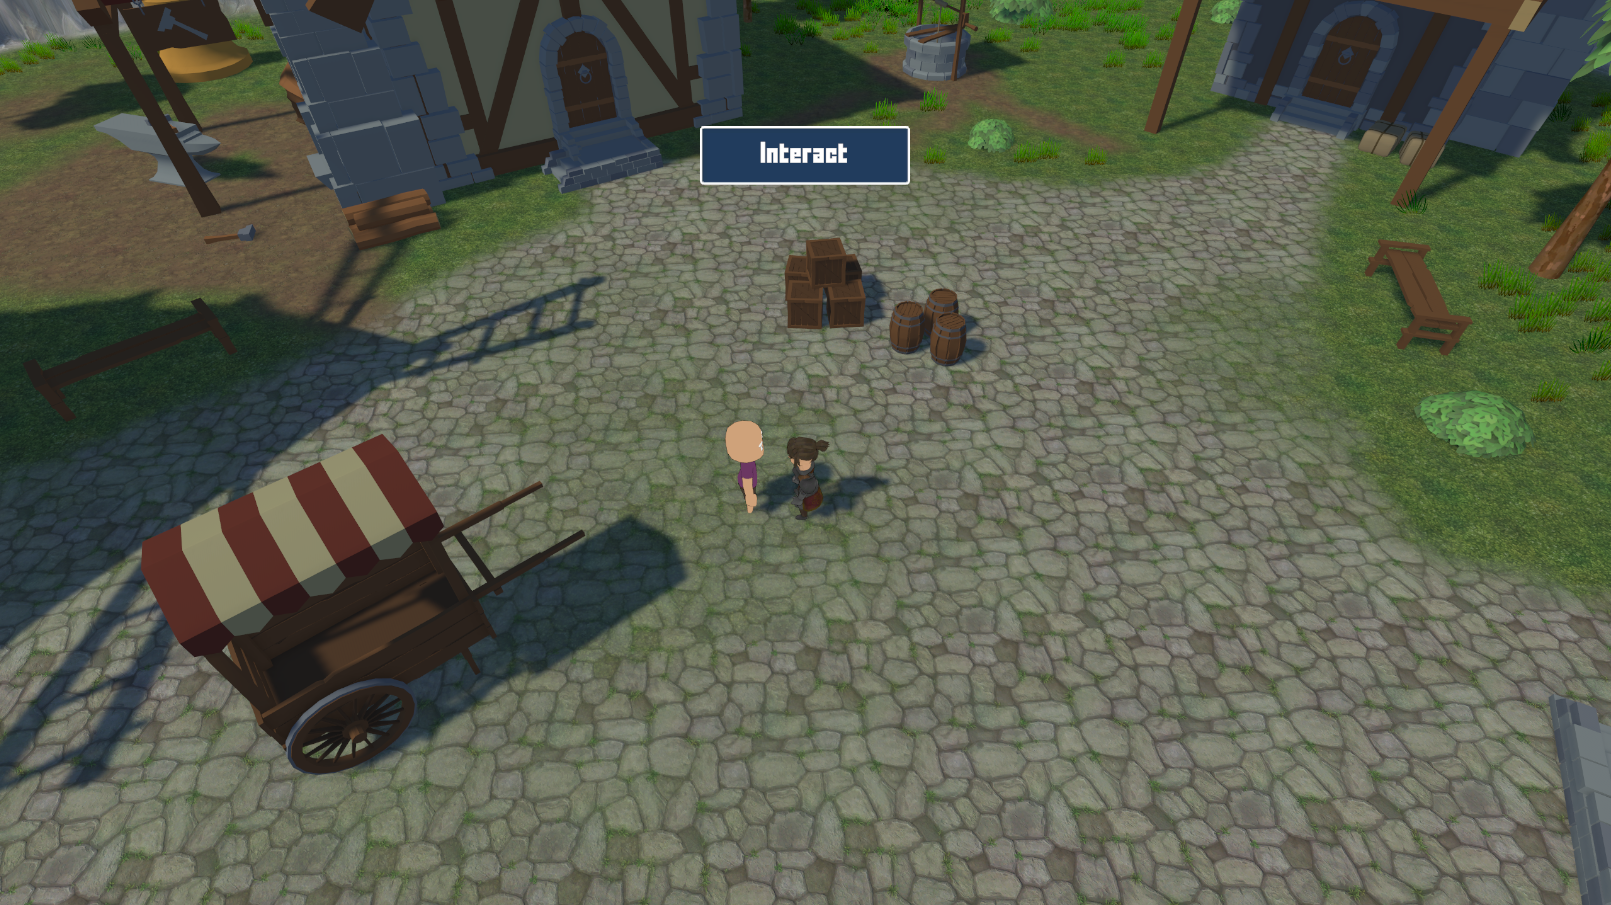
If you’re not satisfied with the look, open up the prefabs of the HUD and adjust it to your liking.

Tip: Content Information #

You can add content information to your interaction HUD. E.g. use the <name> text code in the HUD Text Content component’s text.

Where does this content information come from? From the interaction’s object. You can e.g. use object contents to add content information, or the interaction can be a combatant, item collector or something else with content.

Using Organizer Types (Optional) #

You can use organizer types to display different HUDs for different interactions, e.g. show Talk instead of Interact for NPCs and Collect for items.

This an be achieved by using an organizer type in your interaction components and conditions in your interaction HUD.

Let’s add Talk and Collect interaction HUDs.

Organizer Types #

Open the ORK editor and navigate to System > Organizer Types, we’ll add 2 new types.

Talk Interaction #

Add a new organizer type and change the name:

  • Name
    Set to: Talk Interaction

Item Interaction #

Add a new organizer type and change the name:

  • Name
    Set to: Item Interaction

Save Settings #

Don’t forget to save your changes by clicking on Save Settings at the bottom of the editor.

HUD Prefabs #

We’ll create 2 copies of the original interaction HUD prefab and change the text, afterwards we’ll add 2 new interaction HUDs in the editor and set up their conditions (and the original HUD’s as well).

Talk HUD Prefab #

Duplicate the Interaction HUD prefab and rename the copy to Talk Interaction HUD.

Open the new prefab for editing, select the Text Content child object and change the settings of the HUD Text Content component:

  • Default Content
    Set to: Talk

Save the changes.

Collect HUD Prefab #

Duplicate the Interaction HUD prefab and rename the copy to Collect Interaction HUD.

Open the new prefab for editing, select the Text Content child object and change the settings of the HUD Text Content component:

  • Default Content
    Set to: Collect

Save the changes.

Interaction HUD Setup #

Open the ORK editor, navigate to UI > HUDs and select the Interaction HUD.

Display Conditions > Interactions #

We’ll disable displaying the HUD for any interaction.

  • Any Interaction
    Disable

Not adding an Organizer Type will no longer display the HUD.

We’ll keep it like this – in the future, when other types should be displayed, we can add them here to display the HUD again.

Talk Interaction HUD Setup #

Copy the Interaction HUD.

Base Settings #

  • Name
    Set to: Talk Interaction

Display Conditions > Interactions #

We’ll define the organizer types the HUD will be displayed for.

Click on Add Organizer Type.

  • Organizer Type
    Select: Talk Interaction

Unity UI #

  • HUD Prefab
    Select: Talk Interaction HUD

Collect Interaction HUD Setup #

Copy the Talk Interaction HUD.

Base Settings #

  • Name
    Set to: Collect Interaction

Display Conditions > Interactions #

We’ll change the used organizer type.

  • Organizer  Type
    Select: Collect Interaction

Unity UI #

  • HUD Prefab
    Select: Collect Interaction HUD

Item Drops Setup #

We’ll set up the organizer type for item collectors used by item drops.

Navigate to Inventory > Inventory Settings and change the following settings.

Drop Item Settings > Item Collector Settings > Start Settings #

  • Organizer Type
    Select: Collect Interaction

Default Item Collector Setup #

We’ll set up the default organizer type for new item collectors. This’ll be used by any new item collector that’s added to your scenes.

Navigate to Menus > Item Collection and change the following settings.

Item Collection > Default Start Settings #

  • Use Default Start Settings
    Enable
  • Organizer Type
    Select: Collect Interaction

Save Settings #

Don’t forget to save your changes by clicking on Save Settings at the bottom of the editor.

Scene Setup #

Finally, we’ll add the organizer types to NPCs and item collectors already in your scenes.

I’ll base this on the ORK 4 Quickstart 3D tutorials.

World Scene #

Open the World scene, there should be 1 NPC and 3 item collectors in the scene.

Select the NPC’s object – Casual_Bald – and change the Machine (Schematic) component’s Start Settings.

  • Organizer Type
    Select: Talk Interaction

For the items, select an object with an Item Collector component and change it’s Start Settings.

  • Organizer Type
    Select: Collect Interaction

Repeat this for the other item collectors in the scene.

Dungeon Scene #

Open the Dungeon scene, there should be 3 item collectors in the scene.

Select an object with an Item Collector component and change it’s Start Settings.

  • Organizer Type
    Select: Collect Interaction

Repeat this for the other item collectors in the scene.

Testing #

Hit play and test your HUD!

Talking to an NPC now shows a Talk HUD.

Collecting items now shows a Collect HUD.

Add more functionality to interactions by using multiple interaction controllers.

Table of Contents
  • HUD Prefab Setup
    • Text Content
      • Rect Transform
      • HUD Text Content
      • TextMeshPro - Text (UI)
    • HUD
      • Image (Optional)
      • Rect Transform
    • Create Prefab
  • HUD Setup
    • HUD Settings
    • Unity UI
    • Schematics
    • Save Settings
  • Testing
  • Tip: Content Information
  • Using Organizer Types (Optional)
    • Organizer Types
      • Talk Interaction
      • Item Interaction
      • Save Settings
    • HUD Prefabs
      • Talk HUD Prefab
      • Collect HUD Prefab
    • Interaction HUD Setup
      • Display Conditions > Interactions
    • Talk Interaction HUD Setup
      • Base Settings
      • Display Conditions > Interactions
      • Unity UI
    • Collect Interaction HUD Setup
      • Base Settings
      • Display Conditions > Interactions
      • Unity UI
    • Item Drops Setup
      • Drop Item Settings > Item Collector Settings > Start Settings
    • Default Item Collector Setup
      • Item Collection > Default Start Settings
    • Save Settings
    • Scene Setup
      • World Scene
      • Dungeon Scene
    • Testing
Sitemap
  • ORK 4 BETA
  • Features
  • Showcase
  • Guide
    • Documentation
    • Tutorials
    • API
  • ORK 2 Hub
    • Tutorials
    • Plugins
    • API
  • Support
  • Forum
  • Get ORK
  • Contact
  • Blog
  • Makinom
  • gamingislove.com
Categories
  • News (73)
  • ORK 2 (137)
    • Tutorial (137)
      • Game tutorial (50)
      • Gameplay (32)
      • How-to (55)
  • Release (156)
Search

© 2015 Gaming is Love e.U.

Disclosure: This site may contain affiliate links, which means I may receive a commission if you click a link and purchase something that I have recommended. While clicking these links won’t cost you any money, they will help me fund my development projects while recommending great assets!